
-
We've upgraded and reskinned the forum. Notice something off? Email us at [email protected] and we'll fix it.
You are using an out of date browser. It may not display this or other websites correctly.
You should upgrade or use an alternative browser.
You should upgrade or use an alternative browser.
V1 Desert Sasqwatch #155 Track (mods) - 08 SS/TC crate LNF F40


Ross
Goblin Professor

- Ross Goblin Professor
I pressed out the Cobalt rubber bushing, and put in the DF Poly bushing... but it is about 1/8th of an inch too small. Not sure where these poly bushings are supposed to go, but not here. I may shim these to fit here, but not recommending for other builders. Sorry Mike_sno, I lead you astray. I can reimburse you...or send you some shims to make it work. I really want to get rid of the Cobalt rubber ones.
Attachments

- Gtstorey Goblin Guru
Maybe the aluminum control arms are a different size? Part numbers are hard to check on these on rockauto.
But how are they supposed to connect to the subframe?
There is the option of the OTTP ones, but not cheap.
Maybe we need to take this to a new post or try and tag on to one of the older suspension bushing post.
But how are they supposed to connect to the subframe?
There is the option of the OTTP ones, but not cheap.
Maybe we need to take this to a new post or try and tag on to one of the older suspension bushing post.
ah.b.normal
Goblin Guru
- ah.b.normal Goblin Guru
That baggie looks like a kit for the tube end of a shock absorber.

duthehustle93
Well-Known Member

- duthehustle93 Well-Known Member
To hopefully re-rail @Desert Sasqwatch's build log... I saw your post and it lead me to researching about Zack Allyn's crash. The pictures of that crash are hard to look at, to say the least. I'm happy to see that you are working on improving safety as a result, as the best thing the community can do is try to prevent this happening again in the future.
I was hoping to chime in and have a discussion on your thoughts regarding the mode of failure? From what I could find, there weren't a lot of details disclosed about the accident, which would help in understanding if there could be an improvement to the chassis, or if this level of damage was unavoidable. What concerns me is the lack of plastic deformation (tubes bending) prior to failure. The weld failures were at the HAZ as expected, but I would have expected a lot more bending in the tube before failure. DF's website says that the tubes are mild steel, and I'd imagine MIG+mild steel should yield a good bit before failure. The pictures look similar to what you would expect with chromoly+MIG. Looking at other goblin crash pictures, there's a lot more bending+in tact welds.
I'm trying to imagine how this could happen... it's a nearly perfect shear forward of the main hoop. I feel like this could only happen if it rolled and the bottom center crashed into a tree. This would create a huge bending moment about the center (imparted mainly by the weight of the powertrain), and causing the top-most weld joint at the main hoop (which in a city chassis is also a stress riser) to see the brunt of that load. Once that top weld failed, subsequent ones failed as a domino effect. If this is the case, I would imagine you would want to support from your door bars->main hoop. Although, the race chassis/full hoop may solve this problem(?). Most of your gusseting seems focused on side/corner impact; in Zack's case, if this damage was cause by a driver's side impact, I believe his passenger side main hoop welds would still be intact?
Do you know what the wall thickness is of the main hoop/door bars? Thanks again for posting this up as I would have missed it otherwise, this has me thinking I should do something similar, even though it involves stripping a lot of powdercoat.
I was hoping to chime in and have a discussion on your thoughts regarding the mode of failure? From what I could find, there weren't a lot of details disclosed about the accident, which would help in understanding if there could be an improvement to the chassis, or if this level of damage was unavoidable. What concerns me is the lack of plastic deformation (tubes bending) prior to failure. The weld failures were at the HAZ as expected, but I would have expected a lot more bending in the tube before failure. DF's website says that the tubes are mild steel, and I'd imagine MIG+mild steel should yield a good bit before failure. The pictures look similar to what you would expect with chromoly+MIG. Looking at other goblin crash pictures, there's a lot more bending+in tact welds.
I'm trying to imagine how this could happen... it's a nearly perfect shear forward of the main hoop. I feel like this could only happen if it rolled and the bottom center crashed into a tree. This would create a huge bending moment about the center (imparted mainly by the weight of the powertrain), and causing the top-most weld joint at the main hoop (which in a city chassis is also a stress riser) to see the brunt of that load. Once that top weld failed, subsequent ones failed as a domino effect. If this is the case, I would imagine you would want to support from your door bars->main hoop. Although, the race chassis/full hoop may solve this problem(?). Most of your gusseting seems focused on side/corner impact; in Zack's case, if this damage was cause by a driver's side impact, I believe his passenger side main hoop welds would still be intact?
Do you know what the wall thickness is of the main hoop/door bars? Thanks again for posting this up as I would have missed it otherwise, this has me thinking I should do something similar, even though it involves stripping a lot of powdercoat.
Last edited:
duthehustle93
Well-Known Member
- duthehustle93 Well-Known Member
@Sebnuts Thanks! I saw that on the website, but wasn't sure if "main cage" included the door bars. I guess we can assume anything that's 1.5" OD is .095 wall and anything that is 1.25 is .065 wall? Ie: door bars are 1.5x.095?

Desert Sasqwatch
Bigfoot Goblin

- Desert Sasqwatch Bigfoot Goblin
From what we can postulate an impact to the b-pillar area above the upper frame tube occurred. This probably created the forces, toward the rear, that put the tension force on the frame tubes that pulled the welds apart. How it occurred is just a guess, but it would have to be an immovable object. Could a track frame have helped, that's speculation but maybe? It still makes me sad to think about, but I'm determined to work weld strengthening into my Goblin.
I've only just started and am trying to complete the floor. Unfortunately calculations in 2 different software models finds it to be the weakest part of the frame. Major improvement would require major surgery, so I'm trying to improve on what exists. Lots of gusset plates, some grinder massaged to match angles, many double welded (both sides) to make tube connections as strong as possible.
Stay tuned as I get through more mods, will be posting photos and will do a parts list and specific frame location for everything I'm installing.
I've only just started and am trying to complete the floor. Unfortunately calculations in 2 different software models finds it to be the weakest part of the frame. Major improvement would require major surgery, so I'm trying to improve on what exists. Lots of gusset plates, some grinder massaged to match angles, many double welded (both sides) to make tube connections as strong as possible.
Stay tuned as I get through more mods, will be posting photos and will do a parts list and specific frame location for everything I'm installing.

duthehustle93
Well-Known Member
- duthehustle93 Well-Known Member
Good info; btw, no intent to dwell on the incident itself, but I think understanding the mechanism of failure is important in preventing the failure in the future.
If Gtstorey's location is correct, it looks flat enough to not cause a complete rollover, and a grass shoulder would have made it very hard for him to slow down. So Desert Sasqwatch's theory of a large impact to the B pillar makes sense... but shearing the chassis in half is hard to ignore. I'll add gusseting to my ever-growing to-do list.
If Gtstorey's location is correct, it looks flat enough to not cause a complete rollover, and a grass shoulder would have made it very hard for him to slow down. So Desert Sasqwatch's theory of a large impact to the B pillar makes sense... but shearing the chassis in half is hard to ignore. I'll add gusseting to my ever-growing to-do list.

Dale E
Goblin Kinsman

- Dale E Goblin Kinsman
Anyone wanting to engage in the discussion -- please - take it to individual conversation and not in the general forum!!
Tim is free to post in his build log what he does to his Goblin build! If you have questions then converse privately with him.
The open forum discussion feels disrespectful to the involved party and family - who might still have friends that would read. I don't think anyone of the Goblin forum members have expertise in accident investigation, and so, all comments are speculative in nature.
The Goblin is yours to build as desired.
All of us have varying degrees of driving skills, so drive within your skill. Be cognizant of your traffic environment and be respectful of others..
If you want to know why I feel this way, then PM me. If I am out of line then PM me and tell me to bug off!!
Tim is free to post in his build log what he does to his Goblin build! If you have questions then converse privately with him.
The open forum discussion feels disrespectful to the involved party and family - who might still have friends that would read. I don't think anyone of the Goblin forum members have expertise in accident investigation, and so, all comments are speculative in nature.
The Goblin is yours to build as desired.
All of us have varying degrees of driving skills, so drive within your skill. Be cognizant of your traffic environment and be respectful of others..
If you want to know why I feel this way, then PM me. If I am out of line then PM me and tell me to bug off!!
Desert Sasqwatch
Bigfoot Goblin
- Desert Sasqwatch Bigfoot Goblin
Frame improvement (safety) project - parts list - steel gussets:
3 inch 'saddle' gussets - Roll Cage Saddle Weld Gussets for 1-1/2 Inch Tube, 1/16 Steel, 10 | eBay - X2 sets (20 pieces total)
1.25 inch 'saddle gussets - Roll Cage Saddle Weld Gussets for 1-1/4 Inch Tube, .060 Steel, 10 | eBay - X2 set (20 pieces total)
2 inch plate gussets 60 degree - 2x2 60 Degree Solid Gusset - 1/8” (Set of 6) | eBay - X2 sets (12 pieces total)
2 inch plate gussets 90 degree - 90 Deg. 1/8" Thick Steel Solid Corner Gusset (10 Pack) Roll Cage Gussets | eBay - X2 sets (20 pieces total)
2 & 3 inch plate gussets 90 degree - Roll Cage Chassis Bar Steel Weld Gusset Plates w/ Holes, 2 Piece | eBay - X1 set (25 pieces total)
4X12 inch 1/8 steel plate - 1/8" .125 A36 Hot Rolled Steel Sheet Plate Flat Bar 4" x 12" New Condition. | eBay - X1 piece (for fabbed gussets)
In case you're wondering - total weight of all pieces: 7.5 lbs.
I'm also working on adding triangulation tubes in key areas, more to come on this with a separate parts list.
3 inch 'saddle' gussets - Roll Cage Saddle Weld Gussets for 1-1/2 Inch Tube, 1/16 Steel, 10 | eBay - X2 sets (20 pieces total)
1.25 inch 'saddle gussets - Roll Cage Saddle Weld Gussets for 1-1/4 Inch Tube, .060 Steel, 10 | eBay - X2 set (20 pieces total)
2 inch plate gussets 60 degree - 2x2 60 Degree Solid Gusset - 1/8” (Set of 6) | eBay - X2 sets (12 pieces total)
2 inch plate gussets 90 degree - 90 Deg. 1/8" Thick Steel Solid Corner Gusset (10 Pack) Roll Cage Gussets | eBay - X2 sets (20 pieces total)
2 & 3 inch plate gussets 90 degree - Roll Cage Chassis Bar Steel Weld Gusset Plates w/ Holes, 2 Piece | eBay - X1 set (25 pieces total)
4X12 inch 1/8 steel plate - 1/8" .125 A36 Hot Rolled Steel Sheet Plate Flat Bar 4" x 12" New Condition. | eBay - X1 piece (for fabbed gussets)
In case you're wondering - total weight of all pieces: 7.5 lbs.
I'm also working on adding triangulation tubes in key areas, more to come on this with a separate parts list.
Last edited:
Desert Sasqwatch
Bigfoot Goblin
- Desert Sasqwatch Bigfoot Goblin
Been a while since I last updated. I edited the above list for the gussets, added another set of 1.25 inch saddle gussets and upped the total weight to 7.5 lbs.
The triangulation tubes are next on the list and they consist of 1.25 inch tubes that tie the side bars of the frame together at the 'bend':
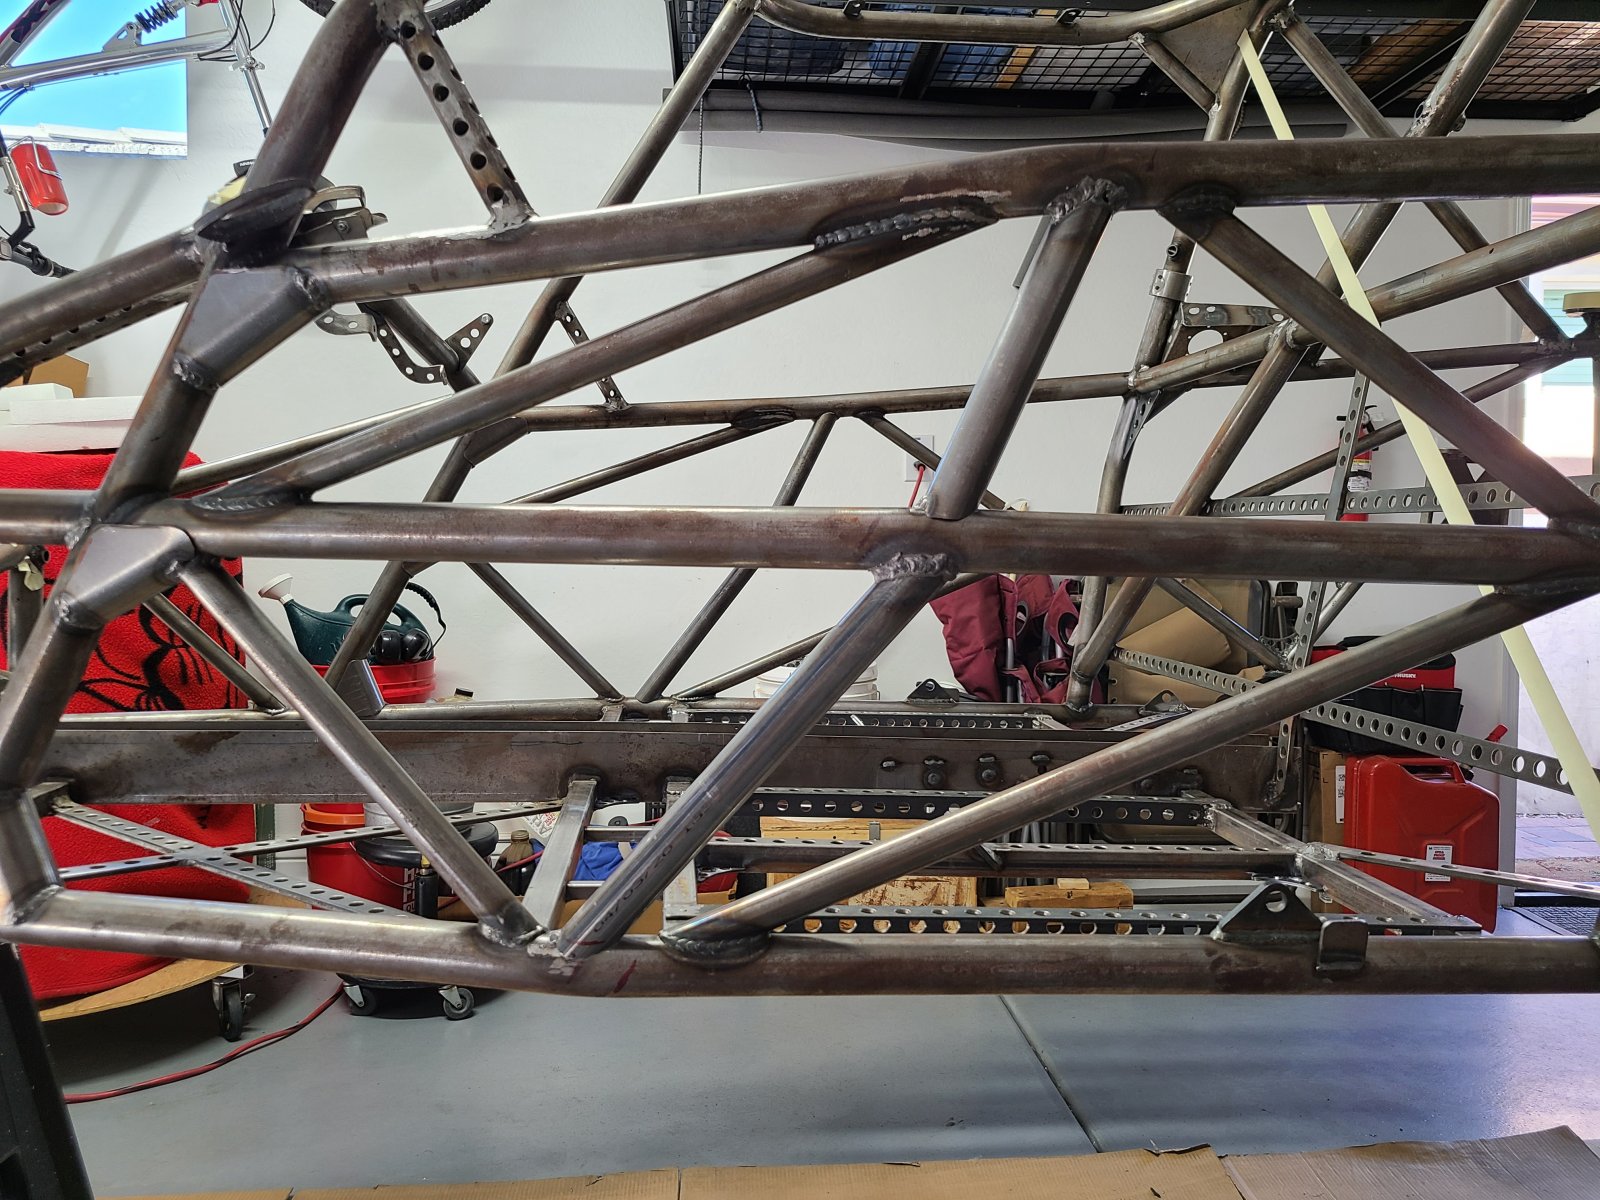
These help prevent the side bars from moving up/down individually from impact to act as a single piece. The added benefit is some minor stiffening of the frame at the sides of the cockpit.
Next up is a second diagonal bar in the B-pillar rollbar, 1.5 inch tube. No explanation needed from the safety aspect:
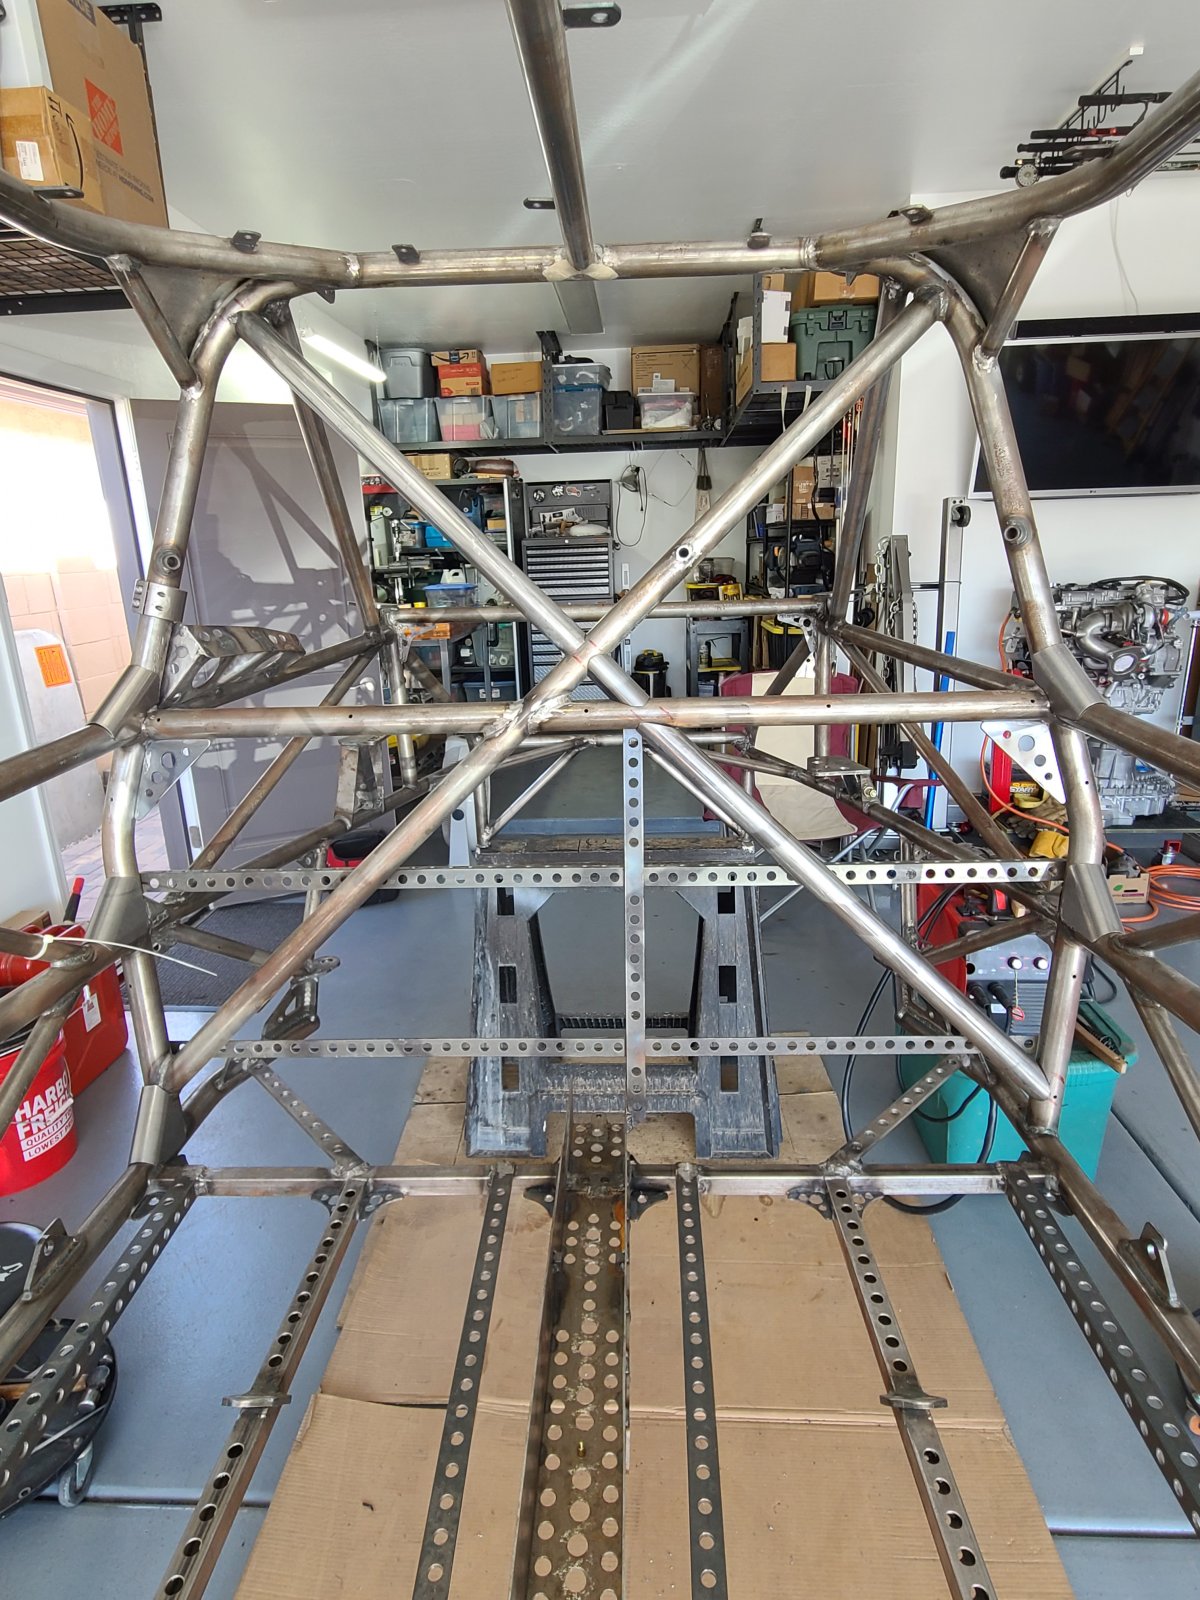
Racer X approves!
Finally, the front open area over the footwell design is in-work. Will add more torsional stiffness and help keep the frame - in front of the A-pillar - from over collapsing in an impact. Considerations to install these triangulation bars are the battery height, brake booster/master cylinder location, and the top of the pedal box. Also clearance under my hood, which has a cold air plenum for ankle/knee cooling, is much tighter:
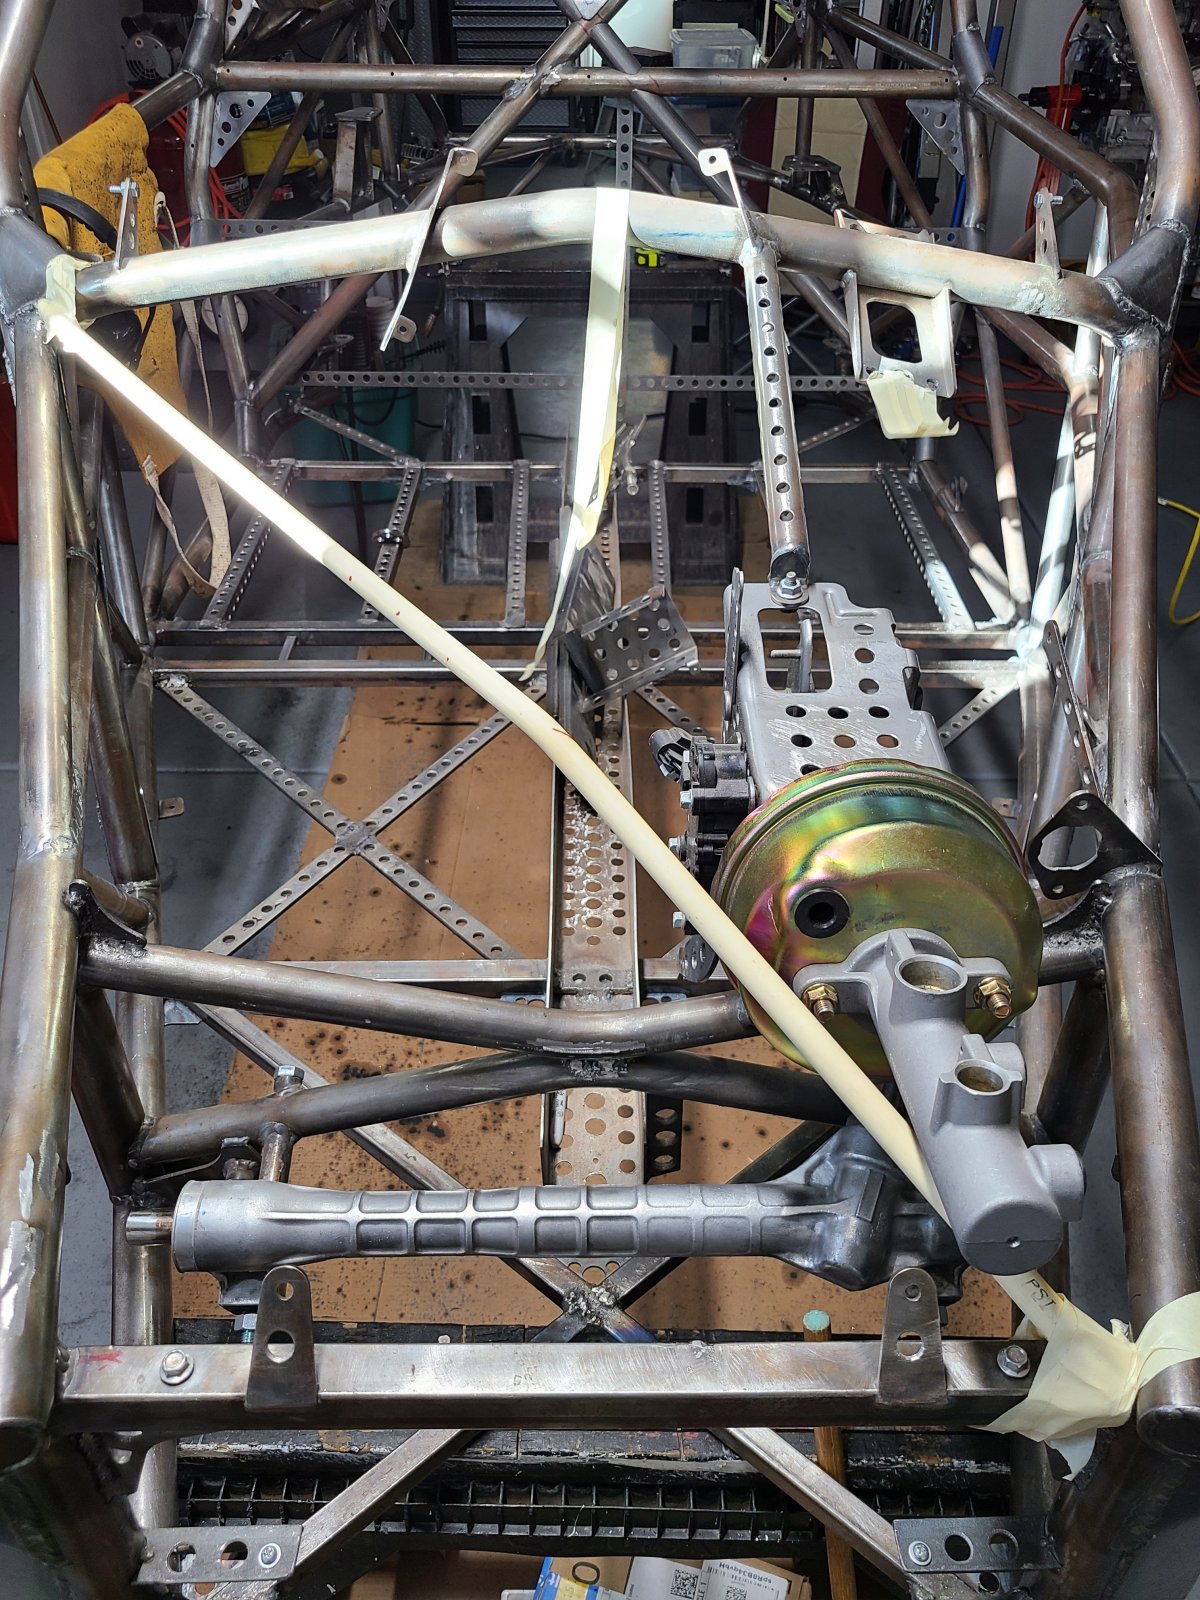
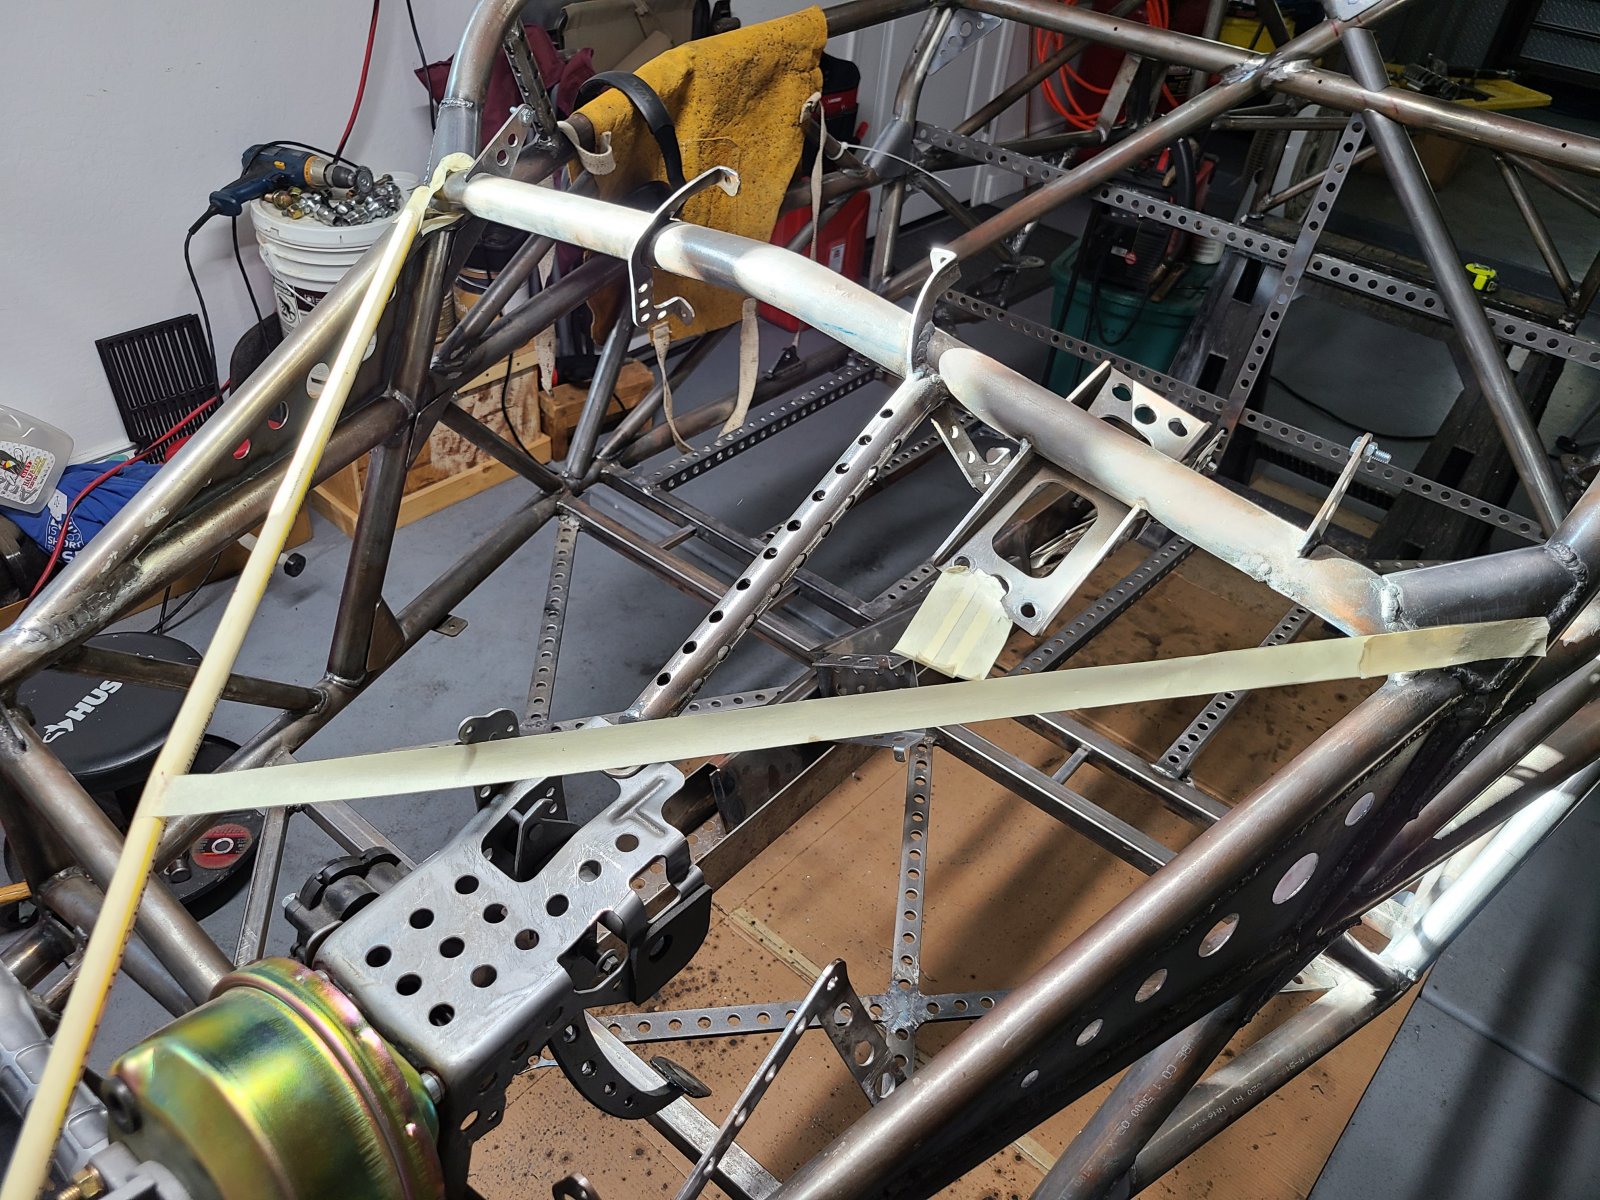
Yes, the battery box is missing in these photos.
Lonny had triangulation in the front of the AT, not certain if it cleared the stock hood. So I'm measuring 200 times before bending, cutting, and welding in the triangulation bars.
I've lowered the battery box 3/4 inch for more clearance, so using a large motorcycle battery will still fit and allow for installation/removal aroundthe bars. The 7 inch brake booster provides clearance for a straight shot across from the A-pillar/dash bar intersection up to the opposite corner of the frame at the shock/upper a-arm mount - in both directions. The triangulation bars will have a 'knee', being kinked about 12 degrees at about the crossover point to make sufficient clearance for everything noted. This crossover point will also be tied vertically to the frame rail at the forward firewall to add stability to the kink.
The triangulation bars add a little less than 24 lbs. for a total of about 31.5 lbs added to the frame for this safety/stiffness project. If this is added to the previous additions to my frame frome the past - minus the weight savings from the speedholes - of 17.5 lbs, I've added a total of 49 lbs to my frame. BUT, my custom subframe is fully 11 lbs lighter than the Cobalt subframe, so I'm net plus 38 lbs over the bare track/extended frame with attached subframe, but with a far stiffer and safer chassis. Meets my needs (RIP Zack).

More to come.
The triangulation tubes are next on the list and they consist of 1.25 inch tubes that tie the side bars of the frame together at the 'bend':
These help prevent the side bars from moving up/down individually from impact to act as a single piece. The added benefit is some minor stiffening of the frame at the sides of the cockpit.
Next up is a second diagonal bar in the B-pillar rollbar, 1.5 inch tube. No explanation needed from the safety aspect:
Racer X approves!
Finally, the front open area over the footwell design is in-work. Will add more torsional stiffness and help keep the frame - in front of the A-pillar - from over collapsing in an impact. Considerations to install these triangulation bars are the battery height, brake booster/master cylinder location, and the top of the pedal box. Also clearance under my hood, which has a cold air plenum for ankle/knee cooling, is much tighter:
Yes, the battery box is missing in these photos.
Lonny had triangulation in the front of the AT, not certain if it cleared the stock hood. So I'm measuring 200 times before bending, cutting, and welding in the triangulation bars.
I've lowered the battery box 3/4 inch for more clearance, so using a large motorcycle battery will still fit and allow for installation/removal aroundthe bars. The 7 inch brake booster provides clearance for a straight shot across from the A-pillar/dash bar intersection up to the opposite corner of the frame at the shock/upper a-arm mount - in both directions. The triangulation bars will have a 'knee', being kinked about 12 degrees at about the crossover point to make sufficient clearance for everything noted. This crossover point will also be tied vertically to the frame rail at the forward firewall to add stability to the kink.
The triangulation bars add a little less than 24 lbs. for a total of about 31.5 lbs added to the frame for this safety/stiffness project. If this is added to the previous additions to my frame frome the past - minus the weight savings from the speedholes - of 17.5 lbs, I've added a total of 49 lbs to my frame. BUT, my custom subframe is fully 11 lbs lighter than the Cobalt subframe, so I'm net plus 38 lbs over the bare track/extended frame with attached subframe, but with a far stiffer and safer chassis. Meets my needs (RIP Zack).
More to come.


comegetjoe
Goblin Guru

- comegetjoe Goblin Guru
You read my mind.Go ahead and add a proper Harness Bar while you are at it.
Desert Sasqwatch
Bigfoot Goblin
- Desert Sasqwatch Bigfoot Goblin
Got a harness bar in the works.  Wouldn't want to be without a properly positioned one for my seat height.
Wouldn't want to be without a properly positioned one for my seat height.Similar threads


- Replies
- 168
- Views
- 19K

- Replies
- 13
- Views
- 387