
-
We've upgraded and reskinned the forum. Notice something off? Email us at [email protected] and we'll fix it.
You are using an out of date browser. It may not display this or other websites correctly.
You should upgrade or use an alternative browser.
You should upgrade or use an alternative browser.
V1 Jay’s Build Log- Track Goblin, extended #323, 07 SS SC


jayrolls
Well-Known Member

- jayrolls Well-Known Member
Cut out the A/C clutch power wires, removed the pressure switch wires back to the connector just in case need for something later. Wrapped the remaining wires. Ordered some new wire loom and then the engine harness will be done.Engine harness day -1
Got all the tape and cable wrap removed from the engine harness. I think the a/c wires are the only thing that need to come out. Then I will be ready to re-wrap it.
Attachments


jayrolls
Well-Known Member
- jayrolls Well-Known Member
Main harness day - 1.
Set up a 4x8 sheet of OSB with some paper to keep from getting snags. Got the harness laid out, took a minute to get all of the old tape off. Got the process started. I was in the Navy as an Avionics Technician for 20 years and am not shy of wires, but dang there are so many wires. I feel like I am off to a good start. Hopefully will be ready to get the harness extended by the weekend
Set up a 4x8 sheet of OSB with some paper to keep from getting snags. Got the harness laid out, took a minute to get all of the old tape off. Got the process started. I was in the Navy as an Avionics Technician for 20 years and am not shy of wires, but dang there are so many wires. I feel like I am off to a good start. Hopefully will be ready to get the harness extended by the weekend
Attachments


Towerdog
Goblin Guru

- Towerdog Goblin Guru
At least your optimistic! Ive done alot of wiring in my day but still had over 40hrs in mine.Main harness day - 1.
Set up a 4x8 sheet of OSB with some paper to keep from getting snags. Got the harness laid out, took a minute to get all of the old tape off. Got the process started. I was in the Navy as an Avionics Technician for 20 years and am not shy of wires, but dang there are so many wires. I feel like I am off to a good start. Hopefully will be ready to get the harness extended by the weekend
jayrolls
Well-Known Member
- jayrolls Well-Known Member

Build Guide Part 10 - Thinning the Body Harness
Build Guide Part 10 - Thinning the Body Harness In Part 10 we unwrap the body harness and thin out the unnecessary wires.
Here is the part that has me a little concerned. Just because it will cause problems later when I get going.


jayrolls
Well-Known Member
- jayrolls Well-Known Member
Main harness day - 2Main harness day - 1.
Set up a 4x8 sheet of OSB with some paper to keep from getting snags. Got the harness laid out, took a minute to get all of the old tape off. Got the process started. I was in the Navy as an Avionics Technician for 20 years and am not shy of wires, but dang there are so many wires. I feel like I am off to a good start. Hopefully will be ready to get the harness extended by the weekend
Steadily making progress. Main harness is thinned out. Started adding pieces back in. Got the headlight harness added using the wiring kit from DF. I’m not sure if I’m suppose to still splice the headlight plugs back on or if there will different plugs for the DF supplied lights. I feel like ground lug is not as long from the main harness as in the video. Hopefully won’t be a problem. Trying to keep the set up for the heated seats is throwing me off a little bit I think. That and I’m not sure how far from the BCM Wiring to the back of the tunnel, I think for the seat wiring it might be easier to come from the back of the tunnel.
I think I need an additional ground lug also, I don’t have a ground for the horn and there is a wire in the harness going to the BCM the needs a ground. I am going to start adding in the dash harness tomorrow. Hopefully that goes smoothly.
Attachments
-
 5474FA37-F720-425F-8DC2-8E3297940299.jpeg420.8 KB · Views: 421
 -
 82AD00E2-FA1D-4F08-B641-25C6992DF085.jpeg441.7 KB · Views: 420
 -
 B39722BB-725C-419C-B2B7-CF08FE458046.jpeg473 KB · Views: 411
 -
 D335A376-E246-430D-B1A4-B518DBC46C60.jpeg425 KB · Views: 429
 -
 D0559C26-31A4-4C27-ABD4-131FBE8DEADB.jpeg418.8 KB · Views: 383
 -
 42942F70-CA73-424F-9763-E8779E1CAA34.jpeg354.8 KB · Views: 418

Ross
Goblin Professor

- Ross Goblin Professor
That is the nicest soldering station I have seen! I need to add the wiring for heated seats back into my LSJ. There is a 20A fuse in the engine fuse box for labeled "HTD SEATS", so that is where I plan to pull power from. A red/white wire. B5 or C5... not sure which.
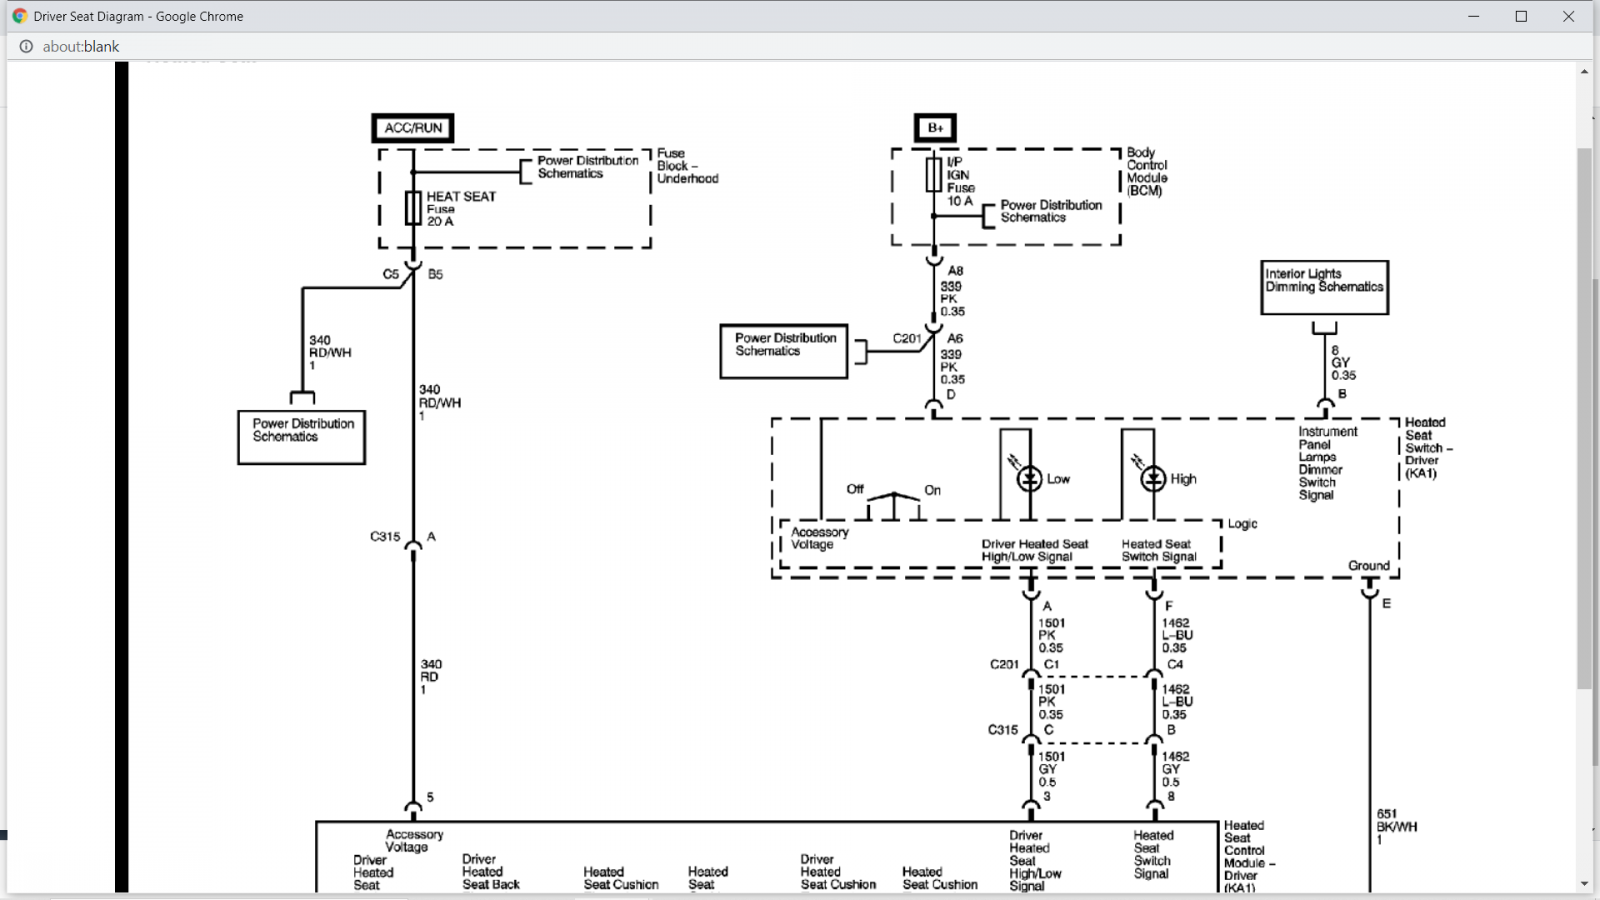
Last edited:
jayrolls
Well-Known Member
- jayrolls Well-Known Member
It’s honestly overkill for this project, but it’s what I had. Lol. Mine has the factory heated seats. So far I think I have it all in order. Tomorrow adding in the dash harness I should have a better idea hopefully. And will try to address how it will work.That is the nicest soldering station I have seen! I need to add the wiring for heated seats back into my LSJ. There is a 20A fuse in the engine fuse box for labeled "HTD SEATS", so that is where I plan to pull powers from. A red/white wire. B5 or C5... not sure which.
View attachment 24736
jayrolls
Well-Known Member
- jayrolls Well-Known Member
Main Harness day - 6 or 7, I have honestly lost count. I finished the last of it up last night and finished the taping today. I keep the dimmer, fog lights and the heated seats. Dimmer - wasn’t sure how bright the instrument panel will be at night. Fog lights, even if I don’t put fog lights on, I figure I could use that circuit for under glow lighting. The heated seats, well heck, it already had them so why not keep a function.Main harness day - 2
Steadily making progress. Main harness is thinned out. Started adding pieces back in. Got the headlight harness added using the wiring kit from DF. I’m not sure if I’m suppose to still splice the headlight plugs back on or if there will different plugs for the DF supplied lights. I feel like ground lug is not as long from the main harness as in the video. Hopefully won’t be a problem. Trying to keep the set up for the heated seats is throwing me off a little bit I think. That and I’m not sure how far from the BCM Wiring to the back of the tunnel, I think for the seat wiring it might be easier to come from the back of the tunnel.
I think I need an additional ground lug also, I don’t have a ground for the horn and there is a wire in the harness going to the BCM the needs a ground. I am going to start adding in the dash harness tomorrow. Hopefully that goes smoothly.
I am downloading files from ALLDATA to build a continuity check list. I would rather read out each pin to know it’s good, than to be chasing gremlins later.
Attachments


SmsDetroit
Goblin Guru

- SmsDetroit Goblin Guru
I wish I would have kept the dimmer switch
jayrolls
Well-Known Member
- jayrolls Well-Known Member
Engine prep Day -1
Took the engine outside and soaked it with degreaser and then hit it with the pressure washer. Separated the transmission and was able to get the engine on the stand. Looks like the trans has been out before and the clutch changed. The flywheel looks pretty good, need to check the measurements to make sure it’s got good meat. If it’s good plan to take it to a machine shop to get it surfaced. The degreaser made a big improvement.
Took the engine outside and soaked it with degreaser and then hit it with the pressure washer. Separated the transmission and was able to get the engine on the stand. Looks like the trans has been out before and the clutch changed. The flywheel looks pretty good, need to check the measurements to make sure it’s got good meat. If it’s good plan to take it to a machine shop to get it surfaced. The degreaser made a big improvement.
Attachments
-
 3ADF1F6E-2269-42D4-B342-4C269388551B.jpeg439.1 KB · Views: 407
 -
 32DFD6A8-8C06-4992-AA2F-C953F2300679.jpeg341.3 KB · Views: 413
 -
 E597AB6C-6BF0-4361-91BF-F7C9B64F6757.jpeg369.5 KB · Views: 450
 -
 B9BF9C30-039B-48C3-9AB7-6719DDA25558.jpeg393 KB · Views: 422
 -
 F98CF155-89DC-48DA-8A93-B05483D4259B.jpeg380.2 KB · Views: 421
 -
 7D0E457F-EDA2-4DE1-8890-63FE503F25FA.jpeg369.2 KB · Views: 418
 -
 DE054A32-3F8E-4799-9C8E-9EB8AAD450AA.jpeg343.7 KB · Views: 442
jayrolls
Well-Known Member
- jayrolls Well-Known Member
Engine prep Day -2Engine prep Day -1
Took the engine outside and soaked it with degreaser and then hit it with the pressure washer. Separated the transmission and was able to get the engine on the stand. Looks like the trans has been out before and the clutch changed. The flywheel looks pretty good, need to check the measurements to make sure it’s got good meat. If it’s good plan to take it to a machine shop to get it surfaced. The degreaser made a big improvement.
Removed the thermostat housing and front cover. Started hitting the engine with a wire wheel. Starting to clean up pretty nice. I’m planning to run a remote oil cooler. Trying to figure out if I can get a thermostat cover the is not for the equipped for the factor oil cooler. Would look a lot cleaner with out having to loop the coolant lines that went to the oil cooler.
Attachments


jayrolls
Well-Known Member
- jayrolls Well-Known Member
Chop up day -1. Haven’t been able to get a recycler to take the donor without the title. Not tilling to give up the title in case I need it. So I figured I will just chop the donor into small pieces and get rid of it that way. Had been wanting a sawzall and now have a very good excuse for it. Highly recommend the Diablo Auto Dismantling blades.
Attachments


Desert Sasqwatch
Bigfoot Goblin

- Desert Sasqwatch Bigfoot Goblin
Sawzall are wonderful inventions!  They are in the same category as duct tape, they can solve a lot of problems PDQ!
They are in the same category as duct tape, they can solve a lot of problems PDQ!
SmsDetroit
Goblin Guru
- SmsDetroit Goblin Guru

jayrolls
Well-Known Member
- jayrolls Well-Known Member
Chop day -2.Chop up day -1. Haven’t been able to get a recycler to take the donor without the title. Not tilling to give up the title in case I need it. So I figured I will just chop the donor into small pieces and get rid of it that way. Had been wanting a sawzall and now have a very good excuse for it. Highly recommend the Diablo Auto Dismantling blades.
Made some more progress cutting down to small enough pieces to load up and take to scrap. 5 blades so far, making good progress.
Attachments


Similar threads

- Replies
- 13
- Views
- 2K

- Replies
- 17
- Views
- 4K
- Replies
- 39
- Views
- 9K

- Replies
- 157
- Views
- 47K

- Replies
- 212
- Views
- 49K