
-
We've upgraded and reskinned the forum. Notice something off? Email us at [email protected] and we'll fix it.
You are using an out of date browser. It may not display this or other websites correctly.
You should upgrade or use an alternative browser.
You should upgrade or use an alternative browser.
V1 Mikes Extended, Full Frame Goblin - 2009 Cobalt LS with 135k donor
- mike_sno Goblin Guru
Yeah, it took me forever to decide what to do. Upgrading my LAP or getting a new motor. Then Lnf or LSJ,... All engines have something good.Mike
I was in a similar boat, decided to build, but will still own an Ariel Atom (in that process now). I would agree with the others that it's worth getting the Goblin on the road and maybe purchasing a new long block or another gently used LSJ. New crate motors are available, quite a few LSJs have popped up on Ebay, and Copart/junk yard pulls are always an option.
If I don't sell my Goblin I'll end up sourcing another complete powertrain for parts. They will eventually start to dry up. Stick with it. You'll enjoy the car you "built" much more than the one you bought.
- mike_sno Goblin Guru
I can only probe, machining would need to be done on a different machine.And I’m no machinist but I think the secret to a good head machining is to ensure it’s mounted with the head bolt holes perpendicular to the cutter head. And the cutter head covers the entire head in a pass. Not sure if you can accomplish that without special jigs/machine.
- mike_sno Goblin Guru
The fun continues. Head is removed and I called 2 shops. Unfortunately no shop is close. At least 1h or 1.5h away. Of course, now my pto is over. Talked to the both shops, one is out for another week before they can work on the head, the other one is open Mo till Friday 8 to 5 and can take it whenever I stop by.
Currently the camshaft and valves are still installed. Looked in the service manual, are you all using the recommended GM tools to compress the springs and remove the seals or is there something better aftermarket ?
Currently the camshaft and valves are still installed. Looked in the service manual, are you all using the recommended GM tools to compress the springs and remove the seals or is there something better aftermarket ?
- mike_sno Goblin Guru
Story continues... Found out that I have a straight edge and a granit block and some die to find cracks at the company. Will try to test tomorrow myself if the head is warped or not. Without putting it on any machine. Simply by hand.
Continued to work on the last final items of the swap. Installed the seats, parking brake,... last night. Now I am thinking of building a little platine to make the controll switches next to the insturment cluster pluggable.
Inspected some other parts of the LSJ and was wondering if there is a way to identify what kind of injectors and pulley I have. Tried google, but still not 100%.
My pulley says at the front 77.9mm.(3.06in) If I set my measuring caliper on 77.9mm I can not find any diameter on the pulley which would match that. I measure a diameter of 75.9mm. (around 3.0in) Is the 77.9 refering to the middle of the belt? 2mm more on the radius? What I found on google is that the stock LSJ has a diameter of 3.3in. If I google 77.9mm it comes up as a stage 2 pulley.
My next question is regarding the injectors. They say Siemens Deka 12599778 I found this on google sayint that https://www.cobaltss.net/forums/2-0l-lsj-performance-tech-47/part-number-fuel-injector-183085/ saything they are 42.5 lbs/h injectors for stage 1 and 2. I cant really find anywhere information what the stock LSJ injectors are.
Would love to add this to the engine overview http://dfkitcar.com/forum/index.php?threads/making-hp-lnf-lsj-le5-lap-vs-l61.2309/post-90705
Continued to work on the last final items of the swap. Installed the seats, parking brake,... last night. Now I am thinking of building a little platine to make the controll switches next to the insturment cluster pluggable.
Inspected some other parts of the LSJ and was wondering if there is a way to identify what kind of injectors and pulley I have. Tried google, but still not 100%.
My pulley says at the front 77.9mm.(3.06in) If I set my measuring caliper on 77.9mm I can not find any diameter on the pulley which would match that. I measure a diameter of 75.9mm. (around 3.0in) Is the 77.9 refering to the middle of the belt? 2mm more on the radius? What I found on google is that the stock LSJ has a diameter of 3.3in. If I google 77.9mm it comes up as a stage 2 pulley.
My next question is regarding the injectors. They say Siemens Deka 12599778 I found this on google sayint that https://www.cobaltss.net/forums/2-0l-lsj-performance-tech-47/part-number-fuel-injector-183085/ saything they are 42.5 lbs/h injectors for stage 1 and 2. I cant really find anywhere information what the stock LSJ injectors are.
Would love to add this to the engine overview http://dfkitcar.com/forum/index.php?threads/making-hp-lnf-lsj-le5-lap-vs-l61.2309/post-90705

Ross
Goblin Professor

- Ross Goblin Professor
In 2006 the LSJ had 32lb/hour bright green injectors that have a ~100% duty cycle at redline RPM.
in 2007 chevy fixed this by using black 42lb/hour injectors.
in 2007 chevy fixed this by using black 42lb/hour injectors.
Last edited:

Desert Sasqwatch
Bigfoot Goblin

- Desert Sasqwatch Bigfoot Goblin
Using a flashlight with the machinists rule and granite block will make the check for flatness much easier. Using the flashlight behind the rule and checking for any light shining through a gap is the best visual, much better than trying to see any gap without it. 
- mike_sno Goblin Guru
Will post a picture in a second.
Can someone help me to find the information of the ACC, Info and Arrow key on the left side of the instrument cluster?
I don't know what the ACC key is used for AC Control?? ACCESSORY ?? Why would that be on an extra switch, can it override the Key Postion 1?
Info an Arrow I found in the Chevy owners manual. Info and Arrow seems to be for the Driver Information Center. On the Plug of the Instrument Cluster I see Pin 5 Dark Green/White Circuit 1358 is a DIC Switch Signal. But only one signal goes to the Instrument cluster and it does not say which one. The diagram has also not really any helpful information
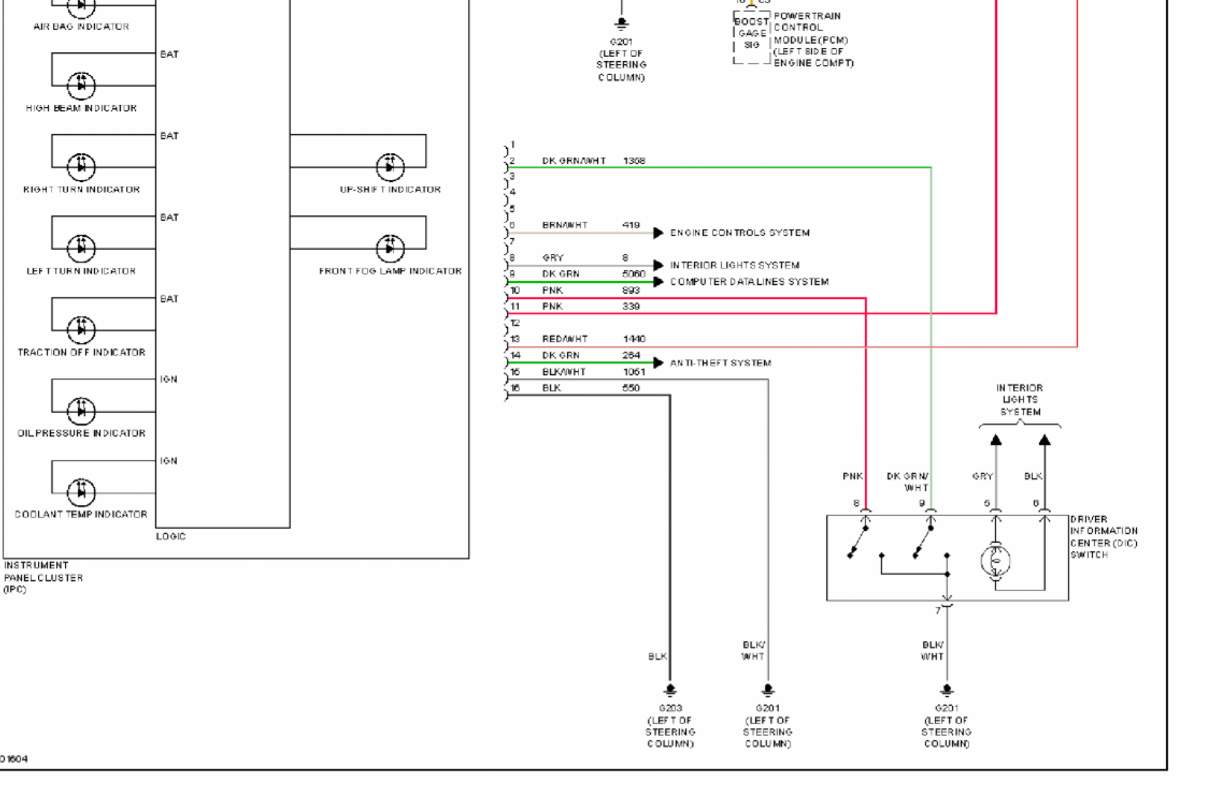
Can someone help me to find the information of the ACC, Info and Arrow key on the left side of the instrument cluster?
I don't know what the ACC key is used for AC Control?? ACCESSORY ?? Why would that be on an extra switch, can it override the Key Postion 1?
Info an Arrow I found in the Chevy owners manual. Info and Arrow seems to be for the Driver Information Center. On the Plug of the Instrument Cluster I see Pin 5 Dark Green/White Circuit 1358 is a DIC Switch Signal. But only one signal goes to the Instrument cluster and it does not say which one. The diagram has also not really any helpful information


Traé
Goblin Guru

- Traé Goblin Guru
I believe the green wires the diagram is referring to is the low speed data wires. They were all tied together in a thin grey rectangular box that was stripped from the harness.Will post a picture in a second.
Can someone help me to find the information of the ACC, Info and Arrow key on the left side of the instrument cluster?
I don't know what the ACC key is used for AC Control?? ACCESSORY ?? Why would that be on an extra switch, can it override the Key Postion 1?
Info an Arrow I found in the Chevy owners manual. Info and Arrow seems to be for the Driver Information Center. On the Plug of the Instrument Cluster I see Pin 5 Dark Green/White Circuit 1358 is a DIC Switch Signal. But only one signal goes to the Instrument cluster and it does not say which one. The diagram has also not really any helpful information
View attachment 44656
- mike_sno Goblin Guru
Correct, one green wire is the low speed data wire. But I am looking for the green one which goes to the DIC switch.I believe the green wires the diagram is referring to is the low speed data wires. They were all tied together in a thin grey rectangular box that was stripped from the harness.
Traé
Goblin Guru
- Traé Goblin Guru
My harness is not fully wrapped so I can check tomorrow if someone else can’t confirm but If my memory serves me correctly the green and white wire went to the dimmer switch connector. In part 8 of the wire harness guide (time stamp 5:30) that plug was removed and the green and purple wires were pulled back to the BCM connector and tied together. In part 9 (time stamp 0:38) they were soldered together. The video doesn’t say green and white but I think it was the wire you’re questioning. The dimmer switch and the data wires are the only green ones I remember messing with in that area.Correct, one green wire is the low speed data wire. But I am looking for the green one which goes to the DIC switch.
Traé
Goblin Guru
- Traé Goblin Guru
Ahh, I understand now. Sorry. In part 10 (time stamp 2:16) they pull the button panel wires together from the BCM and a green and white wire from the gauge cluster grouping and add it to the bundle for the button panel.Hmm, I found the dimmer cables. Those are taken care of.
I'm looking for the three buttons on the left side of the instrument cluster of the goblin. ACC, Arrow and Info.
I'll check the videos again.
the above link will take you to a post about the button panel that may help.
I’ll look at my harness when I’m home from work today and send you some pictures of what I have.
Last edited:

Robinjo
Goblin Guru

- Robinjo Goblin Guru
77.9mm pulley = 3.066" which looks just like Rttoys GM Stage 2 setup. Also, those blue anti-tamper bolts are used in this.
The injectors come back as GM Stage 2 injectors as well, they flow 42 pounds.
When measuring, I went with the top of the ribs (Peak) and not the bottom (Valley). When I did that I got the 71mm on the ZZP unit that arrived and it is marked as a 2.8" pulley. (71mm / 25.4 = 2.795" --> 2.8"). I would be willing to trust that the number you get that way is close to the 77.9 etched on the pulley face.
Since you have the rail and injectors out, change those insulators for fresh ones even if they look ok. They are super cheap and easy to swap now while it's all apart.
The injectors come back as GM Stage 2 injectors as well, they flow 42 pounds.
When measuring, I went with the top of the ribs (Peak) and not the bottom (Valley). When I did that I got the 71mm on the ZZP unit that arrived and it is marked as a 2.8" pulley. (71mm / 25.4 = 2.795" --> 2.8"). I would be willing to trust that the number you get that way is close to the 77.9 etched on the pulley face.
Since you have the rail and injectors out, change those insulators for fresh ones even if they look ok. They are super cheap and easy to swap now while it's all apart.
Last edited:

Chris_WNC
Well-Known Member

- Chris_WNC Well-Known Member
ACC is probably the "accelerate" button for cruise control. I gutted all of my cruise control stuff and didn't do any wiring for it.
Looks like you found the other two. "Info" cycles through the electronic display on the cluster. "Arrow" is enter. You hold it to reset your trip odo. These two follow the same path and use resistors to let the computer which button is pressed.
Looks like you found the other two. "Info" cycles through the electronic display on the cluster. "Arrow" is enter. You hold it to reset your trip odo. These two follow the same path and use resistors to let the computer which button is pressed.
Similar threads

- Replies
- 0
- Views
- 1K

- Replies
- 168
- Views
- 19K

- Replies
- 2
- Views
- 2K