
-
We've upgraded and reskinned the forum. Notice something off? Email us at [email protected] and we'll fix it.
You are using an out of date browser. It may not display this or other websites correctly.
You should upgrade or use an alternative browser.
You should upgrade or use an alternative browser.
V1 Mikes Extended, Full Frame Goblin - 2009 Cobalt LS with 135k donor
ah.b.normal
Goblin Guru
- ah.b.normal Goblin Guru
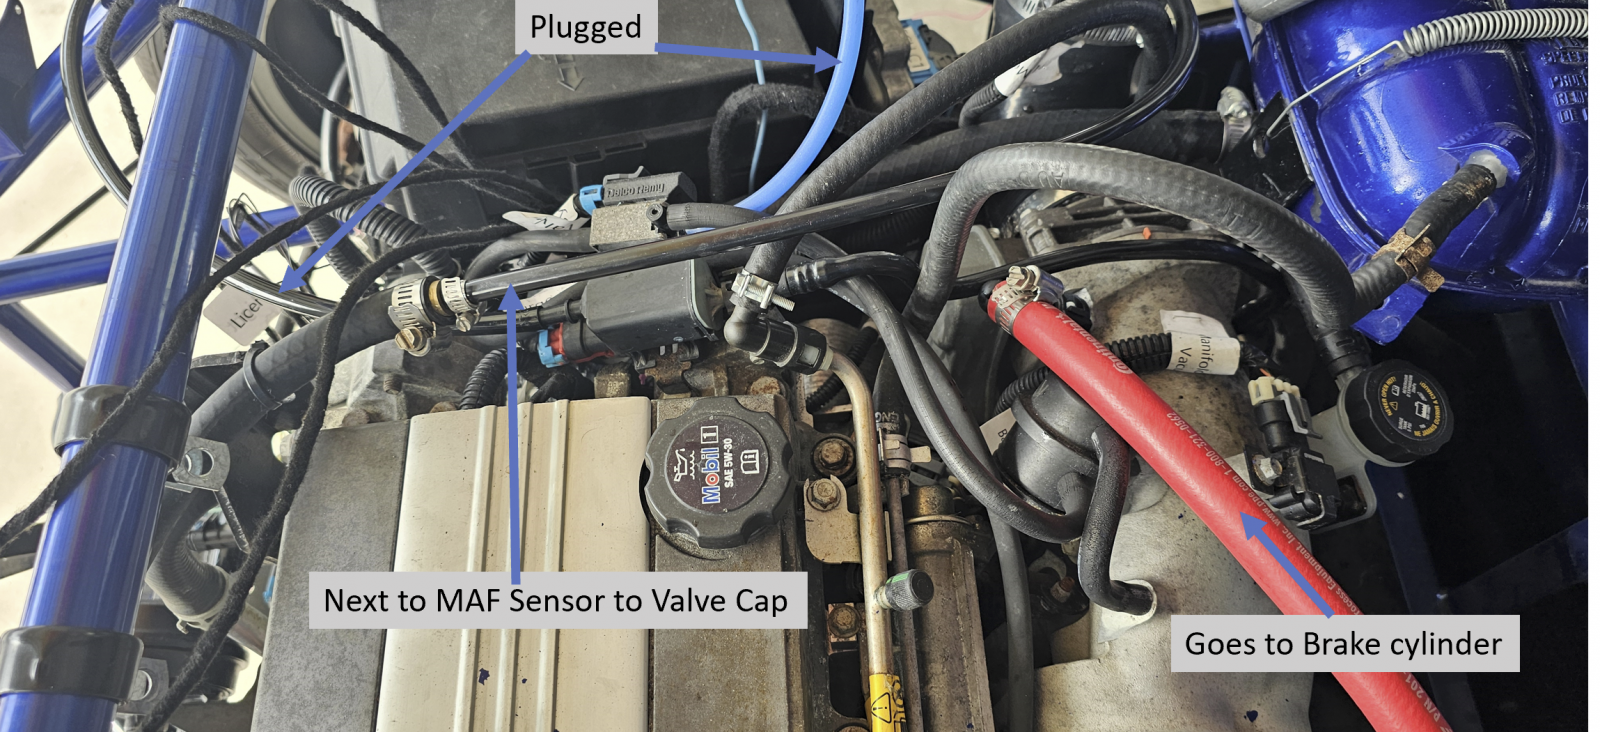
The cure is really simple. The vapor canister had a hose connected somewhere on the engine and you removed that tube, now plug or cap where that tube plugged in.
Actually what I suspect is going on is really simple. Did you ever drink from a broken straw? Where your end was out of the fluid and the crack was in the fluid it worked ok but when the crack/leak is above the drink fluid your sips draw mostly air. That is a version of it. Generally it is an air leak into the intake tract causing the engine to go lean. Depending on the location of the leak the engine systems cannot compensate for the extra air getting in.
Actually what I suspect is going on is really simple. Did you ever drink from a broken straw? Where your end was out of the fluid and the crack was in the fluid it worked ok but when the crack/leak is above the drink fluid your sips draw mostly air. That is a version of it. Generally it is an air leak into the intake tract causing the engine to go lean. Depending on the location of the leak the engine systems cannot compensate for the extra air getting in.
ah.b.normal
Goblin Guru
- ah.b.normal Goblin Guru
Look at the air path going into the engine. The pumping action of the pistons going down with the intake valve open draws in air. The turbo spinning helps draw in even more air. The gasoline engine generally runs best at an air to fuel ratio of 14 parts air to 1 part gasoline. The fuel is metered by the computer by reading the pressure in the intake. Several sensors are involved as well as engine/cam speed/ position. The computer decides how much fuel to inject and the proper moment while each cylinder is filling. A open source for air other than the air filter will throw off the computer’s decisions.
- mike_sno Goblin Guru
Another good day. Pulled the engine again, replaced the clutch and put the engine back in the car. Still a lot to do. Right now I wonder how to route the main coolant hoses. The radius of some corners are to tight. Anyone had good experience with 90 degree elbows?
Would love to see some LSJ coolant hose pictures of you guys.
Would love to see some LSJ coolant hose pictures of you guys.
- mike_sno Goblin Guru
Watched a few videos how to bleed the clutch master cylinder, but actually I had to do it different. Just opening the bleed did not work. It sucked air back out of the hose every time i released the clutch. Then Open, push, close, release also did not work. I ended up using a syringe and sucked the air out of the line. Now, my question: If I push on the clutch the first 6-7mm (1/4in) of cylinder movement, I have no pressure until I can feel that the pressure increases. Is that normal or is there still air in the system?
- mike_sno Goblin Guru
Another question, what is the best way of routing the shifter cable. Out of the tunnel and ABOVE or below the subframe? Currently it's above, but I wonder if it would be better going below. I know that below would be less protection, but I have never touched the ground with the subframe.

Rttoys
Smokin' Goblin

- Rttoys Smokin' Goblin
Still probably have a little air in there. It takes a bit to truly get it all out.
I went above to protect the cables, but it causes a little more resistance being bound up a little. When I fried one cable (don’t ask) I routed the new cable under because I was in a hurry. This made the cable resistance a lot less, but it hangs under the car pretty good. I need to either zip tie it up and out of the way or reroute it above the frame to it’s tucked up like the other.
kind of your call.
I went above to protect the cables, but it causes a little more resistance being bound up a little. When I fried one cable (don’t ask) I routed the new cable under because I was in a hurry. This made the cable resistance a lot less, but it hangs under the car pretty good. I need to either zip tie it up and out of the way or reroute it above the frame to it’s tucked up like the other.
kind of your call.

Robinjo
Goblin Guru

- Robinjo Goblin Guru
I used one of the Motive Pressure Bleeder and open/close the bleeder a few times. Then I have my wife press and hold the clutch while I crack open the bleeder, close it and have her release. This is till with the pressure bleeder attached. About 5 times with her gets it done. Probably sooner but we go extra just to make sure it’s done.Watched a few videos how to bleed the clutch master cylinder, but actually I had to do it different. Just opening the bleed did not work. It sucked air back out of the hose every time i released the clutch. Then Open, push, close, release also did not work. I ended up using a syringe and sucked the air out of the line. Now, my question: If I push on the clutch the first 6-7mm (1/4in) of cylinder movement, I have no pressure until I can feel that the pressure increases. Is that normal or is there still air in the system?

Rauq
Goblin Guru

- Rauq Goblin Guru
Sorry for the delayed response. I will check my car this afternoon and see if I can figure out whether I did the same thing to get the trans to fit.Did you removed the LAP Temperature sensor from the LAP Thermostat housing or leave it in and just not connect it. If you removed it, how did you seal the sensor?
I stuck an oil drain plug in where the 2.2L have the coolant sensor.
6 or 7 seconds won't hurt the engine if there's no coolant in it.That‘s it for tonight. I am charging the battery, I believe I sill have some air in the system. The engine was never running longer than 6 or 7 seconds, but it got hot already and I am worried that there is still to much air in the system. Since I can confirm that the engine is running, I will take it out again and change the clutch. Then install all the other parts again and will then later on deal with the idle issues I am having currently.
This was my exact method and I believe the most efficient way to bleed a Goblin clutch. Quick and easy on the upstream side of the bleeder and effective on the downstream side while maintaining the upstream fluid pack.I used one of the Motive Pressure Bleeder and open/close the bleeder a few times. Then I have my wife press and hold the clutch while I crack open the bleeder, close it and have her release. This is till with the pressure bleeder attached. About 5 times with her gets it done. Probably sooner but we go extra just to make sure it’s done.

Desert Sasqwatch
Bigfoot Goblin

- Desert Sasqwatch Bigfoot Goblin
Inserting an aluminum pipe at the bends, rather than folding the rubber, would be one solution. The 1.25 inch come in 45/90/135/180 bends.Another good day. Pulled the engine again, replaced the clutch and put the engine back in the car. Still a lot to do. Right now I wonder how to route the main coolant hoses. The radius of some corners are to tight. Anyone had good experience with 90 degree elbows?
Would love to see some LSJ coolant hose pictures of you guys.
HPS 1.25" OD 60 Degree Bend 6061 Aluminum Elbow Pipe Tubing 16 Gauge w/ 2" CLR | eBay
HPS 1.25" 32mm OD 90 Degree Bend 6061 Aluminum Elbow Tube Pipe 16 Gauge 2" CLR | eBay
- mike_sno Goblin Guru
I bleeded the clutch again and again. Still the same. I will leave that for the moment.
Shifter cables are installed and routed. Fusebox holder in place and oil and coolant filled. There is still air in the coolant system, but I guess that will come out after driving the car for a bit.
Just to be clear, the engine never ran without coolant, even when I tested it a few days ago.
However, I have now the same issue with the engine not idling correct. I am not sure if the hoses are connected correctly. I try to mark the ends and wonder if someone could confirm that this is correct.
Shifter cables are installed and routed. Fusebox holder in place and oil and coolant filled. There is still air in the coolant system, but I guess that will come out after driving the car for a bit.
Just to be clear, the engine never ran without coolant, even when I tested it a few days ago.
However, I have now the same issue with the engine not idling correct. I am not sure if the hoses are connected correctly. I try to mark the ends and wonder if someone could confirm that this is correct.
ah.b.normal
Goblin Guru
- ah.b.normal Goblin Guru
Concerns about hose bends collapsing can be cured with an external wire spring, Goodyear and other hose makers offer them in stainless steel.Inserting an aluminum pipe at the bends, rather than folding the rubber, would be one solution. The 1.25 inch come in 45/90/135/180 bends.
HPS 1.25" OD 60 Degree Bend 6061 Aluminum Elbow Pipe Tubing 16 Gauge w/ 2" CLR | eBay
HPS 1.25" 32mm OD 90 Degree Bend 6061 Aluminum Elbow Tube Pipe 16 Gauge 2" CLR | eBay
ah.b.normal
Goblin Guru
- ah.b.normal Goblin Guru
In your pic it shows the purge valve for the vapor recovery system, it has the red with blue 2 wire connector and it has a hose running in and another running out of it. The hoses connected to it must be plugged if the vapor recovery system is removed/abandoned. Chase those two hoses down, they need to be complete or their original vacuum source plugged off. This is a possible vacuum leak.I bleeded the clutch again and again. Still the same. I will leave that for the moment.
Shifter cables are installed and routed. Fusebox holder in place and oil and coolant filled. There is still air in the coolant system, but I guess that will come out after driving the car for a bit.
Just to be clear, the engine never ran without coolant, even when I tested it a few days ago.
However, I have now the same issue with the engine not idling correct. I am not sure if the hoses are connected correctly. I try to mark the ends and wonder if someone could confirm that this is correct.
View attachment 44600
- mike_sno Goblin Guru
Ok, I changed the picture and added some numbers. Just want to make sure I do the right thing.In your pic it shows the purge valve for the vapor recovery system, it has the red with blue 2 wire connector and it has a hose running in and another running out of it. The hoses connected to it must be plugged if the vapor recovery system is removed/abandoned. Chase those two hoses down, they need to be complete or their original vacuum source plugged off. This is a possible vacuum leak.
1 comes from the inlet manifold and goes to the left side of the upper of the two things (i guess valves. Upper gray, lower back) with number 2.
From the gray 2 on the right side a hose goes to the lower part of the black thing right above 3. from above it goes to number 3 in the inlet manifold.
The blue hose from the gray 2 thing connected at the lower side is plugged at the end.
4 goes from the throttle valve to the black lower thing at 2 and on the right side. From there on the left side the back hose 5 is plugged.
You want me to directly plug 4?
- mike_sno Goblin Guru
Well, now I am really nervous. It seems to be not an issue of the vacuum. I tested plugging the different hoses and it made no difference. However as more often i tried as better the engine ran. Meanwhile the engine is running!! BUT: First I noticed some water coming out of the exhaust. Not a lot, and also a little smoke when the engine ran. Smoke like water smoke not oil.
I also noticed some water at the exhaust manifold. I am nervous about 2 things: 1. is the coolant sufficient or is there still air in the system? I captured all the coolant from the LAP engine, filtered it and filled it back in the LSJ. Plus some additional water until the coolant reservoirs was full. Checking eveytime I ran the engine what the coolant level is.... This leads to 2:
When I open the coolant reservoir it has even after a few seconds some vacuum. I wonder if that is a damaged gasket which let water in a cylinder. which means there is more work on the engine.
I checked the oil, no sign of water in the oil. Also no sign of oil in the coolant.
I also noticed some water at the exhaust manifold. I am nervous about 2 things: 1. is the coolant sufficient or is there still air in the system? I captured all the coolant from the LAP engine, filtered it and filled it back in the LSJ. Plus some additional water until the coolant reservoirs was full. Checking eveytime I ran the engine what the coolant level is.... This leads to 2:
When I open the coolant reservoir it has even after a few seconds some vacuum. I wonder if that is a damaged gasket which let water in a cylinder. which means there is more work on the engine.
I checked the oil, no sign of water in the oil. Also no sign of oil in the coolant.
Desert Sasqwatch
Bigfoot Goblin
- Desert Sasqwatch Bigfoot Goblin
How are you checking the oil for water? Looking at the dipstick? Unless the water has mixed with the oil - to make 'chocolate milk' - the water will sit in the bottom of the oil pan, likely below the level of the dipstick. If there is suspicion of water in the oil, draining the pan is the best way to identify if this has happened.
- mike_sno Goblin Guru
How are you checking the oil for water? Looking at the dipstick? Unless the water has mixed with the oil - to make 'chocolate milk' - the water will sit in the bottom of the oil pan, likely below the level of the dipstick. If there is suspicion of water in the oil, draining the pan is the best way to identify if this has happened.
I would say the red neck method. Checking the coolant reservoir, the oil fill plug and the dip stick. It all looks normal. I pulled the spark plugs, a friend called me and told me to check them, if there is a head gasket leaking just in the combustion chamber it would make a spark plug like pressure washed clean. No signs for that either. Is it maybe just condensation since the engine has not run in a few month??
Also the pressure/vacuum I had on the coolant reservoir was I believe coming from the return line right at the exit of the water to the cooler. I believe it's the venting line to get air out of the coolant system. I still can feel that the hoses to the radiator up front have air in them. I am just having my pants full of running the engine long enough that the thermostat opens.
My buddy is coming tomorrow morning and we will check the compression. He said it would be a good indicator for a blown gasket.
Similar threads

- Replies
- 0
- Views
- 1K

- Replies
- 168
- Views
- 19K

- Replies
- 2
- Views
- 2K