Goblinfanclub1234
Goblin Guru
- Goblinfanclub1234 Goblin Guru
its going to rip so hard on slicks
You are correct. It will be in the original location (to maintain weight bias). I'm actually in the process right now of building the tank. Making a cardboard replica so I can make sure it fits how I want before I do it in aluminum.Where you planning on placing the gas tank? same location as original?


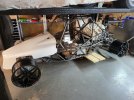
Make sure you account for maintenance accessibilityTook 2 days but I have made a cardboard template. Fits like a glove.View attachment 50102View attachment 50103View attachment 50104View attachment 50105
Yeah true. I know I can easily remove the water pump and alternator. Worst case it will be 4 bolts and the tank will fall right out the bottom.Make sure you account for maintenance accessibility
I really wanted to make it completely symmetrical. But I don't want the alternator up top and I think this style puts me in between 10-15 gal. I'm gonna look at it some more before I start building it. Still have to order fuel pump, sender and filler neckMy ocd seeing that says make it symmetrical lmao
My biggest worry is capacity. I had a T bucket that I had to fill up every time I took it out and that was no fun at all.My ocd seeing that says make it symmetrical lmao
Definitely guna need every inch for fuel with that motor lol and ya filling up every trip is trash.I really wanted to make it completely symmetrical. But I don't want the alternator up top and I think this style puts me in between 10-15 gal. I'm gonna look at it some more before I start building it. Still have to order fuel pump, sender and filler neck
Took 2 days but I have made a cardboard template. Fits like a glove.View attachment 50102View attachment 50103View attachment 50104View attachment 50105
")

Very good, yes I knew this going into it. I will be welding on 1/8 npt bungs to each side at the top and connecting them with a 1/4 stainless brake line.An equilibrium hose tied between the uppermost point on each side of the tank will allow the air pocket on the non-fill side of the tank to contain fuel rather than air. I'm sure Joe has this figured out already.
Correct. I will have an attached hose from both high points in the tank to prevent this from happeningIs that going to fill up correctly. I feel like you are going to have an air pocket on one side. Are you going to have fill ups on both sides?
Thank you for the kind words. I attempted to mimic the geometry from the c5 the best I could. However there were many things getting in my way so I settled for the best possible placement of the arms. If you haven't noticed yet, I actually swapped the left control arms/knuckles to the right side and vice versa. If I used the left rear c5 arms on the left side of my chassis, the mounting location of the upper arm would have been way too far rearward of the. Chassis to support any lateral force.very cool & great fab work, did you do any geometry analysis on the rear or copy the same attachment points as the corvette? just that the c5-6 corvette IRS has got very minimal camber gain and you may want a tad more.
Put a tee in the center and tie in the vent hose, one less hole in the tank to weld in a bung!Very good, yes I knew this going into it. I will be welding on 1/8 npt bungs to each side at the top and connecting them with a 1/4 stainless brake line.

Sweet looking. Just an annoying thing to me is the fill neck on the passages side. Did you think about moving it to the drivers side?The main construction of the fuel cell is done. Still need to cut holes for the pump, level sensor, install the cross over vent and figure out the filler neck and fill cap. Also there's a sneak peek of the new wheels i will be running!