
• We've upgraded and reskinned the forum. Notice something off? Email us at [email protected] and we'll fix it.

V1 Escapepilot’s 06 SS/SC Ext Track Build - COMPLETED

escapepilot
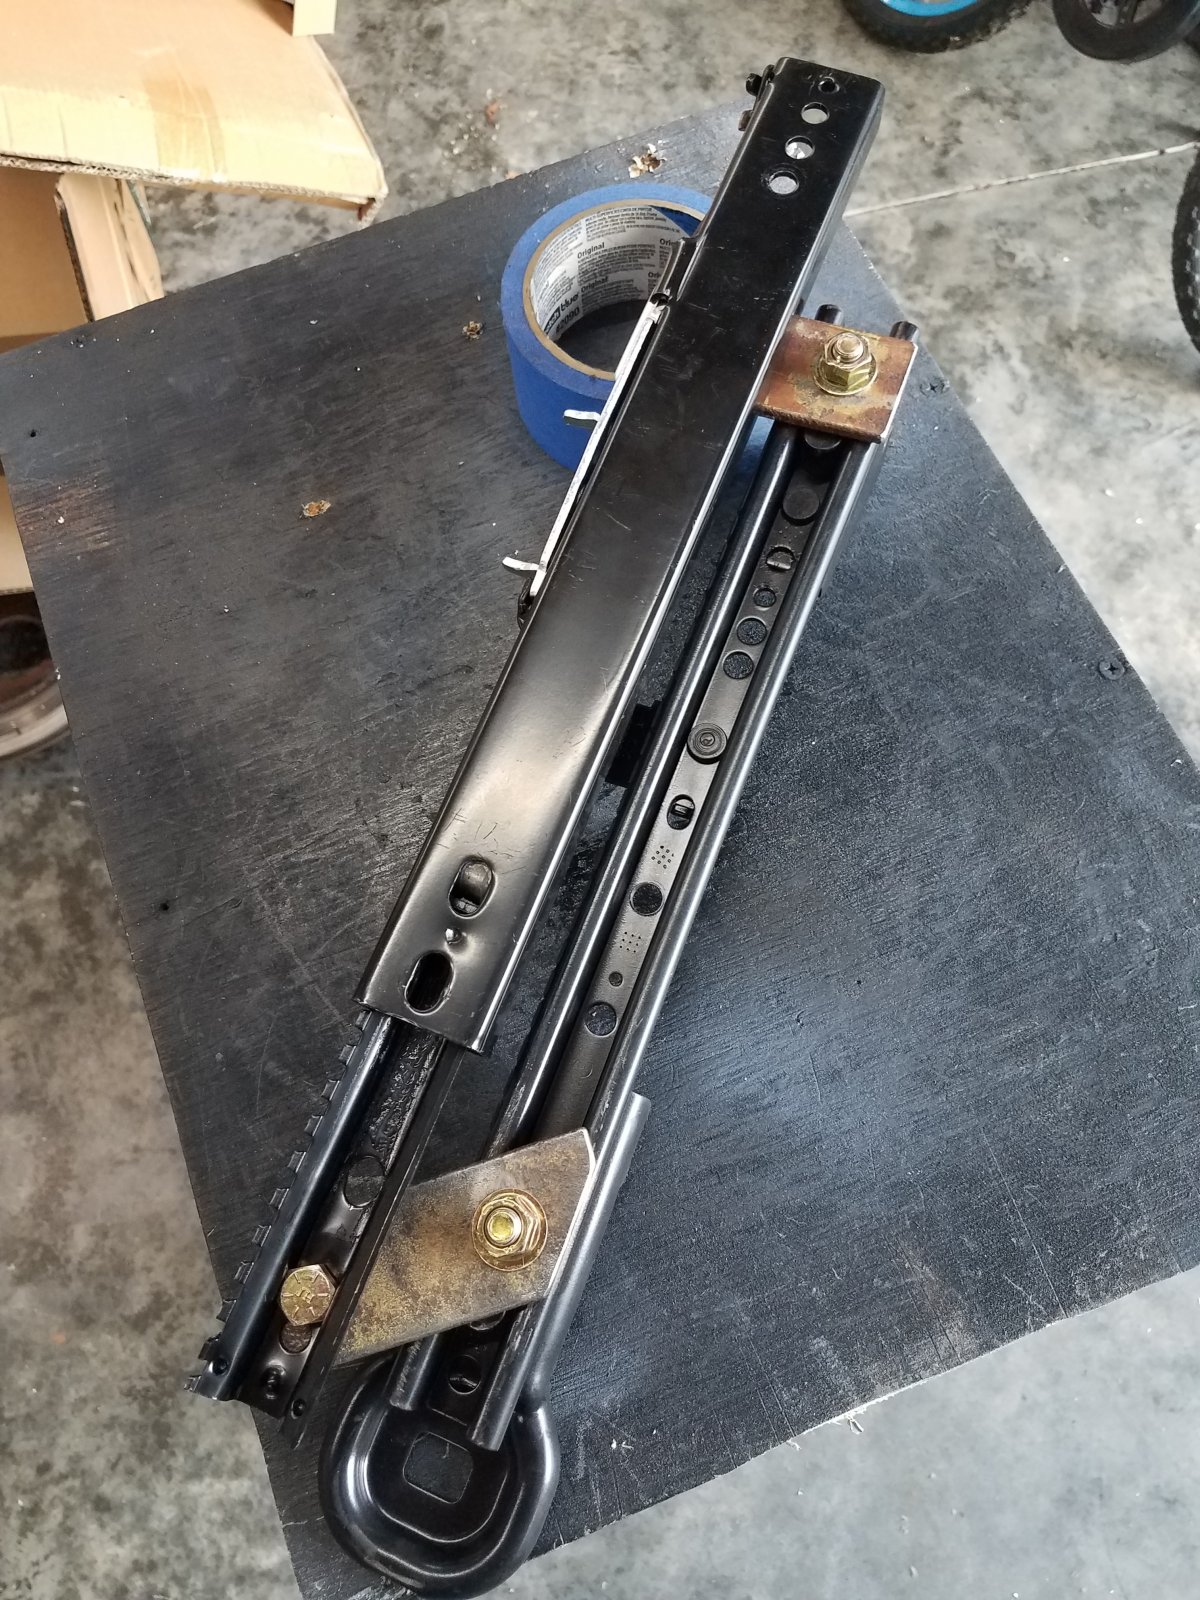
I spent this weekend working on mounting the seats. I just couldn't bring myself to spend so much on the Planted brackets when they don't fit as well as the stock Cobalt ones. So...I disassembled the Cobalt brackets and fabricated tabs from some 1/8" steel to adapt the aftermarket sliders to the Cobalt brackets. So far, it seems to be working but I've invested much more time than I expected and still not done. The angle of the photo makes it look like there is a fairly large gap between the two, but the outside edge of the slider is about 3/16" away from the inside edge of the bracket. A 3/8" Grade 8 bolt just barely fit inside the channel of the aftermarket slider.
35616
 
escapepilot
The to-do list has gotten much smaller. MCO has been requested and if things go well, I'll be ready for inspection next week.

Before inspection:
Install seats (in progress)
Install headlights (waiting on weatherpack connectors; should arrive Thursday)
Install CHMSL
Install hood, side panels

Can be done after inspection or after inspection scheduled.
Tune (seems rich and hunts for idle) (this one intimidates me)
Alignment
Install spoiler, footwell cover
Fabricate and install front splitter
Install parking brake
 
Robinjo
The to-do list has gotten much smaller. MCO has been requested and if things go well, I'll be ready for inspection next week.

Before inspection:
Install seats (in progress)
Install headlights (waiting on weatherpack connectors; should arrive Thursday)
Install CHMSL
Install hood, side panels

Can be done after inspection or after inspection scheduled.
Tune (seems rich and hunts for idle) (this one intimidates me)
Alignment
Install spoiler, footwell cover
Fabricate and install front splitter
Install parking brake

Nice! I'm in the about the same boat as you. Close enough that I'm planning to send in my info to Alabama to setup my 'inspection'. It sounds like it can take 2-4 weeks for them to come see my masterpiece.
I say 'inspection' because I hear it's more of a 'I didn't Steal Stuff' check.....
 
RCK605
I spent this weekend working on mounting the seats. I just couldn't bring myself to spend so much on the Planted brackets when they don't fit as well as the stock Cobalt ones. So...I disassembled the Cobalt brackets and fabricated tabs from some 1/8" steel to adapt the aftermarket sliders to the Cobalt brackets. So far, it seems to be working but I've invested much more time than I expected and still not done. The angle of the photo makes it look like there is a fairly large gap between the two, but the outside edge of the slider is about 3/16" away from the inside edge of the bracket. A 3/8" Grade 8 bolt just barely fit inside the channel of the aftermarket slider.

View attachment 35616

What is the center to center spacing on the seat bottom. I measured mine last night and it was 13.5". The slider rails need to come in a fair bit from the provided tab locations. I made a quick model of a seat bracket idea this morning. The square tube will span and bolt into the existing tabs. The angles will go towards the front to the existing square tube.

20220912_101704.jpg
 
escapepilot
What is the center to center spacing on the seat bottom. I measured mine last night and it was 13.5". The slider rails need to come in a fair bit from the provided tab locations. I made a quick model of a seat bracket idea this morning. The square tube will span and bolt into the existing tabs. The angles will go towards the front to the existing square tube.

View attachment 35627
I installed the Cobalt brackets by themselves in the Goblin and measured a hair more than 16" between them (19" outside to outside). The sliders on my seats measured about 16" outside to outside. I wanted to run a strap completely across the brackets but I was short on material. The most difficult part was drilling through the Cobalt bracket. Between rivets in the way and often two layers of metal, it was just tedious.
 
Desert Sasqwatch
Which seats? Most aftermarket seat bolt locations are narrower than the factory seats - the 13.5 inches you measured sounds correct.

Your idea to add crossbars onto the - what I'm assuming - Cobalt seat rails is spot on. This will keep your seats as low as possible, if you need the headroom, and is a cheaper option when you can fabricate your own.

Please keep in mind that the position of your seats may be more comfortable if they are slightly turned inward. The driving position is not directly behind the steering wheel and pedals, but is about 2 inches outward. Since your are 'building your own' you may want to consider this. Search the forum for info on this - my build log has some info. :D
 
RCK605
I just looked back at my frame. My outer tabs are 1" further forward than the inner tab by the tunnel, so if you keep whatever bracket you make 'square' and tie into those tabs your seat will angle inwards 3.27 degrees. That is if your tabs are offset as well.
 
escapepilot
I started with the passenger seat and am only drilling on hole into the mounting tabs at a time to ensure alignment. When I do the driver side this week, I plan on starting on the inboard mount and angling the seat a slight amount.
 
Desert Sasqwatch
I just looked back at my frame. My outer tabs are 1" further forward than the inner tab by the tunnel, so if you keep whatever bracket you make 'square' and tie into those tabs your seat will angle inwards 3.27 degrees. That is if your tabs are offset as well.
That 3 degrees would be about perfect. It matches up to the angle I made my brackets after spending time determining the best angle for me. BTW, I also angled the steering wheel outward about 2 degrees to face more toward the driver's seat. :)
 
escapepilot
Just about finished mounting the passenger seat (painting the tabs) and this is what I would recommend…a straight bar across the front instead of tabs. In the rear, because of the factory rivets, I wasn’t able to put the inside and outside tabs at the same locations so I doubt a straight bar across would work unless you want the added work of removing those giant factory rivets.
 
escapepilot
So how is everyone attaching the lap belts on their 4 or 5 point harness? There is a welded nut on the tunnel, but not sure what size it is. Is that strong enough? Is it better to attach the inside lap belt to the rear floor mount?
 
escapepilot
Didn’t get much done this weekend. Spent Friday on a road trip to pick up the newest family member, a bloodhound pup. I did finish installing the seats and rolled it into the sun to get some pics. Discovered a new problem also, tried to start and nothing. Pretty confident it’s minor as it was starting fine before so I just need to track down what ever I did. I am loving how the color, wheels/tires, and seat color is looking.
35706
 
escapepilot
The budget bug bit me this time. Wanted to go with Hooker Harnesses, but the cost and lead time were both larger than I wanted so I went the discount route and wound up with seat belts that left black stains on my seats. Basic soap and water didn’t work so tomorrow I’ll try the better stuff I have.
 
escapepilot
Made a little progress today in spite of myself. Wired up the headlights with weather pack connectors and managed to reverse the position between left and right so they are not interchangeable left to right until I rewire one side.

I need some help too…I couldn’t find an obvious reason it won’t crank now. Everything appears to have power except high beam headlights and no crank. Any chance they are related? It cranked fine before I wired in any lights.
 
Back
Top