Jay’s Build Log- Track Goblin, extended #323, 07 SS SC

jayrolls

Well-Known Member
Assembly Day - 12
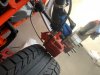
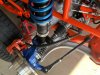
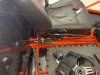
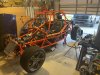
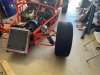
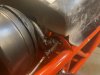
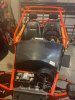
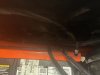
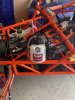
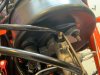
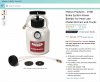
Installed a Motive pressure bleeder. Found a small leak on the front brake line on the brass fitting to master cylinder adapter. Will have to correct that. Was able to start at the R/R and work my way around and got great results. The pressure bleeder made bleeding the brakes fast, easy and a one person job. Will use thread sealer on the brass fitting and then will double check the system for leaks. So ready to be able to put the wheels on.
 

Attachments

Gtstorey

Goblin Guru
I had to crank down on almost all of the brake fitting lines to the point of stripping them. I've never had to get on brake line fittings anything closer to that hard. If DF is making the lines, they may need to replace their flaring dies more often.
I'm not sure that thread sealer will work very well on a compression type fitting.

When the Pressure Bleeders seal good, they are hard to beat for bleeding brakes.
 

jayrolls

Well-Known Member
I had to crank down on almost all of the brake fitting lines to the point of stripping them. I've never had to get on brake line fittings anything closer to that hard. If DF is making the lines, they may need to replace their flaring dies more often.
I'm not sure that thread sealer will work very well on a compression type fitting.

When the Pressure Bleeders seal good, they are hard to beat for bleeding brakes.
I’m was not think that the brass 45 into the adapter is a pressure fitting. I thought I had read that Lonnie uses red loctite on these fittings.
 
Last edited:

jayrolls

Well-Known Member
Assembly Day -13
Clutch cables and shifter installed. Feels a little clunky but hits all of the gears. Found a way to use the OTTP clamps. Threaded the rods into rivenuts and sandwiched the rivenuts in the clamps. I think it will work for now or hopefully at least until DFs new shifter is released. Parking brake handle, tubes, cables installed and adjusted. Have parking brakes. Installed the quick release coupler and steering wheel. It is fulling engaging and locking in, but it feels a little wobbly at the coupling. You and see movement top to bottom. Wheels installed (shout out to SATCX), wheels look great.

Since installing the 42# injectors and GM Stage 2 tune engine is much happier. I am having a few problems with other items. With VCM scanner connected, primarily to watch the engine temp I hit 220 degrees and the fan never came on. I verified that the fan will tune on if you jump it. I also tried to command the fan on and no joy. I have 12 volts at the relay and if I jump the relay the fan turns on. Not sure what the problem.

The other issue is I don’t think that my thermostat ever opened. The radiator hose coming off the thermostat stayed cold. The bypass hose got very hot. I thought the thermostat should open at 195 degrees. I installed a new thermostat with the build, I am wondering if I should try another one and see if i just have a bad thermostat. Any advice would be great. Gonna start checking ALLDATA.
 

Attachments

Rttoys

Goblin Guru
Glad the tune worked out.

you will need to squeeze the hoses at the rear of the frame going to and from the engine to move air and such out and get everything flowing properly. It’s a total pita to get it all bled, but it’ll all work out.
 

Ross

Goblin Guru
I did the hose squeezing thing once, then learned my red-neck air bleeding method: Warm the engine up enough that you are comfortable reving it to 4000 rpm, then give it 4000 rpm for 4 seconds, should get a big burp of air in the radiator overflow bottle. Refill the bottle, and rev it again. One more refill, take it out for a drive, play a little with redline (6500 rpm) and check the overflow bottle once again. Can be done trackside without any tools, and I have tested this method 3 or 4 times now. Works!
 

jayrolls

Well-Known Member
Assembly Day -14
Pulled the thermostat, boiled some water so I could test it and make sure it opened. After verifying that it was indeed working as it should, reinstalled. Used coolant pressure tester from the radiator and then from the reservoir. Was able to add about another half gallon or so of coolant. Ran the vehicle again, and got good coolant flow. Radiator hoses on both sides had good temp. Got the button panel wired. Horn works, hazards work, info and return work. Nothing happens when using the cruise control ON button. Have to look into the cruise more.
Still the fan is not turning on. Even using VCM scanner to turn the fan on, the fan still doesn’t come on.
 

Scott #321

Well-Known Member
Since your jumping the relay this is highly unlikely but are you sure your wired into the correct cooling fan? Yoursoftware should show if the fan is being commanded on and some years allow you to change the settings as to what temp the fan comes on.
 

jayrolls

Well-Known Member
Since your jumping the relay this is highly unlikely but are you sure your wired into the correct cooling fan? Yoursoftware should show if the fan is being commanded on and some years allow you to change the settings as to what temp the fan comes on.
I double checked the wires going to the fan. I’m pretty sure that I am connected correctly because jumping the relay works. I’m thinking a signal wire from the PCM.
 

jayrolls

Well-Known Member
Test drive day!


Next up is fixing the alignment. I have the front shock springs bottomed out and my lower control arms are still not level. Once I get that handled will be ready to set the measurements. Start reading wires to determine what’s going on with the radiator fan.
 

Lonny

Administrator
Staff member
I think you have the lower control arms on the wrong side. Swap them and it will set lower.
 

jayrolls

Well-Known Member
Making progress.
Kit ordered- 5/14
Donor picked up - 5/23
Kit Delivered- 8/25
Back from powder coat- 9/30
First start- 10/11
First drive- 10/25
Ready to start the Montana process.
Still have more work to get done. Body panels mounted, hood and engine covers painted. Need to repaint the front calipers and gonna send the exhaust out to JetHot to get ceramic coated.
 

Rttoys

Goblin Guru
No worries, it happens. That should level you out. Set the Spring tensioner just snug when the spring touches the retainer. Good starting point.
 

jayrolls

Well-Known Member
Assembly correction day!
Got the lower control arms swapped to the correct sides. Now I am setting nice and level. Centered the steering wheel. Still feels like there is some play in the quick release hub. I’ll investigate that more later.
Ordered some toe plates, should be here this weekend.
 

Attachments

jayrolls

Well-Known Member
Assembly Day -16
Its been a productive day. Set the rear camber @ Neg 1.5 on both sides. Adjusted the front camber to the same Neg 1.5. L/F had to turn the heim joint out about 2 1/2 turns, R/F had to turn 1 1/2 turns out. My toe plates didn’t get here yet, so I am just kinda eyeballing it. For the most part I feel I have the steering wheel pretty centered and tracks pretty good in the neighborhood.
Tapped the tunnel and ran allen screws to secure the tunnel cap. Went rather smooth, the far back two were a little harder, self imposed due to having the rear bulkhead already installed.
Installed the passenger seat, bolted both seats down. Op-check of the passenger heated seat checked good. Notched the footwell cover to clear the clutch master cylinder and clutch and brake hoses. Still need to drill holes to be able to zip tie in place.
Ran the power wires to the AEM air/fuel meter. Tied in at the BCM using a fuse adapter to have key on power.

Another few steps forward and 1 step back. So it appears transfer case out out shaft seal that goes on the right cv shaft. Needless to say, when I got the new shafts I did not realize this was a thing. While cleaning up the garage today, noticed it on one of the old shafts. So it looks like I am going to have to pull the R/R so I can install.
 

Attachments

Top