SkyRay's Extended Track Goblin #314 - 09 SS/TC

SkyRay

Active Member
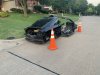
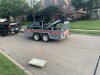
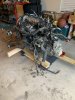
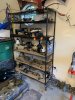
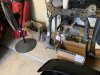
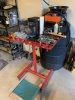
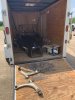
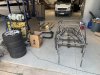
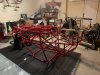
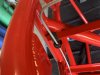
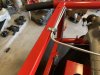
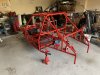
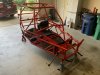
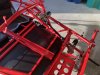
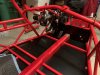
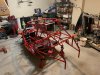
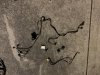
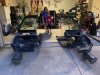
I'm continuing to prep for the arrival of the kit. I haven't had anyone take the donor chassis off my hands, so I borrowed a Sawzall and chopped it up as per CodyP's build log. Of course, after posting it on Craigslist it only yielded me two people trying to scam me. Thanks a lot. The scrap metal yards local to McKinney won't take auto chassis, and the closest one that does, in Sherman, wants a title to go with it. Lonny pointed out that there is a yard near DF that would take it without the title... I may drag it down there if it is still around when I go down to pick up the kit (but hopefully it is gone by then). I was able to get all the bits on one side of the garage so I could get the wife's mini-van back in the other side of the garage. But it would be easier to work on the engine if I didn't have to pull it out of the chassis carcasses to access it. Oh well, I'll figure it out.

IMG_2213.jpeg

I have had some success selling parts. So far I've gotten rid of:
Front bumper cover and headlights: $50
Seats: $425
Rear Window, driver's side: $10 (it took a guy 2 hours to get it out, and he used my heat gun and a lot of my tools. Then, at the end, he told me he was so determined because a replacement elsewhere was going to be $500.)
Door and trunk seals: $50 (my daughter delivered this to a Cobalt fixer-upper in Houston)
Hood: $120 (same guy that bought the front bumper cover and headlights)
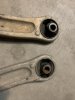
Brakes: $50
Passenger Door: $150 (same guy that bought the front bumper cover, headlights, and hood)

I've had some bites on the sunroof, downpipe (catless), and Injen cold air intake, but they want me to ship which I'm trying to avoid. The guy who bought the brakes is supposed to come back for the rear axle.

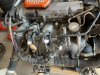
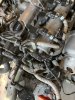
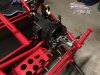
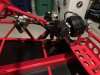
As I started work on the engine, I realized I cut the heater hoses too close to the engine so I can't close the loop with the scraps. So I'll have to make a run to the auto parts store for that. I need to get oil, a filter, and a no-A/C belt also. And I have to make a decision on the paint scheme... I see many other builder's paint jobs that I like, then realize I can't use it since it has already been done. Must keep working on it...
 

SkyRay

Active Member
Big moment this morning... someone hauled off the chassis. Daughter #2 and I put it in the street last night (to minimize the movement pre-7:00 today), which was a bit of a funny sight. I was nervous this guy wouldn't show because I would struggle to get it back up to the garage, but he came and hauled it off. It was a bit of a challenge getting it through the mouth of the trailer. But now I have some space to be able to work on prepping parts. Woo hoo!

IMG_2245.JPEG IMG_2247.JPEG

Also interesting this week was Wednesday night when I was outside and heard an impact and grinding of metal from a nearby street. I ran to look and saw a classic Mustang missing its rear driver's tire. The poor kid driving it was distressed and went to chase the tire down the street. I grabbed my floor jack, my 8 year old helper Adam, and headed off to offer assistance. Found out the kid, who is about to go off to college, was driving the 1968 Mustang he and his dad are restoring. They had just given it a brake job and he failed to get the lug nuts tight on the last wheel. Ouch. Adam found the lug nuts over the prior 100 yards before where the car was, and I also got a skate so we could get the car out of the middle of the road. He's got his work cut out for him fixing the rear axle, but he was at least able to limp it home. His Dad wasn't too thrilled. Torque and pre-load... very important. Have a great weekend!
 

SkyRay

Active Member
It has been a while since I posted... Have made some progress, but not enough. Since my last post I tried to organize the garage (largely so my bride could get her van back inside). I've sold some parts, but not enough. I still have a fair bit of space being consumed with things I won't need.

IMG_2270.JPEG IMG_2274.JPEG IMG_2276.JPEG IMG_2273.JPEG

After returning from a trip to Tennessee to visit family around the 4th of July, I labeled all the connectors on the engine wire harness, took pics of where they connect on the engine, and removed the harness.

IMG_2360.JPEG IMG_2363.JPEG

I had a buddy, who is a mechanic, come over and tell me how easy it is to replace the clutch, timing chain, etc with it sitting on a dolly (or hanging from a hoist per his recommendation). He also recommended some of the upgraded parts, so I got most of them ordered and have received them (but haven't installed them). I also started prepping and painting the donor parts like the drive shafts and pedal box. I also ordered a Tilton 3 tank reservoir based on what I saw on other logs since the stock reservoir broke (where the clutch line leaves the reservoir) during disassembly.

Last weekend I was finally able to pick up #314 at DF. I was headed to Houston (from Dallas) with a buddy for a conference so we loaded the trailer and left it there (those DF folks sure are friendly and accommodating!) instead of dragging it all the way to Houston, then we picked it up two days later on the way home. While there, Lonny replaced the exceptionally worn bushings in the donor control arms.

IMG_2409.JPEG IMG_2109.JPEG

Within 48 hours of getting the kit home, I received a notice from my HOA saying I can't have a trailer on my driveway. They are sooooo helpful. My 8 year old helper Adam assisted as we went through what we received last weekend, took pictures of parts that are going to be painted, and then got those parts back on the trailer. This afternoon I skipped out of work early to pull the trailer with parts to the painter.

Repack.jpg Thumbnails.JPG IMG_2457.JPEG

Some other tidbits:
- I'm still trying to come up with the decorating theme for the fiberglass. I'm trying to tie into the 314 "pi" aspect. I'm thinking of something like "American Pi" or "Cherry Pi." I like to have a song that goes with the toy... I had a Kawasaki Nomad named Marylou (tied to Ricky Nelson's "Hello MaryLou") and a Yamaha XJR named Roxanne (The Police's "Roxanne"). I figure I could tie to Don Mclean's "American Pie" or Warrant's "Cherry Pie." I plan to take Lonny's advice and get a graphic artist creative with wraps to ponder and make recommendations.
- I was looking at the DF group on Facebook tonight and saw that I'm paying about twice as much as many others for basic powdercoat paint. I'm using "Very Red" and "Blackjack." Unfortunately I didn't take the time to shop around.
- When I dropped everything off with the painter this afternoon, he was blown away with the frame. "It's beautiful" and "They did an amazing job with the welds" were repeated several times. He said he does a lot of aircraft work and their welds don't hold a candle to the Goblin frame.
- On a bad note, while pulling the trailer to the painter (9 miles) the trailer popped off the ball while crossing a railroad track and whacked the bumper on the truck. Unfortunately it is my buddy's truck, and it isn't just an old ranch truck, so part of the painting cost will likely be replacing that portion of the bumper. Oh well.

Everything is supposed to be back from paint in about 3 weeks, assuming they get the powder in a reasonable time. I'm hoping I can get the engine ready by then, but it isn't a given because work is crazy now and I'll be going away for 8 days during that period. Maybe I'll get to post again before I get the parts, or maybe not. Thanks for reading my novel...
 

JBINTX

Goblin Guru
It has been a while since I posted... Have made some progress, but not enough. Since my last post I tried to organize the garage (largely so my bride could get her van back inside). I've sold some parts, but not enough. I still have a fair bit of space being consumed with things I won't need.

View attachment 25692 View attachment 25693 View attachment 25694 View attachment 25697

After returning from a trip to Tennessee to visit family around the 4th of July, I labeled all the connectors on the engine wire harness, took pics of where they connect on the engine, and removed the harness.

View attachment 25695 View attachment 25696

I had a buddy, who is a mechanic, come over and tell me how easy it is to replace the clutch, timing chain, etc with it sitting on a dolly (or hanging from a hoist per his recommendation). He also recommended some of the upgraded parts, so I got most of them ordered and have received them (but haven't installed them). I also started prepping and painting the donor parts like the drive shafts and pedal box. I also ordered a Tilton 3 tank reservoir based on what I saw on other logs since the stock reservoir broke (where the clutch line leaves the reservoir) during disassembly.

Last weekend I was finally able to pick up #314 at DF. I was headed to Houston (from Dallas) with a buddy for a conference so we loaded the trailer and left it there (those DF folks sure are friendly and accommodating!) instead of dragging it all the way to Houston, then we picked it up two days later on the way home. While there, Lonny replaced the exceptionally worn bushings in the donor control arms.

View attachment 25698 View attachment 25699

Within 48 hours of getting the kit home, I received a notice from my HOA saying I can't have a trailer on my driveway. They are sooooo helpful. My 8 year old helper Adam assisted as we went through what we received last weekend, took pictures of parts that are going to be painted, and then got those parts back on the trailer. This afternoon I skipped out of work early to pull the trailer with parts to the painter.

View attachment 25701 View attachment 25702 View attachment 25700

Some other tidbits:
- I'm still trying to come up with the decorating theme for the fiberglass. I'm trying to tie into the 314 "pi" aspect. I'm thinking of something like "American Pi" or "Cherry Pi." I like to have a song that goes with the toy... I had a Kawasaki Nomad named Marylou (tied to Ricky Nelson's "Hello MaryLou") and a Yamaha XJR named Roxanne (The Police's "Roxanne"). I figure I could tie to Don Mclean's "American Pie" or Warrant's "Cherry Pie." I plan to take Lonny's advice and get a graphic artist creative with wraps to ponder and make recommendations.
- I was looking at the DF group on Facebook tonight and saw that I'm paying about twice as much as many others for basic powdercoat paint. I'm using "Very Red" and "Blackjack." Unfortunately I didn't take the time to shop around.
- When I dropped everything off with the painter this afternoon, he was blown away with the frame. "It's beautiful" and "They did an amazing job with the welds" were repeated several times. He said he does a lot of aircraft work and their welds don't hold a candle to the Goblin frame.
- On a bad note, while pulling the trailer to the painter (9 miles) the trailer popped off the ball while crossing a railroad track and whacked the bumper on the truck. Unfortunately it is my buddy's truck, and it isn't just an old ranch truck, so part of the painting cost will likely be replacing that portion of the bumper. Oh well.

Everything is supposed to be back from paint in about 3 weeks, assuming they get the powder in a reasonable time. I'm hoping I can get the engine ready by then, but it isn't a given because work is crazy now and I'll be going away for 8 days during that period. Maybe I'll get to post again before I get the parts, or maybe not. Thanks for reading my novel...
Holy moly that was an update alright.
progress at first seems slow. That will change.
Label the vacuum line and coolant lines just like you did on the wire harness.
looking good!
 

SkyRay

Active Member
Today I finally got my parts back from powder coat... 6 weeks later. And of course, of the 12 or so parts that were supposed to be red, they only got one red... it is a good thing since it is the chassis. So they'll get to do the rest again. So I don't actually have them all back yet, but I have enough to get started, and am excited to jump into the build process. One thing I wasn't expecting... they powder coated the inside of the gas tank. Thoughts on whether the fuel will break down the paint?
IMG_2947.jpeg
 

Ross

Goblin Guru
How in the world did they powder coat in there? Is it just a bit of overspray? I doubt they could get the powder on all the surfaces, so it is aluminum somewhere in there... powder coat is just plastic, so it shouldn't hurt the gas, but if it starts peeling and flaking it could plug gas filters. Can you take a picture with your phone inside the gas tank?
 

SkyRay

Active Member
Got some pics of the inside of the tank. It is more than just a bit of overspray. I'll investigate what happened when I get the rest of the red parts, and see if they can strip it and try again with the inside masked off like we discussed in the first place.
IMG_2948.JPEG IMG_2953.JPEG IMG_2949.JPEG

Today was pretty productive, in spite of the heat. My helpers and I got the hoses pulled. The Hose Pulling Tool worked well. Unfortunately, just as the second hose came through the end of the pipe, it tore just past the aluminum ring and the hose sucked back into the pipe. So we got to pull it out and try again. By the third time we were pretty efficient. I think that between my kit being put together and the new video set coming out there were a couple minor tweaks made to the kits, as I've noticed some small differences, the first being my kit didn't come with the nut referenced in the "Preparing the main hose pulling tool." The tool still worked fine.

After the hoses my 19 year old volunteer retired from the hot garage, leaving me with Adam, my 8 year old to help. He and I got the floorboard installed. We had an issue with the rivet gun at one point, plus ended up with the Urethane everywhere, but we got the job done. Adam then disappeared to leave me to install the donor steering rack, which wasn't too bad for one person. I also installed the steering rack limiter kit, but my kit didn't include the hose clamps. Since I didn't have the special boot clamp tool to reuse the original clamps, I got to make a special trip to AutoZone (second of the day, fourth of the week). With the steering rack put back together, I got the rear brake and clutch lines run. My kit didn't come with the edge trim, so I used some bits of hose between the brake lines and the fuel tank rail.
IMG_2966.JPEG
Also note that on the passenger side I ended up putting the screw too close to the end of the fuel tank rail, and after it went through the angle it hit the main roll bar, which made the screw lock up such that I couldn't get it to tighten completely. So I got to pull the screw out and ran another screw a little farther over that would clear the roll bar. That's one extra hole... Finally, my kit didn't come with a 3/8 coated hose clamp for the front of the car, so I ended up using one of the 1/4" clamps. I'll try to remember to replace it since it is pretty tight.
IMG_2964.JPEG

We got a team photo, then everyone assisted getting the chassis right side up. While they cleaned up for dinner, I cleaned up the garage (some) and called it a day. I've got some other commitments tomorrow, so I'm hoping to get the next couple videos incorporated on Monday. In all, I think it was a productive day. Adam, the 8 year old, did a great job sticking with it and helping. He was excited to use a rivet gun, the drill, the shop air, and the power nut driver. We're making memories, and celebrated by taking a seat in the car (on the moving blankets. Thanks for reading!

IMG_2960.JPEG IMG_2968.JPEG IMG_2971.JPEG
 
Last edited:

SkyRay

Active Member
Today is Labor Day 2021. Yesterday (Sunday) I didn't expect to have much time to work on the car, but I did get about 20 minutes and was able to install the EPS module and collapsible shaft with the help of daughter #2, Caroline, who was home from college for the long weekend.
IMG_2973.JPEG

Today I had some more things to do besides just working on the car, but I was able to get to what is currently the end of the new video series, which included the pedal box, clutch pedal and master cylinder, brake booster and brake master cylinder, and front brake lines. Once done with the new videos, I worked on cleaning up the garage some so it becomes easier to find the right tools as the build continues. I may work on the engine for the next couple working sessions to see how many of the new videos come out before I have to continue with the old video series. I did watch some of the old video series and saw by this point the horn was already mounted, so we'll have to see how that comes together going forward.
IMG_2974.JPEG IMG_2975.JPEG IMG_2977.JPEG IMG_2976.JPEG

I did have two things I noticed that gave me pause... On the clutch pedal it is possible to push it down so far that it stays depressed. There is a yellowish piece (top green circle) that is spring loaded and holds it depressed. As I sat in the car and exercised the pedals, it seemed like the pedal got stuck down too easily. I'm guessing that it is supposed to be that way and won't do this when there is fluid in the system? Also, on the vacuum line coming off the brake booster, I've got a connector (also circled in green). In the build video there is nothing in the vacuum line hole at all. The connector wasn't addressed on the old video series, and the new video series it doesn't address removing the connector/vacuum port from the brake booster. I'll hold tight for now to see if this gets addressed in upcoming videos.
Brake and Clutch annotated.JPG DF Build Brake Master Cylinder.JPG

Happy Labor Day and thanks for reading!
 

Rauq

Goblin Guru
I can only speculate on the clutch pedal as I have a different pedal (SS/SC), but I'd guess you're correct in that it won't do that with the master cylinder and clutch system filled with fluid. Lonny and I had talked a little about clutch bleeding, where I learned that the earlier models have a return spring built into the clutch pedals and the later models don't.

You are also correct on the vacuum booster, the stock elbow goes in there with the stock hose and then we clamp black nylon tubing inside to pull vaccum from the motor up to the booster. I also learned from Mayor West that the turbo Cobalts have a vacuum sensor that plugs into the elbow there but is not necessary for the build, as I recall the best guess was that it's tied into our now non-operative traction control somehow.
 

SkyRay

Active Member
Today the painter dropped off the rest of the red parts, took the intercooler mounts which were painted the wrong color, and took the gas tank to strip it and try again with the inside masked off. He acknowledged that was a boneheaded thing to do. Let's see what happens this time...

Adam and I started running the wire harness with the intention of getting the gage cluster and ignition installed tonight. However, when we went to connect to the accelerator, brake, and clutch, we found that accelerator harness and sensor connectors were both male. So I've got an e-mail in to Lonny and Adam at DF to see if I'm doing something wrong? Let me know if anyone else knows what I'm doing wrong. We'll be standing by until this is sorted out...

IMG_2979.JPEG IMG_2985.jpeg
 

SkyRay

Active Member
Roger that. I'll dig around through the garage and see if I can figure out where it ended up. Thanks for the fast response!
 

SkyRay

Active Member
Well, the good news is that I have a picture of it. The bad news is that I took the picture to capture the items I was dropping off at DF to have the harness made. It would have been in a gallon size Ziploc bag with the other miscellaneous harnesses in the pic. Any chance the bag is still hanging around DF? It looks like there is one for sale on EBay, so if not I’ll get it ordered right away.
D4D5CEDB-4215-4A09-9BAE-616306DD4975.jpeg
 
Last edited:

Lonny

Administrator
Staff member
We may have yours here, I will look tomorrow. If not I know we have at least one from an old donor on our electrical shelf. I will send it to you.
 

SkyRay

Active Member
We may have yours here, I will look tomorrow. If not I know we have at least one from an old donor on our electrical shelf. I will send it to you.
Thanks so much! Y'all are awesome. And don't waste too much time looking for it... I can order another one.
 
Top