TravMac's Extended Track Goblin (#253) - 2007 SS/SC Doner
- Thread starter TravMac
- Start date
TravMac
Well-Known Member
Absolutely! I'm very happy with all the painted parts so far. I really can't wait to see it all come together!Looking good! Those Steel-It frames always seem to come out looking great.
Brett
Well-Known Member
Looking good. Most builders have to pull on the clutch pedal to the side and bend the bracket for clearance.
Also, you can cut off the ring that held the ignition to the steering column. It is no longer needed. Be warned, that metal is tough.
Also, I would go ahead and lay in the clutch line. If you dont do it now, it can be a pain to get in, especially when the engine / firewall are in.
Also, you can cut off the ring that held the ignition to the steering column. It is no longer needed. Be warned, that metal is tough.
Also, I would go ahead and lay in the clutch line. If you dont do it now, it can be a pain to get in, especially when the engine / firewall are in.
TravMac
Well-Known Member
Yea, I read a few others having similar clearance issues. I think my method in mind will work. If it wasn't for having another motor open in the shop, I would have been grinding away! And thanks for the tips on the other 2 things. The ring I new about, but the clutch line I hadn't put any thought into. When I get that pedal in place, that will be next!Looking good. Most builders have to pull on the clutch pedal to the side and bend the bracket for clearance.
Also, you can cut off the ring that held the ignition to the steering column. It is no longer needed. Be warned, that metal is tough.
Also, I would go ahead and lay in the clutch line. If you dont do it now, it can be a pain to get in, especially when the engine / firewall are in.
TravMac
Well-Known Member
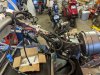
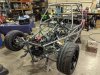
Only had a few hours to spare on the goblin this weekend, but did a few things worth updating for.
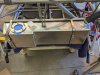
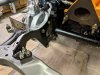
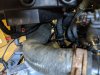
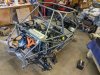
Finished up some more front end wiring work, the steering shaft and clutch pedal install, fuel tank install, installed the engine harness on the engine, got engine off the stand, and played around with all the line/wire routing a bit more.
The steering shaft/clutch pedal did take some bending and sanding, but I eventually got it to fit. I started with the master cylinder in place, and made sure everything fit around that. It was a really tight fit, but everything moves nice and smoothly.
As for the wiring, I'm really a fan of this wire cover stuff that MR.812 also used in his build. It was exactly the solution I was looking for. It's all over amazon for pretty cheap (although I may have bought most the open box stuff ha).
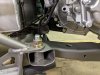
The fuel tank install was pretty easy. I even got a new fuel cap! While I was back there, I found some bolts to fit for the trans/engine install. I think the 2 longer ones will still fit without bottoming out in the trans mount. With the spacers, they all appear to fall to the same depth. I was just making sure I have plenty of engagement for the threads all around.
The line/wire routing is close to complete. There are a lot of touch conditions for the brake/clutch line, so I bought some vacuum hose to slip over and act as a protecting sleeve. I don't see them moving much, so I'm sure it will last a while. Might just end up re-bending lines in the future for a better fit.

Finished up some more front end wiring work, the steering shaft and clutch pedal install, fuel tank install, installed the engine harness on the engine, got engine off the stand, and played around with all the line/wire routing a bit more.
The steering shaft/clutch pedal did take some bending and sanding, but I eventually got it to fit. I started with the master cylinder in place, and made sure everything fit around that. It was a really tight fit, but everything moves nice and smoothly.
As for the wiring, I'm really a fan of this wire cover stuff that MR.812 also used in his build. It was exactly the solution I was looking for. It's all over amazon for pretty cheap (although I may have bought most the open box stuff ha).
The fuel tank install was pretty easy. I even got a new fuel cap! While I was back there, I found some bolts to fit for the trans/engine install. I think the 2 longer ones will still fit without bottoming out in the trans mount. With the spacers, they all appear to fall to the same depth. I was just making sure I have plenty of engagement for the threads all around.
The line/wire routing is close to complete. There are a lot of touch conditions for the brake/clutch line, so I bought some vacuum hose to slip over and act as a protecting sleeve. I don't see them moving much, so I'm sure it will last a while. Might just end up re-bending lines in the future for a better fit.
Scott #321
Well-Known Member
Nice, I purchased the same loom material for my build. Are you planning on re-looming the engine harness to match? I also purchased some spark plug insulators to rework the engine harness as there are several locations on my tc where heat insulation of the harness is a must.
TravMac
Well-Known Member
I thought about doing the engine harness too, but the original corrugated plastic seems in ok shape. Since this stuff isn't heat resistant, I would just need to be careful where it goes. Your idea of spark plug insulators would work great in hot locations. OEM applications use like a reflective tape too for harnesses near catalysts - might be another good option. I just really wanted to get away from only a taped interface all over the front of the car and this stuff cleaned up the look a lot!Nice, I purchased the same loom material for my build. Are you planning on re-looming the engine harness to match? I also purchased some spark plug insulators to rework the engine harness as there are several locations on my tc where heat insulation of the harness is a must.
TravMac
Well-Known Member
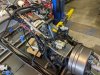
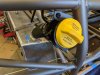
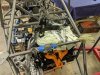
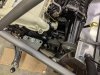
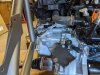
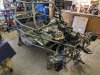
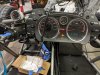
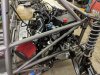
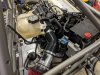
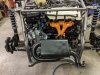
I'm nearly a week late for the best update yet... THE ENGINE IS IN!
I included some shots of the engine and trans mounting holes on an 07ss. I only found a few references, but everything seems to be correct! Lots of shimming and rigging to get all the solid mounts to line up on the cradle install, but that seems to be a common thing around the forum too. You might notice the brake/clutch lines I coated in rubber to add a layer of protection for some touch conditions I kept running into.
Next up, plumbing all the systems and adding suspension! Hopefully I can find all the bolts I need...
TravMac
Well-Known Member
A long weekend of weddings and driving around... but also a few updates here too. Couple of questions:
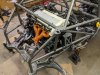
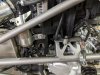
1: Do your SS/SC coolant hoses route like this? It all will fit... so maybe that's all that counts.

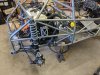

2: Does your coolant reservoir relocation mount like this?

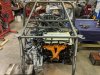
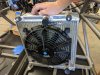
Also installed axles, the other front corner, front brake calipers (no stainless lines yet), rear steering rack, and a rear corner to see how things looked. Put the radiator together with a bit of trimming on the bottom support mounts. Also need some paint on the radiator bracket that has been sitting in a corner. Things to do for next time!
1: Do your SS/SC coolant hoses route like this? It all will fit... so maybe that's all that counts.
2: Does your coolant reservoir relocation mount like this?
Also installed axles, the other front corner, front brake calipers (no stainless lines yet), rear steering rack, and a rear corner to see how things looked. Put the radiator together with a bit of trimming on the bottom support mounts. Also need some paint on the radiator bracket that has been sitting in a corner. Things to do for next time!
Attachments
-
 473.1 KB Views: 196
Rauq
Goblin Guru
Looks good!A long weekend of weddings and driving around... but also a few updates here too. Couple of questions:
1: Do your SS/SC coolant hoses route like this? It all will fit... so maybe that's all that counts.
Generally, yes. If the hose going over the trans clears the shifter linkages, then you're good. I think I just clocked the hose on the barb a bit and locked it in place with the clamp to buy a little extra room.
2: Does your coolant reservoir relocation mount like this?
Yes; I can't remember if I put my mount bracket on the front or rear surface of that frame bracket, but I don't think it makes a difference.
On the passenger side hose, I zip tied it to the frame to help keep if off of the serpentine belt. I think the newer kits have a bracket for this? I also slid the loom down to that spot to reduce the risk of chafing the hose. I think you're close enough that you should be able to figure it out with the parts you have on hand.
Rttoys
Goblin Guru
1. For the most part, yes. There’s a lot of things wanting the same space, so you just have to make it work1: Do your SS/SC coolant hoses route like this? It all will fit... so maybe that's all that counts.
2: Does your coolant reservoir relocation mount like this?
2. I did mine on the other side of the frame because the hose interfered with the air intake. Pics in this thread.
Helpful Photo Albums
Here are some random helpful photo albums. I've ordered them by location on a Goblin, from the front to the rear. Heat Exchanger Front Suspension Rod End Mounts (steel version) Front Bearing Hub Inner Cap Installation Brake Reservoir Relocation Late Model Windscreen Steering Column...
TravMac
Well-Known Member
Rauq,
I was going to do the same with a zip tie to keep it off the belt. I figured it fit so nicely, might as well use what was available! There was just so little reference in the other builds I marked on here that I had to clarify and add more pictures.
Brett/Rttoys,
That's good to hear on the mounting. I saw posts having it either way, but most were on TC builds. didn't know of SC people had any issue/preference one way or another. As long as it all fits! I also can't tell you how many times i searched that album post and totally bypassed your pictures... I'm glad you pointed them out!
TravMac
Well-Known Member
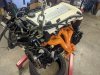
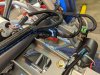
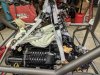
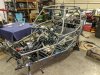
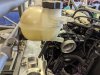
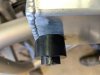
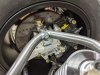
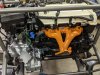
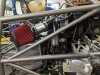
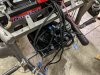
Another bunch of pictures after another great weekend of work. Clutch lines are all hooked up, coolant lines for the engine and supercharger are routed and mostly hooked up, a lot of electrical has been plugged in and routed appropriately, fuel pump and filter were installed and connected to the engine, muffler was installed and hanging off the back. I did get to turn the key with power for the first time and the cluster lit up along with the dash (no electrical failures yet! Now to flash the ECM and see if it will start up. Looks like things are going well!
A few things others may find as well: I didn't have any fuel line for jumping between the filter and the engine, so went out for a few feet of it. I didn't have any brake fluid rated hose to jump between the relocation of the reservoir and the master cylinder, so that is on order. I also had a few extra coolant hose adapter pieces for the supercharger which I'm not sure what to do with (2 plastic elbows and 2 metal fittings).
Nearly all the hose adapters or barbed fittings were not easy to play with, but with enough lubricant and pressing, things found their way together. Once I finally decided "if I break it, I can order another," the assembly went a bit better. I think I may have to redo my front radiator plumbing, since the supercharger intercooler now interferes with the coolant hose routing a bit. I also noticed the silicone elbow touches hard on the ECM connectors without much room to adjust things out of the way. That will have to be addressed in time as well.
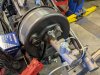
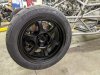
Also, using SS front brake hardware (caliper, pad, and rotor), I actually fit up my previous SS rotors and pads on the front for a bit more aggressive combination. It even fits using the same adapter parts to the front knuckle! Kind of a cool retrofit for those looking for more front braking. Take a look how everything is coming along (lots of pictures!).
A few things others may find as well: I didn't have any fuel line for jumping between the filter and the engine, so went out for a few feet of it. I didn't have any brake fluid rated hose to jump between the relocation of the reservoir and the master cylinder, so that is on order. I also had a few extra coolant hose adapter pieces for the supercharger which I'm not sure what to do with (2 plastic elbows and 2 metal fittings).
Nearly all the hose adapters or barbed fittings were not easy to play with, but with enough lubricant and pressing, things found their way together. Once I finally decided "if I break it, I can order another," the assembly went a bit better. I think I may have to redo my front radiator plumbing, since the supercharger intercooler now interferes with the coolant hose routing a bit. I also noticed the silicone elbow touches hard on the ECM connectors without much room to adjust things out of the way. That will have to be addressed in time as well.
Also, using SS front brake hardware (caliper, pad, and rotor), I actually fit up my previous SS rotors and pads on the front for a bit more aggressive combination. It even fits using the same adapter parts to the front knuckle! Kind of a cool retrofit for those looking for more front braking. Take a look how everything is coming along (lots of pictures!).
TravMac
Well-Known Member
It's something I continue to see as well. I think it all will boil down to balance and being able to manage the heat. I agree there will probably need a proportioning valve somewhere, but I can't think of many race car type build applications where less brakes are better overall for performance. I'm just as curious to see. I'm also close to my rim at this point (15s) so I may reconsider in the end, but it's worth a try!
Rttoys
Goblin Guru
It’s fairly simple. The stock cobalt setup uses (roughly) 60% of its braking on the front. With the big heavy drivetrain sitting right on top of it, this works perfectly. When you put that system in a goblin, 60% front is huge overkill because all of your weight is in the back and the rears will (basically) do nothing. I found that my rear rotors never even got hot at all, under any conditions. under normal braking, it’s fine and you’ll probably never notice that the front is doing all the work, but you stab the brakes or in a panic situation and the fronts lock instantly, then you know.It's something I continue to see as well. I think it all will boil down to balance and being able to manage the heat. I agree there will probably need a proportioning valve somewhere, but I can't think of many race car type build applications where less brakes are better overall for performance. I'm just as curious to see. I'm also close to my rim at this point (15s) so I may reconsider in the end, but it's worth a try!
Restricting the front allows the rear to actually work and your braking changes dramatically. I do suggest running it in the stock configuration so if/when you change you’ll know the difference.
There‘s various ways to proportion the braking, but it needs to be done.