
-
We've upgraded and reskinned the forum. Notice something off? Email us at [email protected] and we'll fix it.
You are using an out of date browser. It may not display this or other websites correctly.
You should upgrade or use an alternative browser.
You should upgrade or use an alternative browser.
V1 Escapepilot’s 06 SS/SC Ext Track Build - COMPLETED


escapepilot
Goblin Guru

- escapepilot Goblin Guru
IT'S ALIVE!
Not exactly smooth but at least the first hurdle is cleared.
Not exactly smooth but at least the first hurdle is cleared.
escapepilot
Goblin Guru
- escapepilot Goblin Guru
Never did find an obvious reason it blew two crank fuses. Thanks to everyone the offered advice. Something must have worked.
After a few more starts, it started to smooth out a lot. Idle is a little high at about 1100 and if I rev to about 4000 and hold for a few seconds then let off, it will sputter at idle and die. I think I saw a similar issue in another thread so time for more research.
Thanks to everyone that offered tips, advice, and encouragement to get this far.
After a few more starts, it started to smooth out a lot. Idle is a little high at about 1100 and if I rev to about 4000 and hold for a few seconds then let off, it will sputter at idle and die. I think I saw a similar issue in another thread so time for more research.
Thanks to everyone that offered tips, advice, and encouragement to get this far.
escapepilot
Goblin Guru
- escapepilot Goblin Guru
Over one hurdle and on to the next! Started cleaning the knuckles for the rear suspension and found a major crack on the passenger side. Those are not easy to find but did find a used one and it’s on the way.
EDIT - Pic added
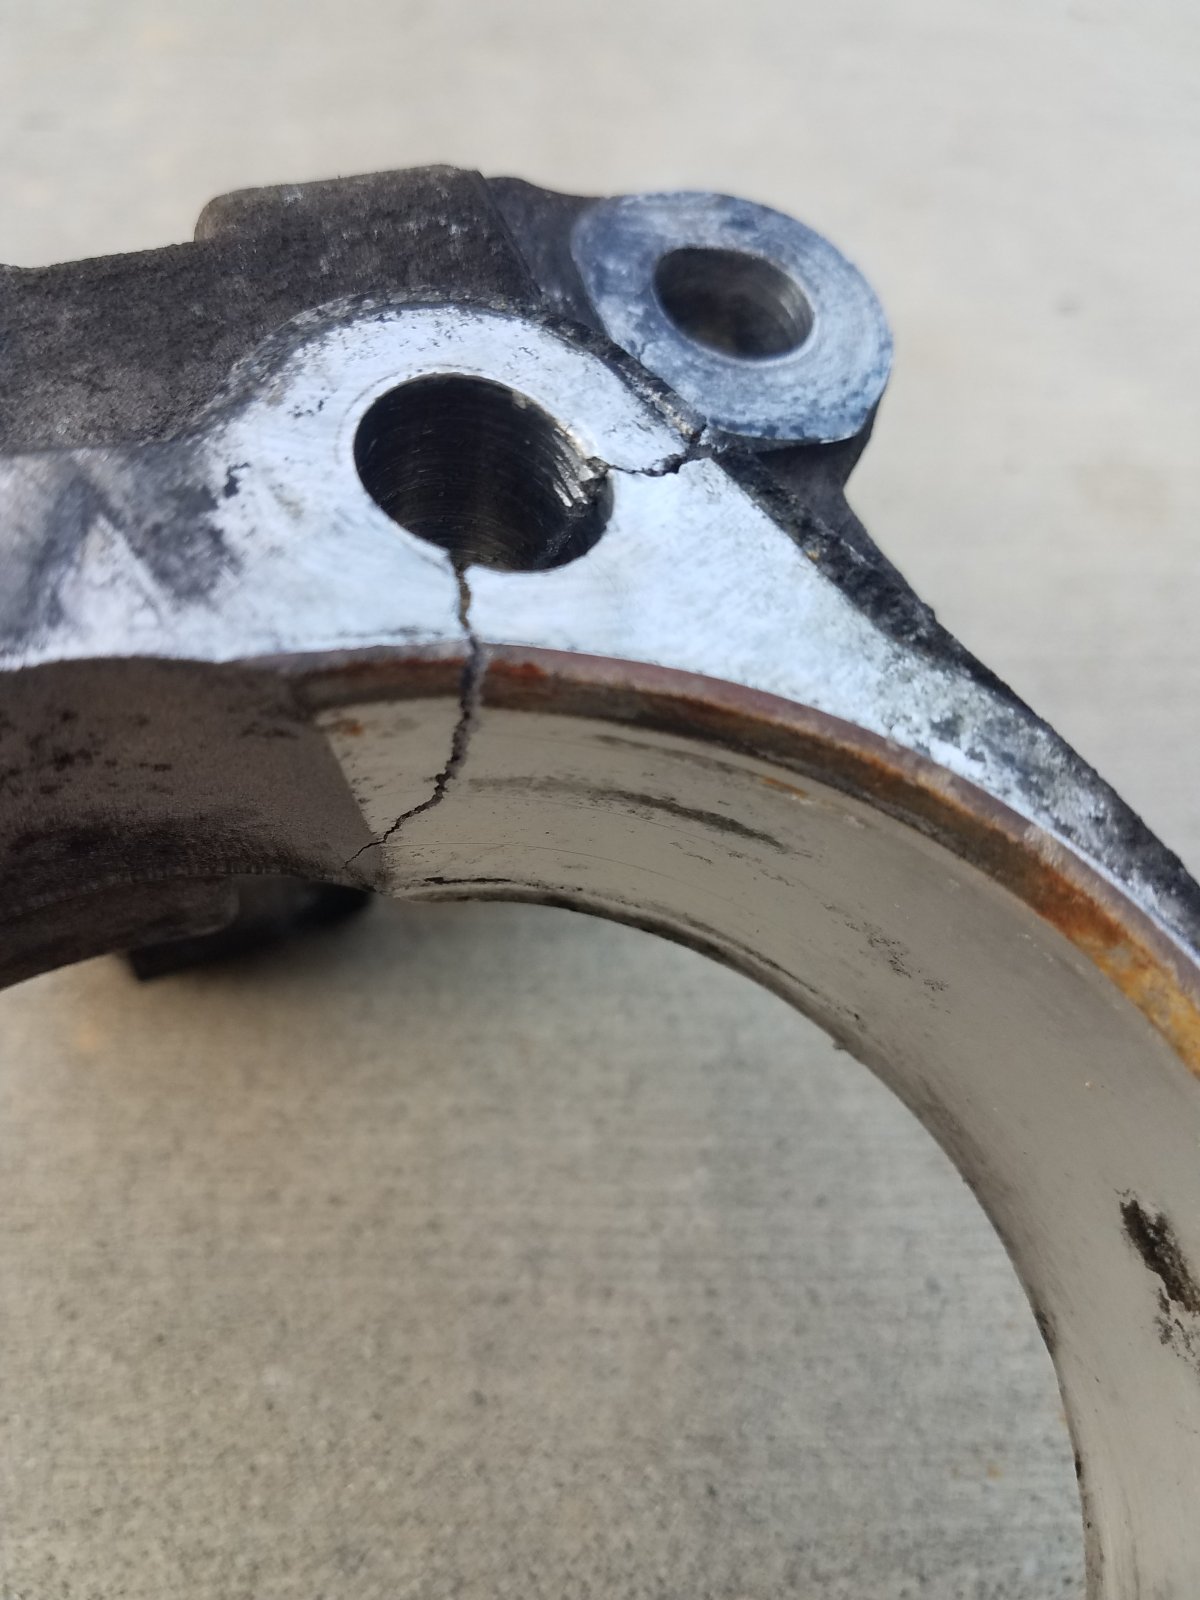
EDIT - Pic added
Last edited:


escapepilot
Goblin Guru
- escapepilot Goblin Guru
Got a few thing done since the last update. Firewall is installed…and that was much more trouble than I expected. Using a hand riveter didn’t help but I had trouble with alignment. If I ever do it over, I’ll enlarge the holes on the panel around the perimeter and on the top panel middle to allow room for slight movement.
I also made a lot of progress on the rear suspension. The brakes gave me fits. So the longer bolts hold the bracket to the knuckle and the short bolts hold the caliper. After seeing a few have issues with rotor clearance, I thought I got lucky when it looked almost perfect. When I torqued the lug nuts down to double check, it moved the rotor enough to make it very close on the inside. So take it all apart again and move a washer. Start installing the caliper bracket and…rubbing on the outside. So take it apart yet again and put it back like it was. I think I assembled that one side at least 5 times.
I also made a lot of progress on the rear suspension. The brakes gave me fits. So the longer bolts hold the bracket to the knuckle and the short bolts hold the caliper. After seeing a few have issues with rotor clearance, I thought I got lucky when it looked almost perfect. When I torqued the lug nuts down to double check, it moved the rotor enough to make it very close on the inside. So take it all apart again and move a washer. Start installing the caliper bracket and…rubbing on the outside. So take it apart yet again and put it back like it was. I think I assembled that one side at least 5 times.

Sluggonaut
Goblin Guru

- Sluggonaut Goblin Guru
When I torqued the lug nuts down to double check, it moved the rotor enough to make it very close on the inside. So take it all apart again and move a washer. Start installing the caliper bracket and…rubbing on the outside. So take it apart yet again and put it back like it was. I think I assembled that one side at least 5 times.
Tell me you built a Goblin without telling me you built a Goblin.
Initiation to the club is quite the journey. lol
escapepilot
Goblin Guru
- escapepilot Goblin Guru
I feel like Pete and RePete are helping me build this.Tell me you built a Goblin without telling me you built a Goblin.
Initiation to the club is quite the journey. lol

escapepilot
Goblin Guru
- escapepilot Goblin Guru
I’m at the point where there is no guidance other than those that have gone before…bless you all.
So, remaining to do (to help me keep track):
Install rear tires when they arrive
Torque axle nuts and lug nuts
Bleed clutch and brakes
Install battery hold down
Verify intercooler function
Verify engine cooling system full and secure overflow tank
Install steering wheel
Install seats
Install parking brake
Install headlights and taillights
Install instrument cluster buttons
Order boost gauge mount
Tune (seems rich and hunts for idle)
Alignment
Install hood, footwell cover, side panels, spoiler
Fabricate and install front splitter
This list seems a lot longer now that I see it in writing. And I’m sure there are things I’m forgetting. Although, if I can manage to have a smooth day without RePete showing up, I can knock out several items.
So, remaining to do (to help me keep track):
Install rear tires when they arrive
Torque axle nuts and lug nuts
Bleed clutch and brakes
Install battery hold down
Verify intercooler function
Verify engine cooling system full and secure overflow tank
Install steering wheel
Install seats
Install parking brake
Install headlights and taillights
Install instrument cluster buttons
Order boost gauge mount
Tune (seems rich and hunts for idle)
Alignment
Install hood, footwell cover, side panels, spoiler
Fabricate and install front splitter
This list seems a lot longer now that I see it in writing. And I’m sure there are things I’m forgetting. Although, if I can manage to have a smooth day without RePete showing up, I can knock out several items.

JBINTX
Goblin Guru

- JBINTX Goblin Guru
If that’s all you got left, you are 90% done!!!….I’m at the point where there is no guidance other than those that have gone before…bless you all.
So, remaining to do (to help me keep track):
Install rear tires when they arrive
Torque axle nuts and lug nuts
Bleed clutch and brakes
Install battery hold down
Verify intercooler function
Verify engine cooling system full and secure overflow tank
Install steering wheel
Install seats
Install parking brake
Install headlights and taillights
Install instrument cluster buttons
Order boost gauge mount
Tune (seems rich and hunts for idle)
Alignment
Install hood, footwell cover, side panels, spoiler
Fabricate and install front splitter
This list seems a lot longer now that I see it in writing. And I’m sure there are things I’m forgetting. Although, if I can manage to have a smooth day without RePete showing up, I can knock out several items.

escapepilot
Goblin Guru
- escapepilot Goblin Guru
Had some time after work so thought I’d tackle the intercooler pump issue. I made sure it ran before even putting the engine in but it didn’t seem to be moving fluid. I verified the wiring was correct but no movement so switched the wires anyway and as expected, no difference. So it looks like I have a bad impeller or a blockage somewhere. I guess the pump will be coming off.


escapepilot
Goblin Guru
- escapepilot Goblin Guru
Yes, standard or stock. I used the vacuum fill tool to hopefully eliminate air pockets but no change in performance.This is a “standard” pump isn’t it? A few of the higher end pumps have protection built in to keep them from running dry so an air pocket will cause it to not run. My Varimax pump on my Camaro is that way.

Robinjo
Goblin Guru

- Robinjo Goblin Guru
I'm in the same boat on my heat exchanger pump. No fluid movement, no vibration on the pump. My next step is to drain the fluid, remove the pump and try it with an external power source. I've been putting it off as I don't really want to drain the fluid again after fixing my coolant leaks. It has to get done, I'm just procrastinating.....
Last edited:
escapepilot
Goblin Guru
- escapepilot Goblin Guru
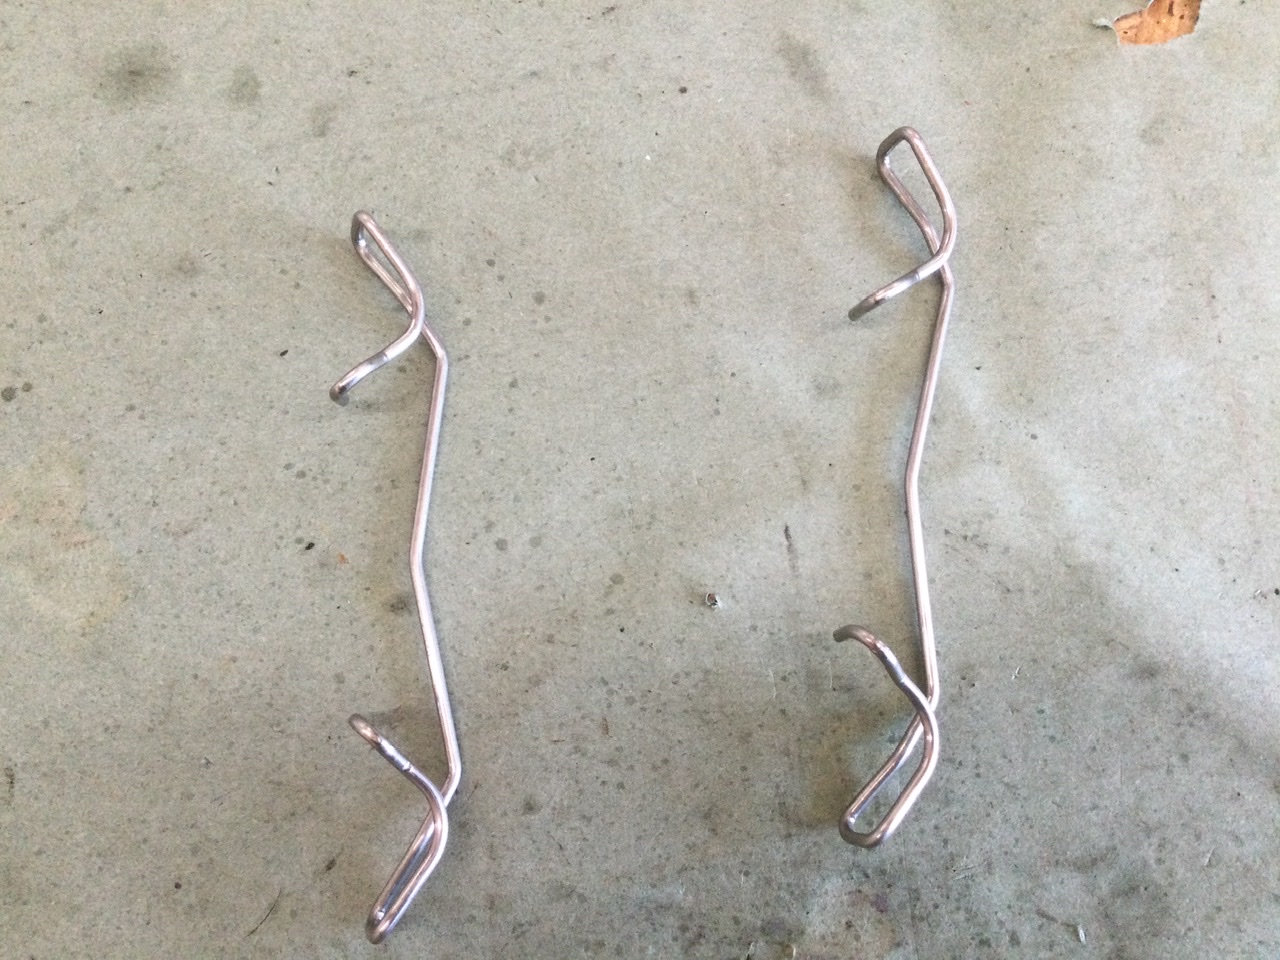
Where do these springs go and how do they fit? Pretty sure they are part of the rear brake assembly from DF, but don’t recall for sure.

k.rollin
Goblin Guru

- k.rollin Goblin Guru
Where do these springs go and how do they fit? Pretty sure they are part of the rear brake assembly from DF, but don’t recall for sure.
View attachment 35395
escapepilot
Goblin Guru
- escapepilot Goblin Guru
Thanks!
Done.
Now to get that BCM and kick plate mounted. I feel like I have more screws, bolts, and spacers than I need.
Last edited:
Similar threads

- Replies
- 68
- Views
- 4K

- Replies
- 168
- Views
- 19K

