Suddenly, the progress is coming fast now.
Thursday evening, I took the rear coilovers back off and spread some anti-seize in the big tubes at the bottom. Not a whole lot, that **** just gets everywhere. I also noticed a couple drips of something under the engine. UH OH!.... but no worries, I traced it up the side of the engine and discovered one of my brass NPT fittings on the turbo intercooler had a very slow leak. I tightened it just a little further, and no more drips since then.
Last night, I deciphered (I think) the Cobalt's cryptic CHMSL wiring. My cruise control should work once I finish the wiring up for my third brake light. For more on that, look
HERE.
Today, I drained the rest of the old transmission fluid (there was not much in there, kinda scary), and refilled it with fresh. It took exactly the two quarts it was supposed to take, so, cool.
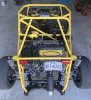
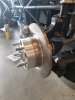
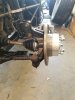
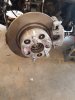
Since I received my parking brake hardware for my hybrid bastard of a car, as well as my back wheel spacers, I finished building the rear suspension. I wanted the car on all fours by the end of July, and I met that goal today, though I will obviously have to jack it up a few more times for things like brake pads, alignment, etc.
Can I get some feedback from the experts? Does this all look correct?
Driver's side:
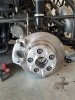
Passenger's side:
Next up:
- Finish the third brake light wiring (still waiting on a new control box for my wing, but it's coming)
- Cut my tunnel cover into three sections, de-burr the edges and touch up with my Ford metallic gray touch up paint
- Finish the gearshift/shifter cables
- Assemble the parking brake (the paint is drying on it now, forgot to paint it before)
- Bleed the brakes and clutch
- Finish cutting my engine cover to fit around the turbo intercooler and piping, and de-burr the edges
- Sand the hood and engine cover lightly with 220 grit sandpaper, lay out my pattern with painter's tape, and spray
- Find and buy 5-point harnesses, and mount them
- Drill the holes for the side panels, wrap them, and mount them
- Final check for leaks, finishing touches, push-button start, send the BCM off to Odo-Pro for zeroing, etc etc.
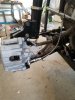
And finally, a a visual progress report. The wheels look mean as ****, pardon my language. (Don't mind the stupid-looking turbo loop fill neck, I will be tucking it away at some point)