Joebobs build log SS/NA Auto Extended City frame #270
- Thread starter Joebob
- Start date
Ark :D
Goblin Guru
Yep. Best to do it now while it's easy, I'd say. I did it after the fact, when I added headlights with integrated turn signals. I was not content with intentions to turn only signified by the mirror signals.Ahh, ok so if I have front headlights with a turn signal function, to also run the signal wires to the front also? Will do!
SmsDetroit
Goblin Guru
What brand are those headlights and are they a direct bolt on or did you have to make mountsYep. Best to do it now while it's easy, I'd say. I did it after the fact, when I added headlights with integrated turn signals. I was not content with intentions to turn only signified by the mirror signals.
Ark :D
Goblin Guru
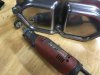
They are Amazon Specials (aka knockoffs). Tough in my mind to justify spending several hundreds on headlights, so I figured I'd give these a shot. Here's some links:
Headlights
Buckets
Additionally, I got a set of Mayor West's 3D-printed mounting rings and bits. You can either use an online 3D printer with the STL files in that post, or I believe West has offered to print them for people for a minor cost. They are 100% necessary though.
Thus far I must say, I am VERY happy with them.
Brett
Well-Known Member
I bought these from Aliexpress:
https://www.aliexpress.com/item/1005001315219926.html?spm=a2g0s.9042311.0.0.204f4c4d8CIYwy
Appears to be the same mode as ArkD. Took about 3 weeks to get here.
https://www.aliexpress.com/item/1005001315219926.html?spm=a2g0s.9042311.0.0.204f4c4d8CIYwy
Appears to be the same mode as ArkD. Took about 3 weeks to get here.
Joebob
Goblin Guru
A long overdue update. I have finished the wiring and boy was that a sticky mess. I hope it all works as a lot was not on the videos such as for Automatic transmission, the EVAP system, ACC outlets, seat heaters, and more that I kept. Fingers crossed.
I survived the Texas Polar freeze with only one burst pipe so we were lucky but still cleaning up all the dead landscaping and post apocalyptic mess around the place.
As it looks like they will be starting my frame soon (#270) I decided I needed to organize the garage and start cleaning and prepping parts. I am painting the steel parts black but started looking at what to do with the aluminum parts. The degreaser cleaned the lower control arms easily but etched the aluminum to a frost white. Me no like. With some wire brushes a drill and DA polisher, I think I made an improvement. What do you think?
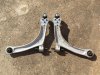
Control arm start
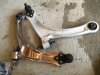
Half way done
Finished...on to polish something else.
Joe
I survived the Texas Polar freeze with only one burst pipe so we were lucky but still cleaning up all the dead landscaping and post apocalyptic mess around the place.
As it looks like they will be starting my frame soon (#270) I decided I needed to organize the garage and start cleaning and prepping parts. I am painting the steel parts black but started looking at what to do with the aluminum parts. The degreaser cleaned the lower control arms easily but etched the aluminum to a frost white. Me no like. With some wire brushes a drill and DA polisher, I think I made an improvement. What do you think?
Control arm start
Half way done
Finished...on to polish something else.
Joe
Northshoresaint
Active Member
That’s incredible! What is DA polishing?
Joebob
Goblin Guru
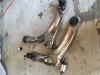
Over the last week I have started to clean and paint the hubs, subframe, brake pedal box, and other things. I pulled the ABS speed sensors from the "front" hubs, but are caps included in the kit or do I have to source my own?
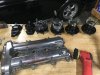
I have also started polishing the valve cover to make it "purdy". Not done yet but getting there.
I also decided to take off the exhaust heat shield and see how ugly the stock manifold was as everyone will be able to see it. Well, a bolt tumbled out and also noticed a large crack in the manifold. No noise when driving it as a Cobalt but have purchased the Amazon headers for $78 which looks to be the same as the Ebay ones selling for $60.
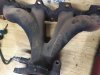
As lots of people complained that it hit the water pump crossover pipe, I figured Amazon will be much easier for returns than Ebay. Oh, and the "bolt" that fell out. It turned out to be one of the exhaust manifold studs. Cracked right off 1/8" into the block. Wasn't me, broke sometime earlier in it's life. I figure since the exhaust wasn't making noise and the aftermarket header is a large solid plate, I will see if it is a problem before creating a new one by trying to drill out hardened steel surrounded by soft aluminum. Super easy access once the Goblin is assembled.
Joe
I have also started polishing the valve cover to make it "purdy". Not done yet but getting there.
I also decided to take off the exhaust heat shield and see how ugly the stock manifold was as everyone will be able to see it. Well, a bolt tumbled out and also noticed a large crack in the manifold. No noise when driving it as a Cobalt but have purchased the Amazon headers for $78 which looks to be the same as the Ebay ones selling for $60.
As lots of people complained that it hit the water pump crossover pipe, I figured Amazon will be much easier for returns than Ebay. Oh, and the "bolt" that fell out. It turned out to be one of the exhaust manifold studs. Cracked right off 1/8" into the block. Wasn't me, broke sometime earlier in it's life. I figure since the exhaust wasn't making noise and the aftermarket header is a large solid plate, I will see if it is a problem before creating a new one by trying to drill out hardened steel surrounded by soft aluminum. Super easy access once the Goblin is assembled.
Joe
Joebob
Goblin Guru
I do have a little flux welder but the stud is broken inside the head. Unless the weld doesn't stick to aluminum, I am sure I would miss trying to weld a bolt to the end of the stud. All the manifold nuts spun off the studs with about 30 ft-lbs or so with no studs backing off. They are in there good. I will get more desperate once I have the engine running again and it leaks.
Joebob
Goblin Guru
Sounds like something scary to try...a bit latter.Weld won’t stick to aluminum, but the stud being broken in the head, will make that a lot more tricky.