Joebobs build log SS/NA Auto Extended City frame #270

Joebob

Goblin Guru
Long time no write.
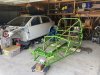
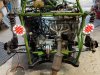
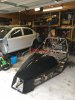
I have had a few weeks where I had all the prep work done for the donor parts and before my kit arrived. the great news is that last Friday I made it out to Red Oak and picked up my kit!!!
frame pick up.JPG
A friend of mine was going to come with me and use his truck but he had house issues and had to back out.
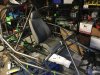
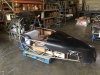
What worked out was I rented a flatbed truck from Home depot. Not the cheapest option but with unlimited miles, worked out well. With the 10 foot bed and the extended chassis, Adam and I can confirm that it fits sideways with literally 1/2" of space for the front nose with the frame contacting the other 3 sides.
kit packed.JPG
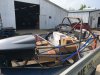
Getting it off the back of the truck was an adventure. I bought a winch to pull the hoses through but repurposed it to lift the frame off the back of the truck. I built a frame for the winch to span several attic joists and drilled a hole in the attic floor to lower the hook through. I backed the truck unto the garage as far as it would go and roped the frame to the hook. Cranked it up, drove the truck out, and lowered it to the ground safely while the wife kept it from swinging. Went very smooth.
kit home.JPG
Driving there and back of over 500 miles was exhausting and got the frame unloaded and the truck returned to Home Depot 5 minutes before they closed for the day. Super win.

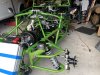
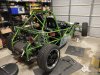
My fist thought...."Gosh it is so small!!"

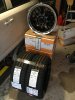
With my order I got a couple of options and upgrades:

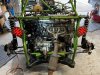
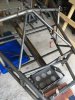
As I have an automatic transmission and no clutch bracket, I got the Goblin AT diagonal frame braces. This should strengthen and increase torsional rigidity in the frame. I also got the thicker aluminum floor from the AT as well, since we are so low to the ground and I plan to mostly street drive the goblin, I wanted a bit stronger floor for road debris intrusion protection. No pictures as it looks like the regular floor.
brace front.JPGbrace top.JPG
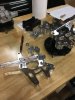
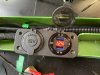
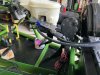
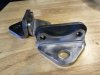
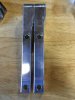
Also upgraded is the thicker lower upright brackets where you can see the increase in thickness as well as material around the bolt holes. This should keep the Goblin tracking straight incase I hit a pothole or something. Cheaper than a new alignment.
HD lower bracket.JPG
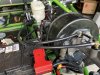
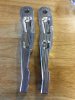
Rounding out the front steering parts is the HD steering arms. Here they are next to the stock arms. They are a little bit thicker and wider and not as deep scallops, and I LOVE the machining on them. Just a piece of mind part as it is available.
HD steering top.JPGHD steering side.JPG
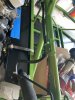
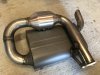
Lastly is the Catted exhaust. As a Texas Goblin with new rules of dubious enforcement, I will set up to be full emission compliant. So rather than figuring out how to make a catted exhaust, DF fabbed me up one.
catted exhaust.JPG
Next step is to find out where to get the frame powder coated and figure out if I need to change anything on the frame to attach Lexan side panels.

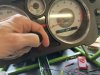
I do have one question from the recent kit deliveries: I see that the calipers are silver coated instead of raw cast iron. Do these need to be painted to prevent rusting or do they hold up on their own?
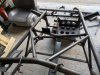
The build starts!!

Joe
 

Ark :D

Goblin Guru
I always get jealous of you guys who get to visit and tour the DF facilities. One of these days, I'll find my way out there to see the heart of it all.
 

Joebob

Goblin Guru
Well the idea has been to use as much off the cobalt as possible but list most things for sale incase someone wanted to pay a great price for used parts. Made some pretty good money so far with some potential to make a bit more. With TTL and shipping I paid $1750 for the cobalt. It was a lot but was in great shape. So far I have sold $1400 worth or parts and I still have the California rated cats to offload. From selling parts I "had" to upgrade to the BC rear coil overs and buy new wheels and tires but the car will be much better for it. I will echo most peoples complaints on the fickleness of the average person responding on Facebook. I will echo that all people that have actually shown up have been really cool and a pleasure to help keep their cars on the road. I offer fair prices for parts and usually throw a bunch of extras in for free or just a few bucks as I hate throwing away good parts like stock speaker, wipers, switches and such. I am hoping to sell a few more parts as my goal now is to break even on the donor, while keeping all the Goblin bits.

In the mean time, my new wheels and tires showed up today.

wheels and tires.jpgIMG-0530 wheel 1.JPG
The are Petrol P4C wheels. Not the most expensive and not the lightest but better than stock looks and grip with the 235/45R17 summer tires as well.

Basically I
 

Joebob

Goblin Guru
Basically I have been test fitting parts, painting steel and making aluminum shiny. Me love shiny metal.
shiny.JPG

When not doing that, I have been working on parking brake placement and thinking in my Vroom vroom chair.
vroom.JPG

Still working if I need to weld any tabs in for side panels and if I want any changes before I send it off to get painted.

Joe
 

Joebob

Goblin Guru
Long overdue update. Frame is powdercoated! Decided like @TheDon to go with Illusion sour apple.
IMG_0648.jpg

I don't own a truck or a trailer so what worked for me was to take some Harbor Fright dolly wheels and mount them to some of that prime 2x4s that shipped with the kit and make a dolly. With the wheels spaced just inside of 24", I could roll the frame in and out of a U-Haul truck myself. The dolly bolts through the seat mounts and stayed as the rear support for mobility.
25237

One thing that I did was buy or use donor sacrificial bolts to fill all the threaded holes, protecting them from blast media and powder. A quick crack of the powder coating and all the threads are ready to use. I did this for the frame and the A-arms.

I bought a 13" 3-in-1 rivet/rivnut tool from amazon that made rivets so easy my 11 son could do it. I think I had to use a conventional tool for some of the bulkhead rivets as the easy tool opens very wide.
25233


I did but rivnuts on the bottom of the bulkheak, in case I wanted to extend the floor under the radiator, I would have a good rear attachment points.

One thing I missed and regret is to drill or add rivnuts to the 1" square tube where the toe plate bolts to over the BCM. With the floor in place, there is little room to drill or use tools there. Hopefully the next guy will catch that.

While flipped over for the floors, I also ran the radiator hose. I followed the weed-whacker line and paint roller method to swab the bores. I had bought 2 spray bottles of Tire Wet, thinking I needed a lot to lube for the hose, but ended up using about 1/3 of one bottle. Just buy one bottle and if anyone in Houston needs some, come on by.

I used a cheap Harbor Freight boat winch and some nylon strap to pull the hose through . Some Tire Wet, lots of zip ties and my son on the dirty side, it went super easy. Houston summer heat to warm the hose probably helped too.
25234


Flipped back over, I started following the videos and everything is going smoothly. I had to shave the bulkhead for the steering U-joint as most people need to do. As Texas is threatening to be emission compliant, I welded a bracket prior to powder coating to mount my EVAP canister next to the fuel tank. It fits nicely and only have to shift the tank over about an inch to fit. A bolted top plate keeps it from flying out.

25235
25240


Using the same boat winch that I pulled the hoses through and reloaded with the steel wire rope, I used it to lift the rear of the frame up to install the engine. I was up in the attic while the wife guided it and called out directions.

25236


I have the auto transmission so I installed in the forward set of holes and used the auto tranny spacers on the driver side. Oh you can also see the Transmission cooling loop I made by bending some 3/8" aluminum fuel line into a 180 degree bend and secured with hose clamps. I thought their could be clearance issues so I cut the hoses a bit short. I would have left them about an inch longer if had to do over again.
25238
25239


My donor's accident broke both the bottom and the side tabs for mounting the fuse box, so a quick Ebay purchase should get me back on track with connecting the wiring. I am hoping for a first start in the next two weeks and loving the build and bolting stuff onto the frame.

Joe
 

Brett

Well-Known Member
Looking great. On the ignition switch, you can cut off the circle mount with a grinder. The casting is extremely hard.
 

Joebob

Goblin Guru
Had my first start yesterday. Sorry no cool video. Last thing I needed was to connect the EVAP system to the tank and engine to get all connected. I used all the stock connections so not the cleanest routing but can clean up once everything is stable. Didn’t want too many variables if had problems.
8A8376E5-9D1A-4B11-84D9-C659BECEE256.jpeg5D947CF4-CB93-4FBF-8CAD-198B625D0D8C.jpeg25EB186A-0A3E-4ED3-8670-82A7579CD54C.jpeg
I didn’t want to jump the fuel pump so I cycled the fuel pump and bleed air out of the fuel line. It took more than a dozen starts and I started getting nervous that it would start, run for a second, then die. Keep bleeding and keep trying and finally ran continuously. Still have to bleed the air out of the coolant loop but wanted to start bolting more stuff up.
I have to switch the coil overs to the other sides and start the wiring of all the lights.
Joe
782AE51B-5F76-4536-B962-8F3FD3BA8889.jpeg
 

Joebob

Goblin Guru
Made some progress despite the stifling heat here in Houston. Got the lighting complete. Headlights, mirrors, taillights, license plate light, and third brake light (not shown).
IMG_0869.jpg IMG_0873.jpg

One thing that tripped me up is that for the Automatic transmission people (all 2 or 3 of us), the reverse lights don't come on from the gear selector, but from the transmission itself, so without the engine on, push the shift cable in one detent and the reverse lights come on.
IMG_0878.jpg

Like many people other people, I put in a USB charger and ACC port to put into the tunnel cover, I used the stock ACC plug wiring and found out that they are hot all the time. I had to change the USB charger and volt meter to one that has an ON/OFF switch to keep the battery from draining. I don't have the heat exchanger pipes running in the tunnel so it fits in front of the gear selector, but I have to plug anything I want before putting on the harness as I am sure I will not be able to reach while buckled in.

IMG_0877.jpg

Way back when before doing the harness thinning back in December, I read that there was some complaints that the car would stay electrically active for 15 minutes as there was no open door switch to tell the BCM to shut off. To remedy that, I kept, the driver door ajar circuit intact and wired it to a momentary closed switch. I still need to work out on mounting it, a parking brake light, and my seat heater switches, but it seems to work.

IMG_0875.jpg

I didn't care for the angled elbows provided by DF for the brake reservoir to the MC and the resulting roller coaster of hose elevation, so I changed to straight 90 degree elbows. I think it is a cleaner look and helps bleeding brakes easier.

IMG_0867.jpg IMG_0868.jpg

Tasks at hand is to complete a draft alignment at assumed drive height, button up the wiring and complete the tunnel, and start bolting on the brakes.

I do need to make a trip to DF in the coming weeks to switch out a few things and then she will be on the ground.

Joe
 

Joebob

Goblin Guru
Well I just had a oh crap moment. Better now than later I guess. All the discussion on wheels rubbing on the control arms got me worried so I got a wheel out of storage and with the brakes mocked up, I tested my clearance and thought I was safe.

Joe's wheel clearance check

It turns out that with my thicker HD lower brackets, they were hitting the lower helm jam nuts stopping the steering just before the end of the rack capability. After seeing someone's AT build log, DF provides an aluminum spacer to raise the upright to clear. I used a 5/8" grade 8 washer under the lower bracket which seems to do the trick even at full extension.

26295


I thought I was in the clear and that was the end of my issues, I would get the SS rack steering spacers and keep the wheels off the control arms. I went to test fit the wheel back on the hub and noticed that it didn't take much to tighten the lug nuts on the hub. I counted the turns to take off the lug nut and was only 3 turns!. Less than a 1/4" engagement. Well that won't do. As you can see in the picture above, the stock hubs had seen significant length of thread engagement. So I looked at my new aftermarket wheels that were said to fit.

26296


As you can see there is significant thickness under the conical surface to the back mounting side. It is about 1/2" which is great for strength but didn't leave enough stock thread engagement. My options that I can see are to either pound out all the stock studs and set new, longer ones, or buy spacers such as these to "reset" the stud length sans rotor thickness.

wheel spacers

The good news is that the 1/8" stud protruding past the spacer should not hit the wheel and the extra inch should allow the wheel to not hit the control arm at full lock without the steering restrictors.

Moral of the story is to check all your threaded engagement lengths for wheel studs, tie rod ends, basically anything that is hidden to make sure you have the strength you need.

I know there was a lot of discussion on front tie rod engagement. Keep in mind that an alignment shop will rotate the inner tie rod to change toe and will not be looking for the rack being centered or the tie rods having maximum engagement. If the inner helms and outer helm are each threaded out 1/4", you have taken away 1/2" of tie rod thread engagement.

I hope my discovery helps and or protects someone else.

Joe
 

Gtstorey

Goblin Guru
What style lug nuts are you using. I swapped to the extended length style lug nuts on mine for more thread engagement.
 

Joebob

Goblin Guru
What style lug nuts are you using. I swapped to the extended length style lug nuts on mine for more thread engagement.
IMG_0710.jpg


They are extended length but my issue is that the stud does not extend enough out past the conical seat of the wheels to grab enough thread to be safe.

Joe
 

Gtstorey

Goblin Guru
If you are getting at least 3 full turns these would put you right at the minimum recommended of engagement of 1XDiameter (12mm).
.31"=7.87mm plus 1.5mmx3turns equals 12.34mm. There may be even longer ones available.
 

Joebob

Goblin Guru
If you are getting at least 3 full turns these would put you right at the minimum recommended of engagement of 1XDiameter (12mm).
.31"=7.87mm plus 1.5mmx3turns equals 12.34mm. There may be even longer ones available.
I just measured and have an opening for .613 so it looks like they should work and torquing down the nuts yields closer to 4 turns so I will be golden. Learn something new every day.

Thanks,

Joe
 

Joebob

Goblin Guru
I went to visit DF a couple of weeks ago to pick up some brake parts and a windshield. I was going to design my own but driving season is ending soon and I am impatient.
0349F674-CE52-460B-BD10-ED3D53728540.jpeg
Got the wheels mounted up and set up to bleed the brakes. I vacuum bled them a few times. Felt like no brakes at all. Saw the driver caliper stay loose after pumping the brakes. Looked like the dry seals were stuck in the notes so the piston would rock back and forth and not close the gap to the rotor. Removed the caliper and stroked it back and forth a few times and helped firm up the pedal. Got it off the Jack stands and checked that the brakes worked and…

7CD9526B-363B-4AB1-8B8B-0FF318B286E0.jpeg
It drives. The pads do need to bed to the rotors to firm up and I did have one leak but it feels better the more I drive it. Kept the speed low and avoided all intrepids. I still am working on the alignment, side panels, hood and windshield so have plenty to do but nice to have on the ground.
Joe
 
Top