Not an actual corgi's Build Log - 2007 SS/SC

Corgithulhu

Well-Known Member
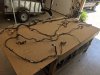
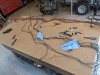
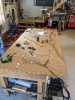
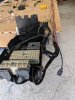
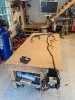
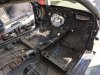
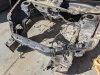
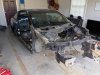
More updates: the donor is only down to the fuel tank and maybe some odds and ends I missed, but I don't think there is anything since I stayed faithful to the video progression. I tried to get that done tonight, but I got my second vaccine shot yesterday, and that made my arm all gammy and I was just generally out of gas today. This weekend is going to be taking the wiring harness to my dad's garage and we're both going to spend the weekend thinning and tidying it up. Will definitely post pictures of that process.

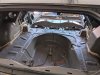
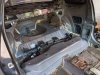
Once I get the shell out, I'll take inventory of what parts are getting kept vs. what needs to go. I printed out Adam's checklist from a few years ago, and took extra notes based on various threads on this forum to grab extra things that may not be on that list (like the manual shifter clips).
 

Rauq

Goblin Guru
Definitely keep the shifter clips but I believe all the new kits come with their rod-end hardware for the shifter. I tossed my shifter clips based on the advice of a builder from a period where they were supplied; I believe they've been through three phases now, one where a set of replacement components were provided, then one where they weren't (me!), then the current where they are supplied. But if you keep them and they're not needed, you're better off than tossing them and needing them.

Parking brake cables and guide tubes are one of the most frequently forgotten items, make sure you grab those. You're welcome to post pictures of your shell and see if any of our eagle-eyed friends can point out anything else.
 

Corgithulhu

Well-Known Member
I actually kept my shifter and cables in one piece, so the cables and clips are still attached to the handle. I just disconnected them from the transmission and pulled the cables through the firewall with the shifter.

I posted a few pictures of as it sits right now. If anyone sees anything I missed, let me know!
 

Attachments

Corgithulhu

Well-Known Member
Official last picture of the donor! Unless any of you eagle eyed folk spot a part I missed on the above pictures, I'll start calling to have to hauled away next week. Alexa, play Angel by Sarah MacLachlan.
 

Attachments

Desert Sasqwatch

Goblin Guru
Keep the rubber brake lines and clips that connect them at the fenderwell. Salvage the evap lines and canister, someone on the forum may need one that they didn't keep. Good way to help out your fellow builders.:)
 

Corgithulhu

Well-Known Member
Well the wiring harness is done! And by done, I mean I screwed up by labeling the wiper/TS switches backwards and not picking that up in the videos. I chalk that up to us rushing so I could leave before dark to drive home last night (I live a couple hours from my parents' house where we did this) and not bringing the stalk switches up with me to do this. The result of this is that I'm 99% certain I kept the now-useless wiper switch connector and cut out the turn signal/headlight switch. I think my short-term plan is to just wire those two things external to the wiring harness to some switches I mount on the dash somewhere.

Everything else on the harness went pretty much exactly how Lonny worked it up in the videos. I'm confident I'll have a car that can start and run and drive around based on the wiring. All in all, we spent about 20 hours as a two man team thinning the harness. Our method was to play a step in a video, pause, do it, clarify and move to the next step. I'm still bummed I got that TS switch so wrong. The saving grace (maybe?) is that we recognized the BtD harness pink/white low beam wire was missing, so we just extended the fuse block side out to the end of the tape that goes to the steering wheel area and put the printed out label on the end to identify. Would I be able to use that with my own third party switch? I suspect that wire sends 12v to a relay that turns the headlights on, correct?
 

Attachments

Corgithulhu

Well-Known Member
I kept every single connector, and I know they're still taped together in the box of connectors, so I probably could wire them back in. Thanks!
 

Corgithulhu

Well-Known Member
The donor shell is gone! Got taken to a local scrap yard, and got 80 bucks for it! Now to inventory and sell off the valuable parts, and work on cleaning the parts I need to keep. I'm not going full show-quality clean like others, just enough to be presentable and not look grimey.
 

Attachments

Corgithulhu

Well-Known Member
Hey guess what landed in my garage!

The driver Mark was such a nice guy, and that cool crane made it so easy to plop in my bed to take the last mile home. I live in a pretty tight neighborhood, and he was able to meet me at a nearby parking lot.

We have been very impressed with the kit so far, and even shot a light coat of primer on once we got it unpacked and wiped down. Can't wait to get in deeper.

25853

25854

25855


One question about received parts: I got the two hoses in the picture below. Their part numbers aren't explicitly called out in the box that has most of the hardware and some other radiator hoses/parts. I also have two radiator hoses not accounted for on that list of items - S12D / Radiator Hose 71796, and S12G / Radiator Hose 86050. Are these hoses the right ones for those two line items?

25856
 

MJP61

Well-Known Member
Hey guess what landed in my garage!

The driver Mark was such a nice guy, and that cool crane made it so easy to plop in my bed to take the last mile home. I live in a pretty tight neighborhood, and he was able to meet me at a nearby parking lot.

We have been very impressed with the kit so far, and even shot a light coat of primer on once we got it unpacked and wiped down. Can't wait to get in deeper.

View attachment 25853
View attachment 25854
View attachment 25855

One question about received parts: I got the two hoses in the picture below. Their part numbers aren't explicitly called out in the box that has most of the hardware and some other radiator hoses/parts. I also have two radiator hoses not accounted for on that list of items - S12D / Radiator Hose 71796, and S12G / Radiator Hose 86050. Are these hoses the right ones for those two line items?

View attachment 25856
I had the same thing shipped to me. The 71796 is now 22271 and 86050 is now 18701, As per Adam. The 18701 is for bypass on back of thermostat housing.
 

Corgithulhu

Well-Known Member
Awesome, thanks for confirming! I had a strong suspicion that was the case since it made sense, and looked familiar to the videos I've seen.
 

Corgithulhu

Well-Known Member
Well....it's purple now!

26049


26048


Please don't judge the hideous work area lol. If I had to start over, I'd strongly consider just having it powder coated. Trying to dial an HVLP gun to not overspray 2/3s of your paint and also get every nook and cranny is insane. Every time I look at it, I see a small spot I missed. Oh well, the hard part is over - now on to the fun part of the build!
 

Corgithulhu

Well-Known Member
I don't know, yours is really clean. Up close to mine, you can definitely tell that some bum who thinks he's better with a spray gun than he really is did the paint. But for real thank you! I am still loving this color.

This weekend should begin the actual assembly!
 

Corgithulhu

Well-Known Member
I think this paintjob is more like a fine wine. It needs some age to really be its best. It is much like a ripe grape right now - lumpy, purple, and tastes weirdly good. But after some miles, it should wear in nicely.
 

Rauq

Goblin Guru
Plus you'll probably have an easier time touching it up than us powdercoated folks. Your dents and dings may sting but at least you can fix them!
 
Top