SACTX - Track - 07 SS/SC - Chassis #201

SACTX

Well-Known Member
Update time.

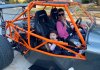
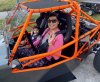
Time to call my build complete. It is as I envisioned at the start. I have some small things and some upgrades coming.

Not a huge amount of changes...

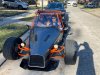
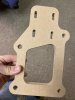
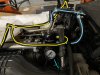
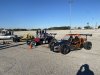
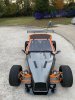
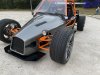
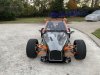
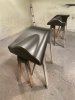
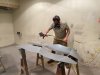
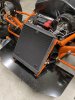
I made a full front bottom plate and splitter from 6mm alumalite. There is a duct on the bottom for the intercooler air. I also made some floor extensions to stick out the side of the car to help airflow.

There are two vents (2 3/4 x 12) that allow the air that comes in to the front to go out over the top of the hood rather than under the car .

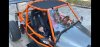
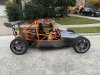
I also completely sealed the foot wheel cover. The only hole that is left unsealed is the hole for the steering.

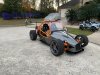
I put some Noice 150 mil Sound insulation on the floorboard and covered it in grip tape to help getting in and out of the car as well as keeping your feet where you want them. The stock paint was pretty slippery.

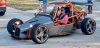
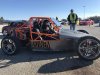
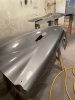
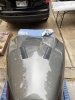
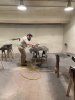
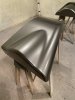
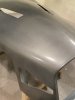
My business partner and I painted the hood and side panels a Hyundai titanium silver. It’s an awesome color. It changes shade depending on the light in the direction that you look at the panel.

A word of caution, be very careful around your radiator when the body is off of it. I dropped a tool while I was doing some work in the backyard and punctured my radiator. I just happened to have the hood off to prep it for paint when that happened. I now have a cover to put over the radiator when I take the hood off.

More to come.
 

Attachments

Last edited:

SACTX

Well-Known Member
Pulled post from the Finished Goblin Picture thread.

I’ve updated the first post with all of my final build info and any changes that I made to the kit or custom things I’ve done. I’m going to post some more in depth info on some things and link them on that first post.

Thank you to everyone here for the help and support. As I said in my previous first post, the support in this forum and from Lonny and Adam were the deciding factor in me deciding to go down this exact road.

Thank you all again and there will be more to come!
 

SACTX

Well-Known Member
Momma and Baby Girl got to take the car for a spin and Gris and I gave a couple of the neighbors rides this weekend. We absolutely love the car. Gris joked about building her one and she even has colors picked out....May not be a joke if she drives it much more :)


On the build continuation side, I'm getting ready to swap the supercharger to the TVS and start the major power upgrades. I'm also working on changing up the rearend alignment as well. More to come on this.
 

Attachments

Last edited:

SACTX

Well-Known Member
A couple people have asked about them so I've decided to share the details of my splitters.

The front splitter sits about 3" out from the furthest projection of the hood. It's about 1 1/2" to 2" into the footwell and the side splitters butt to it. The sides are adjustable in and out but mine sit about 6" outside of the frame at the back and about 3" in the front angled section. They can be extended back up to 14 1/2" and miss the rear wheels. I might make some extended ones to try out but I'm happy with them now.

I installed the front splitter with self-tappers up into the frame members (not the rails with the coolant lines :D ) and stainless steel sexbolts (https://www.mcmaster.com/99637A301/) through the floor. There are some bolts and stuff to contend with. I drilled two holes at the front for access to the hood bolts and created recesses where the radiator mount bolts and floor pan rivets hit.

The side splitters are attached with 3M Double Stick VHB Tape and more sexbolts (8 to be exact). I used a 3" hole saw to cut out for the seat mounts and recessed any spot that there was a screw or rivet head in contact. They are very solid. Alan uses them as steps to get in the car and he is up to 48lbs now.

The front is angled down about 1 degree and the sides are about 2 degrees (following the rake on the bottom) because of the different mounting points and stuff to go around.

If you don't want the front "wings", just run it forward at the angle and it'll follow the frame rails out of the front of the car. It will be recessed back from the sides of the hood.
 

Attachments

Goblin Graber

Well-Known Member
When you swap to the TVS can you measure the clearance between the blower and fuel tank on both of them? I might want to switch to a TVS with the new motor I’m going to build and with an automatic the M62 is already really close to the tank.

edit-I went back and looked and it’s the intake that’s super close not the blower. Should fit no problem
 
Last edited:

SACTX

Well-Known Member
When you swap to the TVS can you measure the clearance between the blower and fuel tank on both of them? I might want to switch to a TVS with the new motor I’m going to build and with an automatic the M62 is already really close to the tank.

edit-I went back and looked and it’s the intake that’s super close not the blower. Should fit no problem
Sure. I think it'll be above the tank. I also have a 1/4" phenolic spacer between the manifold/intercooler and the head. It made the intercooler lines VERY tight.
 

Goblin Graber

Well-Known Member
Sure. I think it'll be above the tank. I also have a 1/4" phenolic spacer between the manifold/intercooler and the head. It made the intercooler lines VERY tight.
I’ve got the same spacer on mine and with the automatic mounting the engine farther forward there’s no way around putting a 90° fitting in for the lower hose.
 

SACTX

Well-Known Member
A quick update. A toy to tinker with always gets tinkered with :)

I am taking apart the valvetrain and installing stage 2 cams, 82lb springs, and titanium retainers from ZZP. Going with this will be an ATI overdrive damper.

I've got the TVS installed with a 2.9 pully. It fits pretty easily. The Allen head screws were hard put in because of my expansion tank. Without that, it would have been easier.

The Bosh 60's are in and the Boost regulated fuel pressure regulator will be going in this weekend. I'm running supply lines to the original supply line and also feeding the other side of the FPR (I didn't know it was a flow-thru until I received it). It's OTTP's kit and it's very easy to install. Fuel will be supplied to both ends of the rail and will be funneled back through the valve to the return port on the fuel pump.

I replaced the Timing chain bolts yesterday, quick and easy as well.

The last little project is upgrading the shifter. The new base was cutout today and I'll look at trying to mount it in the next week or so.

After the top end is done and it's running, I'll be dropping the transmission to trace down the leak that hasn't stopped and I have no idea where it's coming from. Keep your fingers crossed on this one.
 

Attachments

Rauq

Goblin Guru
I'm curious to see this fuel system setup. I've seen adapters for sale that are supposed to replace the cap at the dead end of the fuel rail with a fitting. I'm wondering if that's part of the idea here.
 

SACTX

Well-Known Member
I'm curious to see this fuel system setup. I've seen adapters for sale that are supposed to replace the cap at the dead end of the fuel rail with a fitting. I'm wondering if that's part of the idea here.
That is exactly how their system works. The FPR they use has two ports. They flow across the relief valve so it'll flow from the side opposite the rail into the other end of the rail rather than be capped. Looking at the cut of the regulator, it looked like each side was independent but they are connected. I ordered some AN-6 fittings to connect to it and I'll tee the fuel supply line right before the stock fuel rail supply line connection.
 

SACTX

Well-Known Member
I'm curious to see this fuel system setup. I've seen adapters for sale that are supposed to replace the cap at the dead end of the fuel rail with a fitting. I'm wondering if that's part of the idea here.
This is the set up. I obviously have not started the car yet but it all came together like I planned.
Light blue is fuel and it feeds both sides of the fuel rail as set up.
Yellow is manifold pressure/vacuum line.
I need to connect the bottom return line to the return port on pump after removing the pressure regulator in the pump. I'll be doing that tonight or this weekend.
 

Attachments

SACTX

Well-Known Member
First Autocross in the books. I had a blast and was mostly successful in achieving my goals.

I went with my street set up but stiffened up the dampers a bit. It was good to push the car hard how I normally drive it on the road. I felt the limits without getting crazy on the road. I can say with 100% certainty that it would be hard to get to those points on public roads.

This car is insane.

Videos to follow.
 

Attachments

Last edited:
Top