Sluggonaut's Extended Track #364 - 2007 SS/SC (Turbo) Donor

Sluggonaut

Goblin Guru
Day 6
Work Time: 2 hours
Completed: Finished Video 5, Started Videos 6 & 7


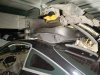
I had an extra set of hands today so I made sure to finish up the rest of Video 5 so I could get the dash pulled when my son stopped by. Definitely a job for 2 people. The steering shaft wouldn't collapse so that was a little annoying but still not too bad.

With the snow upon us and the temps getting pretty low, my son convinced me to bring the dash home to work on inside. We loaded the dash and I started into Video 6 while still at the shed. I found 2 10mm nuts to remove to get the subwoofer out, but that's as far as I got before getting cold and headed home. I started into the dash for a little bit before calling it a night. It will be nice to have the dash at home to work on as I find time here and there.

I received my wiring kit yesterday and will be getting my table set up in the next day or so. I hope to have the harness out the next time I'm at the shed so I can get cracking on the wiring harness.
 

Sluggonaut

Goblin Guru
Day 7
Work Time: 1.5 hours
Completed: Video 7 (minus clutch removal)


Video 6 is still in pause mode as I work on the dash at home. I was able to get through Video 7 pretty quickly and stopped with just the clutch assembly left to remove. I removed some nuts, wiggled some stuff, then called it a night.

I got a preview of what 14-year-old electrical tape feels like and not looking forward to the start of the wiring harness later this week or next week.

I hope to get back up to the shed to finish Video 6 soon. I left off with the subwoofer - I removed 2 bolts and will need better lighting and crawl in the trunk to see how many other bolts need to come out. Once I get the sub removed I should be able to finish Video 6 in short order. That is all that is between me and starting the wiring harness.

Not many photos for these last 2 sessions, but progress is being made. Progress from the trunk:
28740


Parts piling up:
28742


Dash transported home to finish Video 7 indoors:
28743
 

Attachments

Sluggonaut

Goblin Guru
I had 2 issues when disassembling the dash:

1. Clutch Pedal Removal: Searched the forum and found my answer. I hope to have this removed tonight.

2. Dimmer Switch: When I popped the trim piece with the dimmer knob, there was nothing attached behind it. This reminded me that when my donor was assembled, I originally thought the cluster was bad because I couldn't see the DIC info. Further checking revealed it was working but just really dim making it nearly impossible to see except in the dark. I now know why turning the dimmer knob had no effect. lol

I'll have to recheck my dash wiring harness, but I didn't see any extra unlabeled connectors. so I am not sure where the dimmer switch wiring went.

Does anyone have a picture of what the dimmer switch wiring/connector looks like?
 

Rttoys

Goblin Guru
When you rework the wiring harness, you’ll tie the wires together so the dash lights are always on full. This eliminates that switch, less you just want to use it, then you’ll have to find a place for it. To be honest, unless it’s night time, you can’t see the DIC anyways.
 

Sluggonaut

Goblin Guru
I found the wires. The fog lights were pulled and used for the boost gauge's power and the back half of the dimmer switch either fell off or was removed for some reason and was just dangling somewhere in the dash.

Neither of these were plugged in when I popped it off the dash:
28763


I knew this wire had been pulled from somewhere when I removed the A-pillar gauges and it's definitely the fog light switch connector:
28764


Untangling the mess revealed the back half of the dimmer switch still plugged in:
28765
 

Sluggonaut

Goblin Guru
Day 8
Work Time: 3 hours
Completed: Clutch Removal & Video 6, Started Wire Harness Videos


After reading some nifty advice on the forum I was able to get the clutch off pretty easily to officially call the dash video complete. I hauled the dash carcass back to storage and finished up Video 6. This means I finally have my wiring harness out and back home on the board ready to start the harness video series journey.

And so it begins...

28802


How hard can it be? It's just under a dozen videos and they are all less than 10 minutes, right?

Lonny: Start by using wire cutters to snip all of the plastic wire ties.

Me: Easy, got them right here *pauses video*

28803


Lonny: Use a sharp knife to remove the tape and plastic wire loom.

Me: Easy peasy *pauses video*

28804


Me: Dang, my back hurts, who built this table so low?

28805


Me: This tape is magical. Some of it is knife-proof and the rest is sticky everywhere. When did they start making double-sided electrical tape?

28806


Me: That's a wrap, no pun intended. I'll pick back up where I left off tomorrow. Six seconds of wiring video completed in about an hour. All but the first 2 steps left for my harness. Yay!
 

Ark :D

Goblin Guru
I probably have 50 hours into my harness. It takes much longer than one might think, based on the length of the videos.

You'll be fine. Just focus on one step at a time, and you'll get through it before you know it. Just focus on doing exactly what the video instructions say to do, nothing more. In instances where it seems like something is missing, Lonny will circle back to it. Good luck.
 

Rttoys

Goblin Guru
That’ll push you along.

It’s really not hard, but it is very tedious. Colors start to look the same, you question what you just did, a 10 minute video takes you 4 hours, back hurts, fingers are all black from the tape……..

fun :D
 

Scott #321

Well-Known Member
A nice tip is use silicone spery on a rag to wipe the wires down after removing the tape. Removes the sticky residue making the harness less of a sticky mess. Not sure who originally posted that tip but it made things much easier for me.
I wiped my harness down after removing the tape and again after thinning it.
 

Sluggonaut

Goblin Guru
A nice tip is use silicone spery on a rag to wipe the wires down after removing the tape. Removes the sticky residue making the harness less of a sticky mess. Not sure who originally posted that tip but it made things much easier for me.
I wiped my harness down after removing the tape and again after thinning it.
Is there one in particular or just any silicone lubricant type spray?
 

Sluggonaut

Goblin Guru
Day 9
Work Time: 2 hours
Completed: Wiring Harness Guide Part 1


Spent just under 2 hours on the harness tonight. I moved at a leisurely pace just cutting and removing tape after getting rid of all the wire ties and loom last night.

I watched some TV and chatted with the wife and the next thing I knew all the tape was off and there was nothing left in the 1st video. That wasn't too bad.

My harness is only kind of holding its shape even though I tried not moving it too much and sort of looks like Lonny's in the video but on a bad hair day. I'm hoping to get some decent time into it this weekend and see if we can't bang this whole thing out in 2 weeks.

Took my time and the next thing I knew I had a box full of tape:
28818


Spaghetti. It's what's for dinner:
28819
 

Sluggonaut

Goblin Guru
In the Thinning the Main Harness - Part 1 video, Step 22: Removing the Passenger Door Connector step, I paused it after it said to remove the connector. I thinned all the wires out only to continue and see that the ground wire should be kept.

Do I need to add this back for it to be attached to something later?

Or is this just one of the many ground wires that get bolted together in a later video? If it's one of these I don't think there is any need to keep it is there?
 

Sluggonaut

Goblin Guru
Is the headliner plug standard across all models? I'm curious because the 2:00 mark in Thinning the Harness Part 2 step 7 is to remove the headliner wires.

I don't have a headliner plug or the VCIM white connectors. The only things that came out of my headliner were a passenger-side wire running to the satellite radio on the rear deck and some driver-side cables that ran to a connecter on the rear deck just off the rear defroster. These wires ran above the headliner to connectors at the sunroof motor, sunroof switch, and rearview mirror. They came out with the harness and that connector that was on the driver side rear deck is still connected in my harness.

Nothing is missing a label and there are no extra connectors anywhere. None of the ones I've removed so far look like the headliner connector in the video either.
 

Rttoys

Goblin Guru
I don't remember, but if you got all the sunroof and stuff out of there, I think that’s it. A base model like in the videos, wouldn’t have had all that stuff, so it may have had just one connector.
 

Sluggonaut

Goblin Guru
Day 10
Work Time: 4 hours
Completed: Wiring Harness Guide Part 2 & 3 (Thinning)


I got in two solid 2-hour sessions today. I was able to complete the thinning videos. Mostly.

I have to check some wiring diagrams for one single red w/white stripe wire. It looks like it was cut from a connector and leads to one of the multi-plugs but I'm not sure what it was from. I didn't take any breaks during the video and made sure to thin or label each wire on each step. The first video was very straight forward and the significant differences didn't occur until the second thinning video.

I also still have a second connector for each seat (seat heater stuff maybe?) still on the table. I know when removing the main seat connector the video referenced a possible second connector that should have come out with the main one but neither of these did. Aside from the missing headliner connection mentioned in a previous post above, here are the other differences I encountered:
  • Missing both black and white VCIM connectors (trunk light went to BCM/ground and not VCIM/ground as shown in the video).
  • The rear defroster was connected to the wires that went to my sunroof from the driver-side and the defroster wire that came off the passenger side went to a ground lug - it wasn't a single wire to pull from the harness in like the video.
  • I didn't have a vacuum sensor or yaw sensor connector.
  • When I went to pull the second set of speaker wires I couldn't find them. I know I labeled them when I removed them, but it was a long day of chasing wires and I don't remember if they got removed earlier in the day. In either case, no more speaker wires are on the table.
I'm going to check the wiring diagrams as stated above and make sure I can just cut out those second seat connectors and I should be completely done with the thinning. I will also try to tidy up my mess, as my wires aren't looking like the video like they did at the beginning. I'll call it a night after that and throw some pics up once done. I'll start the Organizing videos tomorrow.
 
Top