Ross's extended city, easy entry Goblin- 06 SS/SC, NW Arkansas
- Thread starter Ross
- Start date
Desert Sasqwatch
Bigfoot Goblin
Transmission oil pump and filter?
Ross
Goblin Guru
This transmission had an oil change a few days ago, (using redline MT-90) and this is the color of the filtered oil going back into the transmission.
I wonder if there was some graphite additive at some point in its' life, or if this is normal?
I wonder if there was some graphite additive at some point in its' life, or if this is normal?
Last edited:
Ross
Goblin Guru
I am pulling oil from the drain plug hole.
I bought Banjo Bolt M18x1.5 with 12mm Hose Barb Fittings
as this is the same thread on the drain plug and fill plug.
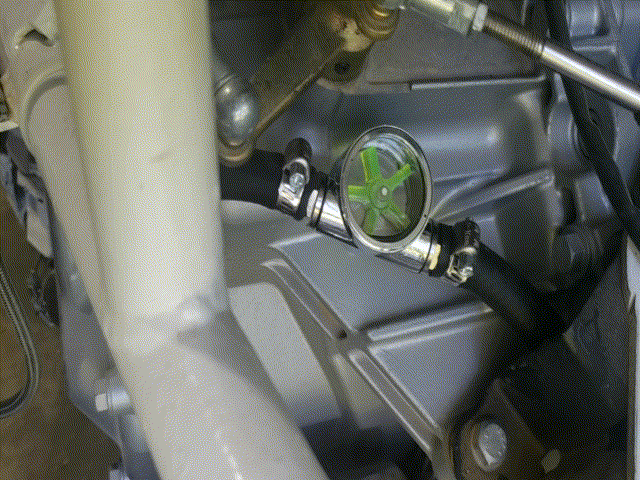
Later I added the Visual Flow Indicator G1/4 Inch $14.19
I bought Banjo Bolt M18x1.5 with 12mm Hose Barb Fittings
as this is the same thread on the drain plug and fill plug.
| Gear Oil Pump 12VDC Electric Waster Oil Pump | $34.96 | ||
| Banjo Bolt M18x1.5 12mm Banjo Bolt Hose Barb Fittings | 13.99 | ||
| Derale 25708 Remote Filter Mount Kit | $22.99 | ||
| FRAM Extra Guard PH8A Oil Filter | $4.48 | ||
| Barb Fittings 3/8 Inch Barb × 1/2 Inch NPT, Brass Air | $7.99 | ||
| Tax | 6.33 | 90.74 |
Last edited:
RobC76
Well-Known Member
I saved pic so I could blow it up and I was just going to post that I found it. Thanks for sharing banjo bolt size. Does it just run with key on or do you have a separate switch? Assume the filter housing is lower than the return so that it doesn’t gravity drain back to transmission. Thanks for sharing!
Ross
Goblin Guru
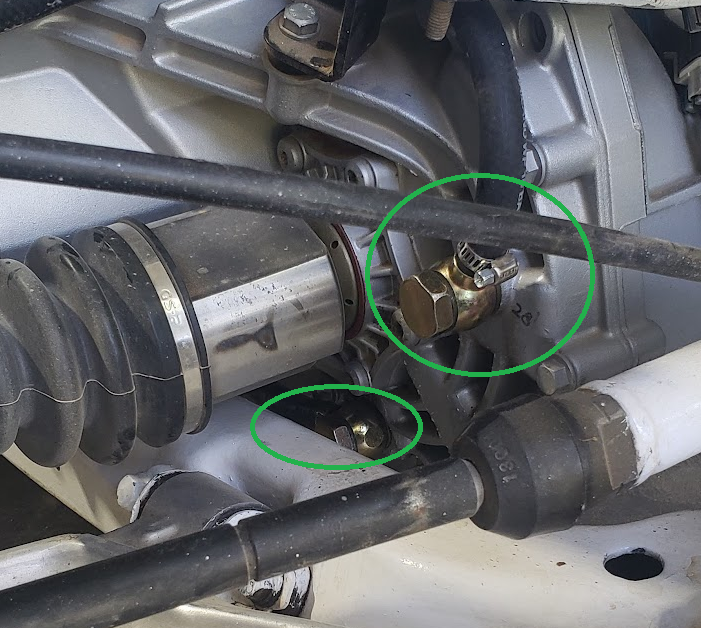
The drain hole line runs horizontally to the gear pump, so that should always be full of oil. After the pump, the pressurized oil flows up to the upside down filter, then to visual flow indicator, then back to the transmission fill hole. So, no the filter housing isn't lower than the return line. It stays filled with oil (as it is upside down), the line out from the filter will drain back, as will the visual flow indicator. I had to refill the transmission, after I turned on the pump, filled the filter and lines. Probably holds an extra quart now... but the oil in the transmission is at the original height.
I plan on tapping into the wire that runs the intercooler pump, and adding a new relay. Grab some 12V+ from the starter, run it thru a fuse, then the new relay, then off to the transmission oil pump. The intercooler pump has a 10 second delay from when the engine starts before both the electric pumps start up.
I plan on tapping into the wire that runs the intercooler pump, and adding a new relay. Grab some 12V+ from the starter, run it thru a fuse, then the new relay, then off to the transmission oil pump. The intercooler pump has a 10 second delay from when the engine starts before both the electric pumps start up.
Last edited:
Rauq
Goblin Guru
I'm not sure if there's a magnet inside the F35 like there is in the F23, but assuming there is and the case has never been split, there's probably a good bit of junk on that magnet. It's also usually near the bottom of the fluid level, so I wonder if you're pulling the junk off with that setup?
Ross
Goblin Guru
I couldn't find a relay base for the GM Tyco fuses that the rest of the car has. Online stores all seem to have the relays with the + pattern, not the 4 corners relays.
Since I have a dead BMS, I decided to make my own, and cut a fuse base out of the middle of it.

I added a fuse holder to the bottom, soldered the wires on, and filled it with hot glue. Splash of black paint.

This circuit will run the oil pump (8A), and the seat heaters (another 8A).
Since I have a dead BMS, I decided to make my own, and cut a fuse base out of the middle of it.
I added a fuse holder to the bottom, soldered the wires on, and filled it with hot glue. Splash of black paint.
This circuit will run the oil pump (8A), and the seat heaters (another 8A).
Desert Sasqwatch
Bigfoot Goblin
I thought I was bad at cobbling scrounged parts together to make something that cannot be bought (or doesn't exist)!!! 
Ross
Goblin Guru
I would have preferred to buy a relay base, but sometimes your own cobbled up engineering and creativity works too.
I soldered into the pink wire at C2 to get the PCM to trigger the SC pump's relay, and now the transmission oil pump's relay too.

I removed the 12V+ jump post from the rear fusebox, and put an electrical ring crimp connector on the yellow wire to feed the relay 12V+ power.
The 12V- post on the side of the transmission mount also got a ring crimp connector.
The relay is bolted to a hole I found on the plastic fusebox base.
Now the relay clicks 10 seconds after engine start, the oil pump starts, and I ran a wire into the transmission tunnel for the heated seats too.

I soldered into the pink wire at C2 to get the PCM to trigger the SC pump's relay, and now the transmission oil pump's relay too.
I removed the 12V+ jump post from the rear fusebox, and put an electrical ring crimp connector on the yellow wire to feed the relay 12V+ power.
The 12V- post on the side of the transmission mount also got a ring crimp connector.
The relay is bolted to a hole I found on the plastic fusebox base.
Now the relay clicks 10 seconds after engine start, the oil pump starts, and I ran a wire into the transmission tunnel for the heated seats too.
Last edited:
Ross
Goblin Guru
I added the Davies Craig electronic water pump (EWP) controller to the dash. I ran the wires for the EWP off the BCM fuse #6, but the pump isn't installed yet, as I still need to bypass or remove the stock pump and thermostat. Mostly I wanted the controller to run the radiator fan, as the stock PCM doesn't control it anymore. I lost a transistor inside the PCM. The new controller also has a new thermistor installed in the engine coolant.
Tested the oil pump, it seems to be working, now with it automatically turning off and on with the engine.
Also added the seat heaters and car cameras to the same circuit, and the wires run thru the tunnel.
I put it back together today, and took it for a grocery run. Filled up with gas, and found out that the fuel pump isn't sealed at the top of the tank. Darn, I thought I fixed that. I am struggling to get the 5 bolt fuel pump to seal. I wonder if the LNF's 8 bolt pump is better?
Well, 2 steps forward, 1 step back.
Last edited:
Ross
Goblin Guru
Axle nuts torque to 155 pound feet, just in case you are getting back from your 2nd week of test driving a new engine. I would bet that the wheels will not fall off if neglected, but you don't have to take my bet, feel free to test it yourself. I am glad that I have center caps on my wheels, as it could prevent me from looking for shiny nuts on the side of the road. There are a limited number of ways to loose a wheel, axle nuts isn't one of them.
Checked my camber, wheel pressures, adjusted the tow in, centered the steering wheel, repainted the front brake calipers,

cleaned the sticky goo off the wheels from the past 4 times they put balancing weights on them. Rotated the tires, for some smokey reason I keep wearing the rears faster than the fronts. Need to caulk the fuel pump, as I would like it to seal against the gas tank... I tightened the fuel pump bolts down using a 7/32 drill bit this time, as it was leaking with the 1/4" bit.
Looking forward to joining the Locost 7 group tomorrow for some fun driving around Arkansas. I convinced Alice to join us, so I am also charging the in-helmet intercoms, while checking for loose bolts. I need a better way of finding all the bolts needing to be torqued... honestly not trying to be a bone head, just succeeding.
Checked my camber, wheel pressures, adjusted the tow in, centered the steering wheel, repainted the front brake calipers,
cleaned the sticky goo off the wheels from the past 4 times they put balancing weights on them. Rotated the tires, for some smokey reason I keep wearing the rears faster than the fronts. Need to caulk the fuel pump, as I would like it to seal against the gas tank... I tightened the fuel pump bolts down using a 7/32 drill bit this time, as it was leaking with the 1/4" bit.
Looking forward to joining the Locost 7 group tomorrow for some fun driving around Arkansas. I convinced Alice to join us, so I am also charging the in-helmet intercoms, while checking for loose bolts. I need a better way of finding all the bolts needing to be torqued... honestly not trying to be a bone head, just succeeding.
Last edited:
Rauq
Goblin Guru
Since every nut and bolt on your car is labeled for torque, seems like the next step is to write (backwards) on the visor of your helmet "CHECK TORQUE"
I don't remember who it was but when I first met up with some Goblin folks in Charlotte to do the initial alignment on my almost-completed build, another Goblin builder would come in behind me and take every fastener that was not torqued and back it way the heck off. I thought it was annoying at first but then I realized the value of bolts that aren't snugged looking like they're not snugged. Not that that'd do any good for a hypothetical loose axle nut...
Are you sure your rubber fuel hat o-ring is where it needs to be? I seem to recall having issues with mine trying to squeeze out of the ring, although I can't remember if that was to the inside or outside. I also had an issue for a little while with a hairline crack on one of the molded elbows that got everything around the ring moist, it sure presented like a bad o-ring. I ended up JB-welding in barbs like I think you did... although half the little projects I've done that were inspired by the forum are attributed to you in my mind, so prolific and mythical have been your contributions.
Tire wear is honestly one of the reasons I preach 200tw max on Goblins. I have a theory that tires that aren't sticky enough actually end up wearing at least comparably if not faster, just because they get broken loose more.
Ross
Goblin Guru
I have set that green O ring on there twice, and it doesn't seem to move, so I think it is in the correct place.
Next attempt, I cleaned it with acetone, then caulked all around it with the Hylomar blue.

Rear tire wear is probably related to driving conditions, although you are correct, 200TW tires would last longer, it is just harder to catch the fishtails when driving over the limit.
Next attempt, I cleaned it with acetone, then caulked all around it with the Hylomar blue.
Rear tire wear is probably related to driving conditions
, although you are correct, 200TW tires would last longer, it is just harder to catch the fishtails when driving over the limit.You have an electric oil pump as well?I added the Davies Craig electronic water pump (EWP) controller to the dash. I ran the wires for the EWP off the BCM fuse #6, but the pump isn't installed yet, as I still need to bypass or remove the stock pump and thermostat. Mostly I wanted the controller to run the radiator fan, as the stock PCM doesn't control it anymore. I lost a transistor inside the PCM. The new controller also has a new thermistor installed in the engine coolant.
Tested the oil pump, it seems to be working, now with it automatically turning off and on with the engine.
Also added the seat heaters and car cameras to the same circuit, and the wires run thru the tunnel.
I put it back together today, and took it for a grocery run. Filled up with gas, and found out that the fuel pump isn't sealed at the top of the tank. Darn, I thought I fixed that. I am struggling to get the 5 bolt fuel pump to seal. I wonder if the LNF's 8 bolt pump is better?
Well, 2 steps forward, 1 step back.
View attachment 47270
Ross
Goblin Guru
Yes, but the electric oil pump is only circulating the F35 transaxle oil thru a filter. This isn't normally filtered on a standard transmission, but I had a bit too much metallic flake in the old oil for my liking. I don't know the previous life of the F35. So it is just an attempt at getting as much metal flake out as possible, as an oil change doesn't get all the sediment out. It cost me about $100 to install the pump and filter, which is a lot cheaper than replacing a F35 with a Quaife differential, and right now it is shifting great, even thou it has 140,000 miles on it.