-
We've upgraded and reskinned the forum. Notice something off? Email us at [email protected] and we'll fix it.
You are using an out of date browser. It may not display this or other websites correctly.
You should upgrade or use an alternative browser.
You should upgrade or use an alternative browser.
V1 Eric's Track Goblin - 06 SS/SC donor
Robinjo
Goblin Guru
- Robinjo Goblin Guru
As far a cleaning the engine, a rattle can paint job did a nice job. You can give it a quick coat of paint now, and worry about all the nooks and crannies later, as you do maintenance in the future. I left my engine unpainted for the first year... got around to painting it later... basic maintenance is more important.
I am on the same plan. I got the thing running and plan to pull the engine again winter 2023/24 to do the timing chain, possibly an LSD insert and just clean the whole engine up for a painting. I just sprayed degreaser all over the engine out of the car and lightly pressure washed it, like Lonnie did in his videos. His came out much cleaner than mine, btw.
TravMac
Well-Known Member
- TravMac Well-Known Member
I believe the consensus is to leave the dip stick alone. Replacements are nearly unobtainable if something happens.
Yea, to second this... The bottom bit of my dip stick broke into the pan, and needed to drop it during my engine maintenance. I honestly shoved the upper biy back in afterwards since its held in by a bolt up top, and its still holding on for now. There are some short ones that might fit some folks have used, but those take a bit extra work to make secure I havent looked into yet.
I saw a guy at PRI this year making custom dipsticks for certain applications. But didn't look like he had any ecotec stuff yet...
- Esstover Well-Known Member
Haven't been doing the best at posting. I've got quite the mess in the garage. Lots of things pulled apart for cleaning and painting. Might end up with some panic posts trying to get everything back together. Just received my shipment from ZZP so I have a new Timing Chain Tensioner bolt, shorty header, header gasket, valve cover gasket, intake gasket(s), a-arms, sway-bar links, SC gasket, and clutch alignment tool. So I'm about ready to start putting the engine back together. Will be holding off at the valve cover until i send it off to be powder coated with the frame.
Where I need some support!! I've got my main wiring harness laid out on the table (it's slightly smaller than 4'x8'). All zip ties and tape is removed. First thing mentioned in the thinning video is something to do with a TC car only, so that's not me. Then it goes on to talk about TC and SC cars needing key power on. So they go to the red plug and show two wires coming from D7. I don't have two wires. Then they talk about chasing it to the passenger seat plug? I can't seem to find a plug that matches what they show. So I think this is a discrepancy because the video car is an NA Auto, or maybe I'm just lost.
Anyway I am scared to death of this wiring task. Decided I would put it on hold and get this post out there to see what you guys say. I'm sure there is another build log i can follow for a specific 06 SS/SC wiring. Let me know where do go so I don't wear everyone out with the same questions that you've probably answer several times.
On a somewhat positive note. I called DF this week. My kit is ready to go..... It has been ready to go. They actually have several in the NE area, so hopefully the transport company gets it on the schedule soon and gets it coming my way. I think I should be ready by the time it gets here.
Ross
Goblin Professor
- Ross Goblin Professor
Is your wiring harness labeled? Some help identifying connectors is here and here. There are different trim levels, so some of the connectors may be different, even thou it is the same year and engine. Be careful to get these connectors correct. If you can't identify the connector, then do some research here. There are some more electrical resources if you go to my signature and click on "Build thread index here." and then find "Electrical diagrams:"
Once you get it all labelled, you can decide which items you want to keep, and which can go. Mostly I followed the DF video, but I did keep the 2 auxillary power ports (12V cigarette lighters). Wish I would had seat heater wires, or at least added them back in.
Then start making plans. I decided to cut wires an inch or two away from the connector, rather than cutting wires flush with the connector. That way I could solder back the wire, if I made a mistake, or I could repurpose the wire for something else in the future. Just have to be careful to insulate the cut wire, so it doesn't touch another short wire.
Last edited:
- Esstover Well-Known Member
Ross, You are the best! Followed your two videos and got everything labeled. I was a little nervous because i had taken all the covers, and tape off, but was able to follow right along. Now i need to figure out what extra wires to keep along with what the DF videos say.Is your wiring harness labeled? Some help identifying connectors is here and here. There are different trim levels, so some of the connectors may be different, even thou it is the same year and engine. Be careful to get these connectors correct. If you can't identify the connector, then do some research here. There are some more electrical resources if you go to my signature and click on "Build thread index here." and then find "Electrical diagrams:"
Once you get it all labelled, you can decide which items you want to keep, and which can go. Mostly I followed the DF video, but I did keep the 2 auxillary power ports (12V cigarette lighters). Wish I would had seat heater wires, or at least added them back in.
Then start making plans. I decided to cut wires an inch or two away from the connector, rather than cutting wires flush with the connector. That way I could solder back the wire, if I made a mistake, or I could repurpose the wire for something else in the future. Just have to be careful to insulate the cut wire, so it doesn't touch another short wire.
- Esstover Well-Known Member
So I'm thru the main wiring harness thinning. It would be nice if at the end they say this is what you should have left. Mine didn't turn out just like the video on the fuse box side.
On the fuse box side I have....
3 wires for fuel pump? i think the video showed 2
the twisted wires it says to leave 6" left as you tape
wires for the brake reservoir
wires for the overflow tank
Also my white plug with the big red wire had 3 wires coming off of it. I think the video just showed 1 big red and 1 little red.
On the BCM side...
I have several wires still hanging. I think that is right because I see wires on that end in the video. Would just be nice to know I have the right ones.
I also have a red/white strip going to a 12V outlet that I kept.
I'm typing my post on my computer, it will be easier for me to post pic's from my phone so I will do that after I write this up. Then maybe you guys can tell me if i screwed something up.
I also started into the front lighting harness. They start on the end with the big wire square plug and say to cut the black on the headlight and the black wire on the horn connector. I found those clearly and cut them where they said. Then we start taping. You get to a point where he has 4 black wires and says to cut them all to the same length and solder on extensions. I only cut 2 wires (1 headlight and the horn)? Did they mean to tell me to cut the others? I think I have a fog light, and then the head light and fog light from the passenger side? Anyway that is where I stopped. I need to get a solder gun and some heat shrink. If anyone can look at my pics and let me know how I'm doing I'd appreciate it.
Also the PIN outs for plugs is very helpful. I saw some @Ross posted for alldata. I don't have an account but if there is a google doc folder somewhere with them that would be appreciated.
- Esstover Well-Known Member
So I'm thru the main wiring harness thinning. It would be nice if at the end they say this is what you should have left. Mine didn't turn out just like the video on the fuse box side.
On the fuse box side I have....
3 wires for fuel pump? i think the video showed 2
the twisted wires it says to leave 6" left as you tape
wires for the brake reservoir
wires for the overflow tank
Also my white plug with the big red wire had 3 wires coming off of it. I think the video just showed 1 big red and 1 little red.
On the BCM side...
I have several wires still hanging. I think that is right because I see wires on that end in the video. Would just be nice to know I have the right ones.
I also have a red/white strip going to a 12V outlet that I kept.
I'm typing my post on my computer, it will be easier for me to post pic's from my phone so I will do that after I write this up. Then maybe you guys can tell me if i screwed something up.
I also started into the front lighting harness. They start on the end with the big wire square plug and say to cut the black on the headlight and the black wire on the horn connector. I found those clearly and cut them where they said. Then we start taping. You get to a point where he has 4 black wires and says to cut them all to the same length and solder on extensions. I only cut 2 wires (1 headlight and the horn)? Did they mean to tell me to cut the others? I think I have a fog light, and then the head light and fog light from the passenger side? Anyway that is where I stopped. I need to get a solder gun and some heat shrink. If anyone can look at my pics and let me know how I'm doing I'd appreciate it.
Also the PIN outs for plugs is very helpful. I saw some @Ross posted for alldata. I don't have an account but if there is a google doc folder somewhere with them that would be appreciated.
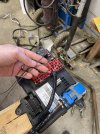
so I think the extra big red wires needs to go. I marked that I cut it from the SRS plug.
Attachments
-
 00053F9F-7366-4BDD-8128-C431BE0805F0.jpeg404.3 KB · Views: 362
 -
 96C4147C-E109-4529-A76B-CB9F57E5DEC3.jpeg409.2 KB · Views: 376
 -
 DCF398C2-58A4-4D6B-8063-04EA19F736D2.jpeg345.9 KB · Views: 349
 -
 FABA12BF-E71D-439A-959E-7254A7210278.jpeg275.6 KB · Views: 407
 -
 9ADEF00F-80E2-43BA-A6A7-369180DB1D22.jpeg349 KB · Views: 324
 -
 26F43766-A45A-4AD5-AC2C-87F49DC5D225.jpeg367.1 KB · Views: 357
 -
 C083B1A9-202C-4E3E-8E2D-025C3C6EA0FA.jpeg290.8 KB · Views: 355
 -
 46FF868E-413B-4386-9A65-BAF9A32594C9.jpeg298.2 KB · Views: 342
 -
 150A1754-61FD-48BB-803E-96DD32D39660.jpeg346.4 KB · Views: 349
 -
 F361E8D1-031D-46AF-B511-288FCED223D1.jpeg299.9 KB · Views: 336
 -
 5CEB82F8-00FA-4CC0-A046-7C3F28DD1143.jpeg333.2 KB · Views: 353
Ross
Goblin Professor
- Ross Goblin Professor
I mentioned how to get access to the PIN outs at post #25 above.So I'm thru the main wiring harness thinning. It would be nice
...
Also the PIN outs for plugs is very helpful. I saw some @Ross posted for alldata. I don't have an account but if there is a google doc folder somewhere with them that would be appreciated.
Specifically, these 2 sentences:
If you can't identify the connector, then do some research here. There are some more electrical resources if you go to my signature and click on "Build thread index here." and then find "Electrical diagrams:"
In AllDataDIY, go to diagrams.
Then Connector views. I also use Search a lot.
Last edited:
- Esstover Well-Known Member
Thanks @Ross I didn’t click on the link before. Super nice of you to provide your access. I’m working on only a phone this evening but will log on tomorrow when I have my laptop and pull some plug pin outs for info.I mentioned how to get access to the PIN outs at post #25 above.
Specifically, these 2 sentences:
If you can't identify the connector, then do some research here. There are some more electrical resources if you go to my signature and click on "Build thread index here." and then find "Electrical diagrams:"
In AllDataDIY, go to diagrams.
View attachment 38561
Then Connector views. I also use Search a lot.
View attachment 38562
- Esstover Well-Known Member
New Question(s)....
So I think I have sorted my fuel pump wiring and verified I have what I need. I think there is a little piece missing in the video regarding the headlight wiring harness and I believe I have that sorted also.
So now in the videos we're starting to solder on extensions. Should I be holding up to wait and receive my kit? does the extension wires come with it? or should I just go pick up some wire, or use scraps that I have already removed from the harness? I picked up some solder the other day and also some heat shrink. Watching ahead it looks like I may need a few little copper barrels for soldering the larger wires.
Another question... Does anyone have a final measurement between the fuse box and the BCM? I didn't build a 4x8 table because i already had a pretty large table. When I got to plugging things in I just stretched the wires tight and put a little extender on to attached the BCM. I think it has to be right because I pulled it tight, but when I measure something seems off. How critical is this?
Robinjo
Goblin Guru
- Robinjo Goblin Guru
New Question(s)....
So I think I have sorted my fuel pump wiring and verified I have what I need. I think there is a little piece missing in the video regarding the headlight wiring harness and I believe I have that sorted also.
So now in the videos we're starting to solder on extensions. Should I be holding up to wait and receive my kit? does the extension wires come with it? or should I just go pick up some wire, or use scraps that I have already removed from the harness? I picked up some solder the other day and also some heat shrink. Watching ahead it looks like I may need a few little copper barrels for soldering the larger wires.
Another question... Does anyone have a final measurement between the fuse box and the BCM? I didn't build a 4x8 table because i already had a pretty large table. When I got to plugging things in I just stretched the wires tight and put a little extender on to attached the BCM. I think it has to be right because I pulled it tight, but when I measure something seems off. How critical is this?
For soldering in extensions, I just used scrap pieces of the wiring that got cut out in the first half of the videos. I tried to match up the colors as best/close as I could. I think I had to do something wonky on the headlights though, like the white wire got mated with a blue extension (or the other way around). I did list it out on my 'flag' I made for the section to keep it straight later on. I used solder butt connectors. If you use these, let them fully cool before pulling on them, I learned they are still pliable for a bit the hard way. I had a couple pull out as they were still liquid.
For the overall length, I can't recall. I bet someone else knows that though.
- Gtstorey Goblin Guru
At one time DF sold a "wiring" kit with the (maybe just some) extra's needed but I'm not sure if they still do. A lot of people just use the salvaged wire. I bought new wire wire for the extensions.
Depending in your experience with wiring and soldering, I might suggest getting some various size uninsulated crimp butt or bypass splices that you solder after joining the wires. It can be faster and maybe more secure, but not really necessary.
Depending in your experience with wiring and soldering, I might suggest getting some various size uninsulated crimp butt or bypass splices that you solder after joining the wires. It can be faster and maybe more secure, but not really necessary.
Fozda
Goblin Guru
- Fozda Goblin Guru

Wiring Harness Supply Kit
All the wires, tape, solder, heat shrink and hardware you'll need to rework your wiring harness. This includes extension wires for the body to dash harness, horn, turn signals, headlights and more.
store.dfkitcar.com
- Gtstorey Goblin Guru
It does show the SS/SC sold out. I wonder what is so unique about that kit?Wiring Harness Supply Kit
All the wires, tape, solder, heat shrink and hardware you'll need to rework your wiring harness. This includes extension wires for the body to dash harness, horn, turn signals, headlights and more.store.dfkitcar.com
Sluggonaut
Goblin Guru
- Sluggonaut Goblin Guru
I used the wiring kit for my SC kit. Other than a few extra labels I didn't need, I used everything provided in the kit.
It not only had all the correct colored wires so the extensions matched the wires they were connecting, it even included electrical tape. I went with Tessa tape but if you are happy with electrical tape it provides plenty for the job.
It not only had all the correct colored wires so the extensions matched the wires they were connecting, it even included electrical tape. I went with Tessa tape but if you are happy with electrical tape it provides plenty for the job.
- Esstover Well-Known Member
Need some details on the overall wiring harness length. I’ve managed to be a little shorter than the videos. Not sure why, I pulled everything tight. I’m going to say I’m 4-5” shorter. With the fuse box holder screwed at the 1”mark of the 2x4 which should be 1’ off the plywood my BCM module won’t stretch to the edge as shown. I moved my fuse block in so I can mount the BCM on the edge and use that to integrate the dash harness.
@Lonny do I need to stop now and un tape everything and see if I can find some slack??
@Lonny do I need to stop now and un tape everything and see if I can find some slack??
Similar threads
- Replies
- 168
- Views
- 19K