Deviant Goblin - Extended Track #373 | 07 SS/SC donor

devianteng

Well-Known Member
August 01, 2022
Last update was April, and here it is already August!
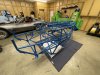
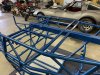
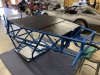
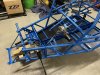
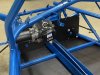
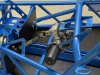
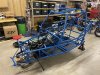
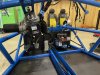
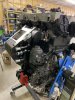
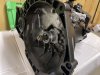
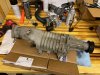
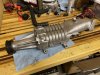
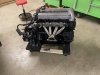
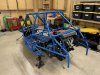
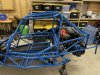
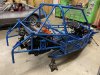
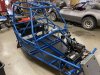
Been busy with non-Goblin things, unfortunately. Moved into a new house, made updates to our previous house and got it on the market, spent a bit of time getting the new shop organized (still not done; but is it ever done?), and trying to get my 78 Vette back on the road (new radiator, fans and thermostat; minor refreshes like new intake, exhaust, and valve cover gaskets, reseal oil pan, new fluids, etc). Anywho, about a week ago I dropped my frame off for powder and was able to pick it up this past Saturday. I think it turned out great!
86.jpg87.jpg88.jpg

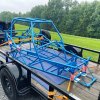
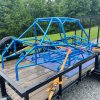
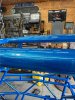
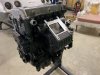
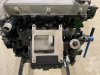
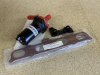
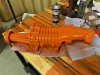
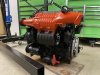
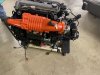
I decided to go with Blue Diamond from Columbia Coatings, and for accents I will be using an orange (debating between Illusion Mandarin and Dormant Orange currently). Valve cover, wheels, wing uprights, and a few other things will be in this orange. I've decided that my floor pans/firewall will be done in a black truck bed liner, and smaller things like battery hold down bracket, brake booster, etc will be done in a rattle can black of some kind.

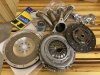
Powder work was done by Rainy Day Coatings out of Willisburg, KY. First time using them but very happy with the work so far (I'll be picking up A arms, tunnel cap, trans bracket, and sub-frame this coming weekend).

Hopefully I can get the 78 Vette back together this week and out of my working bay by this weekend, so I can start working toward my first startup!
 

devianteng

Well-Known Member
Oct 02, 2022
I see that I haven't posted an update in a while.
September was a busy month for me (new routines with kid starting school late Aug, birthdays, selling a house, family trip, etc) but I managed to get 7 hours of build time for the month...it's something. Mounted floor pans, steering rack, brake lines, clutch line, pedal box, clutch pedal, brake booster/master cylinder, front brake lines, ignition switch, radiator...good progress. Floor pans, pedal box, and some other pieces were all painted with rattle can truck bed liner, and it turned out great I think!
Seems I've misplaced the upper radiator house, so I have a new one ordered. Hoping by end of next weekend to be ready to install the engine...but I still have my engine to clean up, paint, install a new flywheel/clutch, dual pass endplate, laminova o-rings, etc. Unless something major happens, I expect to have my first start before the end of the month!

Oh, still waiting on my stage 2 kit quote from DF...so that's not ordered yet.

89.jpg90.jpg91.jpg92.jpg93.jpg94.jpg95.jpg96.jpg97.jpg98.jpg
 
Last edited:

devianteng

Well-Known Member
Oct 12, 2022
Some progress. Bought a new fuel pump (Delphi FG2064-11B1) and got that installed, misplaced my upper radiator hose and had to order a new one (Dayco 71796).
Focus has been on engine prep. I previously stripped everything off the engine, basically to a complete long block and it's sat on the engine stand for ~6 months. Got it out, and spent a good bit of time with degreaser and the pressure sprayer to clean it up. Taped it off, and sprayed it with a couple cans of Flat Black DupliColor Engine Enamel. I've also taken the intake manifold apart, cleaned it up real well, soaked the laminova cores and installed new o-rings, and put on my new dual pass endplate. Taped it all up, painted, and put it on the engine to see how it looks. Needed a new intake gasket so instead ordered a ZZP phenolic spacer, so currently waiting on that. Also cleaned and painted the lower bracket for the intake manifold, and the intercooler pump bracket. Ordered a new ZZP upgrade intercooler pump, as well as an oil cooler bracket so I can ditch the water-cooled oil cooler, and go with a remote mount air cooled oil cooler.

Next up is to clean/paint the alternator bracket, clean the alternator, gut and clean the A/C compressor (not deleting the compressor, but gutting everything from inside to decrease weight and pulley resistance). After that, to finish the engine I need to clean and paint the thermostat housing (new thermostat ordered), mount the supercharger, new flywheel and clutch, paint the trans, mate the trans to the engine. That should only leave plumbing and top end things like fuel rail, injector rail, etc...which I can do after the engine is in the Goblin.
I left the valve cover unpainted with the intent to powder coat that, and the supercharger housing at a later date.

99.jpg100.jpg101.jpg102.jpg103.jpg104.jpg105.jpg106.jpg
 

devianteng

Well-Known Member
Oct 17, 2022
Small update. Alt bracket painted, AC compressor painted, alternator cleaned up. Phenolic spacer installed, ZZP intercooler pump mounted, and ZZP oil cooler adapter installed. Thermostat housing cleaned up and ready to go on with new thermostat.
Got some Duplicolor Chevy Orange Engine Enamel on order, planning to paint the m62 supercharger and valve cover; was planning powder, but I eventually plan to swap the m62 for something else (TVS1320? Turbo? Undecided), and want the valve cover to match.
I think the next thing to do though is clean/paint the intermediate axle bracket, then get the engine back on the hoist. Then trans goes on the engine stand to get it painted up and then mate to the engine.

107.jpg108.jpg109.jpg110.jpg
 

devianteng

Well-Known Member
Oct 23, 2022
Got a lot done this week! Supercharger painted and installed, ZZP aluminum flywheel and GMPP clutch installed, new throwout bearing and clutch pipe/slave cylinder installed, trans painted and mated to engine, new thermostat and painted thermostat housing installed, transaxle bracket painted and installed, and probably other little things I'm forgetting.
I seemed to have lost my belt and starter, so got some on order. Also ordered a pair of -10AN caps for the oil cooler plate, so I can do my first start without the oil cooler. My injector insulators are also toast, so new ones on ordered. Injector rail is painted and ready to go, so once the insulators, belt, and starter show up I should have the engine complete and ready to mount into the frame. Was hoping to have my first start by end of Oct, but I don't think that will happen...but I'm getting close! Really need to get my stage 2 ordered, but DF isn't replying to my emails...I need to remember to call them this week.

111.jpg112.jpg113.jpg114.jpg115.jpg116.jpg117.jpg118.jpg119.jpg120.jpg121.jpg122.jpg123.jpg124.jpg125.jpg126.jpg
 

devianteng

Well-Known Member
Oct 31, 2022
Another productive week. Got the following installed; new starter, belt, oil cooler plate caps, injector/fuel rail (new insulators and o-rings), fuel regulator, coolant overflow tube, throttle body, header, o2 sensor, and engine harness. Then I got the engine mounted in the frame, which to me is a big milestone. I haven't done my battery positive cable yet, so we'll see how easy that is to get to with the engine already in the car.

127.jpg128.jpg129.jpg130.jpg131.jpg132.jpg133.jpg

I was hoping to have my first start by end of Oct, but that didn't happen...but I'm close. Lots of little things to do first though! To-do before first start:
1) Fuel filter/lines - Need to order a new fuel filter, also some 3/8" fuel line. I want to replaced the factory lines on the fuel pump and run new lines for a cleaner look.
2) Coolant lines - Need to plumb frame tubes to the engine, loop the oil cooler fittings on the thermostat (similar to what's done with the heater core fittings), and figure something out for my overflow tank thermostat fitting.
3) Overflow tank - I have my factory overflow tank, but I think it looks ugly on the Goblin. Looking at a few aftermarket options (Mishimoto has one I really like), but not sure what will happen if I eliminate the overflow tank sensor from the engine harness. Suppressing the CEL in HPT is easy, but I'm not sure if there are any other side effects.
4) Battery cables - Need to shorter the positive cable, and get it connected; Also need to connect the battery ground.
5) Fuse panel - Pretty straightforward, need to mount the box and get all the plugs hooked up
6) Engine harness cleanup - Earlier this year I decided to re-tape the engine harness (it was looking rough from the donor) and I didn't account for eliminating anything. So I'll probably pull the engine harness and spent a little time on that; To get rid of are the radiator fan connectors, waster fluid level sensor, and the AC compressor connector; maybe coolant overflow sensor??
7) Oil temp sensor - At least I think that's the sensor mounted on the oil cooler. Need to decide if I want to plumb that in to an oil cooler (along with a thermostat); I suspect it's entirely possible I won't need an oil cooler at all on this build given that the engine is so exposed. Target oil temp is what, 230-250F in these cars?
8) Fluids - Lastly, but most importantly, need to fill the engine with oil and coolant. Let's hope I don't get in a rush and forget!


So questions;
1) Any clear info on how to run the coolant hoses for the engine? I've come across some pictures but no real info where to cut the long coolant hose I have left from the stage 1 kit; is that supposed to be enough, along with a short elbow, to plumb both sides? I'm sure I can figure it out but why reinvent the wheel if it's clearly documented elsewhere.
2) Anyone running an aftermarket overflow tank? I figure as long as it has 2 ports (overflow from top of head, and fitting to thermostat), any tank should work. Just not sure about the coolant overflow tank sensor -- any harm trimming that from the harness and disabling the CEL (if there is one)?
3) Similar to the last question, anyone eliminate the oil temp sensor? I feel like I should keep this sensor and find a way to plumb it into a remote cooler setup because more sensor data, the better. However, Mishimoto (and probably others) make a pretty nice inline thermostat with a few temp options (160, 185, and 200). So that with the 200F thermostat...I shouldn't need to worry about monitoring oil temps. Any thoughts?
 

Desert Sasqwatch

Goblin Guru
I would keep the oil temperature sensor, as I believe the ECM monitors this for some engine functions - timing related to boost(?).

Keep in mind that engine oil has an optimal operating temperature, typically between 210-250 degrees. Too hot and the oil breaks down, too cold and the oil doesn’t do it's job of providing lubrication. The temperature is needed to maintain correct oil film thicknesses for the engine bearings - crankshaft, rods, camshaft - for the oil to flow properly thru the bearing. If the oil is too viscous, below the optimal operating temperature, the oil may not flow correctly across the entire bearing surface which can cause wear or failure. The Ecotec engine is very dependent upon consistent oil temperatures, and oil film thicknesses, for optimum operation.

The stock engine oil cooler keeps the engine oil temperature within this optimal range - the radiator fluid is 210-230 degrees - and is designed to also bring the engine oil up to optimal temperature quickly. This is especially important on the TC for the turbo bearings. Unless your Goblin will be operating under constant racing conditions, the external oil cooler is generally not needed. Adding more oil capacity is a better option for a (mostly) street driven engine.
 

Rauq

Goblin Guru
7) Oil temp sensor - At least I think that's the sensor mounted on the oil cooler. Need to decide if I want to plumb that in to an oil cooler (along with a thermostat); I suspect it's entirely possible I won't need an oil cooler at all on this build given that the engine is so exposed. Target oil temp is what, 230-250F in these cars?
3) Similar to the last question, anyone eliminate the oil temp sensor? I feel like I should keep this sensor and find a way to plumb it into a remote cooler setup because more sensor data, the better. However, Mishimoto (and probably others) make a pretty nice inline thermostat with a few temp options (160, 185, and 200). So that with the 200F thermostat...I shouldn't need to worry about monitoring oil temps. Any thoughts?
That's an oil pressure sender (1). Doesn't even read a pressure, just yes/no good oil pressure.
36691
 

devianteng

Well-Known Member
Destroy the motor if you loose oil pressure and don't know it may be considered a negative effect
Uh okay? Not asking what happens if oil pressure is lost...asking what the ECU will do if this sensor is eliminated/disconnected/faulty. Thanks for trying though?
 

devianteng

Well-Known Member
Remove the sensor and you remove the low oil pressure light. I don't think it reports to anywhere else.
Thanks, that's what I'm trying to confirm. Easy enough to keep the sensor though, in something like this (inline to the oil cooler). Just trying to get an idea what would happen if I didn't use it at all, because right now the sensor is just hanging from the harness.
 

Rauq

Goblin Guru
Per this thread, you may get a CEL. Per the (2006) owners manual, you may get an Oil Pressure Light.

The cobaltss.net thread references an actual sensor install for a gauge. You could also probably adapt the port to a Lowdoller Motorsports combo pressure and temp sender (or comparable), and run your own gauges, but I'm not sure if that port is pre- or post-oil cooler.

Or, you could leave the factory oil pressor sensor, and install a pressure and/or temp sensor off an oil galley plug elsewhere on the block.
 

Gtstorey

Goblin Guru
I just checked and the later models do have the oil pressure switch reporting through the ecm and can trigger a P code. The manual doesn’t indicate that the fuel pump is cut. It will turn on the oil pressure light. The way I read the manual, I think it will trigger the light and code even if you ground the switch, but it isn’t completely clear. It seems to check the status of the switch both key on/engine off and key on/engine on. I made a manifold to connect both the switch and a pressure gauge to when I built mine.
 
Last edited:
Top