SACTX
Well-Known Member
Thank you!I put a reminder on both facebook pages for the degenerates that refuse to come here to ask questions")
Thank you!I put a reminder on both facebook pages for the degenerates that refuse to come here to ask questions
Cool. What's the total cost and how do I pay?You were not but you are now. I missed the request to be on the list in the little back and forth. I'm glad you mentioned something because you got the last shifter.
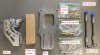
The last shifter is gone. I have hardware for 8 or 9 more sets (I need to confirm) and we'll have 14 more bases.
A full set is $317 + shipping. I'll send you a message once I have the next set of bases on the way with all of the pertinent info.Cool. What's the total cost and how do I pay?
OkA full set is $317 + shipping. I'll send you a message once I have the next set of bases on the way with all of the pertinent info.
I haven't been active on the forums of late, so I haven't seen this development. Very cool stuff, I'd be happy to buy a full set for chassis #35
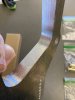
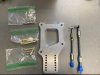
I'm out of shifters but have plenty of plates and hardware. You can get a shifter off of Ebay and modify it yourself using the instructions in the other threads. The base and full hardware set up is $182 + shipping. I'll put you both on the list.If you are not sold out... I would like to order a full set up. Looks awesome!
Your name is in the list in the first post of the thread, near the bottom.Hopefully I was on the list?


Gotcha covered!Put me down for a baseplate and full hardware set.
, told me that we had things we needed to do… Apologies to everyone but I will need to push things off for a day.Gotcha covered!
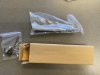
On another note, today did not go quite as planned. I got hammered late in the day at work and did not get quite as much done on this project as I wanted. I was only able to get 11 kits packaged and shipped out but will be back there tomorrow to get the rest going.
Also, was going to work this evening on sending out messages and getting shipping worked out but when I came home my event planner, AKA “Lovely Goblin Loving Wife”
I will do my best to send out messages first thing in the morning for shipping and get the rest of the packages out tomorrow.
If you want to help, go ahead and send me a message with your name and shipping address, if you would like me to include shipping, and I will reply tomorrow morning with the UPS ground shipping charges.
Thank you everybody!
You must be new to the internet. I'd edit your post and remove your address ASAP.Scott Geyer-